Canon PIXMA MX850 Quick Start Guide - Page 12
One-Touch Speed Dial buttons, Enlarge/Reduce button - paper jam
 |
View all Canon PIXMA MX850 manuals
Add to My Manuals
Save this manual to your list of manuals |
Page 12 highlights
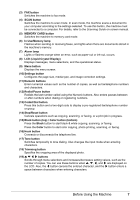
(20) OK button Finalizes your selection for the menu or setting item. This button is also used to dismiss the error message and resume the machine's normal operation after resolving a printing error or removing jammed paper, or to eject documents remaining in the ADF. (21) Back button Cancels operations and returns the LCD to the previous screen. (22) Feed Switch Selects the paper source. Press to switch the paper source between the Rear Tray and the Cassette. To print out received faxes, the paper source selected on the FAX settings screen is used. (23) FAX Quality button Sets the scan contrast and resolution of the fax you are sending. (24) Search button Searches for photos on the memory card with the specified shooting date. (25) Enlarge/Reduce button Specifies the enlargement or reduction ratio for copying. (26) Two-Sided button Specifies the settings for duplex copying. (27) Rear Tray lamp (top) / Cassette lamp (bottom) These lamps indicate the currently selected paper source. (28) One-Touch Speed Dial buttons Press these buttons to display pre-registered fax/telephone numbers or groups. 8 Before Using the Machine
-
 1
1 -
2
-
3
-
4
-
5
-
6
-
 7
7 -
 8
8 -
 9
9 -
 10
10 -
 11
11 -
 12
12 -
 13
13 -
 14
14 -
 15
15 -
 16
16 -
 17
17 -
18
-
19
-
20
-
21
-
22
-
23
-
24
-
25
-
26
-
27
-
28
-
29
-
30
-
31
-
32
-
33
-
34
-
35
-
36
-
37
-
38
-
39
-
40
-
41
-
42
-
43
-
44
-
45
-
46
-
47
-
48
-
49
-
50
-
51
-
52
-
53
-
54
-
55
-
56
-
57
-
58
-
59
-
60
-
61
-
62
-
63
-
64
-
65
-
66
-
67
-
68
-
69
-
70
-
71
-
72
-
73
-
74
-
75
-
76
-
77
-
78
-
79
-
80
-
81
-
82
-
83
-
84
-
85
-
86
-
87
-
88
-
89
-
90
-
91
-
92
-
93
-
94
-
95
-
96
-
97
-
98
-
99
-
100
-
101
-
102
-
103
-
104
-
105
-
106
-
107
-
108
-
109
-
110
-
111
-
112
-
113
-
114
-
115
-
116
-
117
-
118
-
119
-
120
-
121
-
122
-
123
-
124
-
125
-
126
-
127
-
128
-
129
-
130
-
131
-
132
-
133
-
134
-
135
-
136
-
137
-
138
-
139
-
140
-
141
-
142
-
143
-
144
-
145
-
146
-
147
-
148
-
149
-
150
-
151
-
152
-
153
-
154
-
155
-
156
-
157
-
158
-
159
-
160
-
161
-
162
-
163
-
164
-
165
-
166
-
167
-
168
-
169
-
170
-
171
-
172
-
173
-
174
-
175
-
176
-
177
-
178
-
179
-
180
-
181
-
182
-
183
-
184
-
185
-
186
-
187
-
188
 |
 |
