Canon PIXMA MX850 Quick Start Guide - Page 85
Before Sending Faxes, Adjusting the Image Quality Fax resolution, Adjusting the Density Scan contrast
 |
View all Canon PIXMA MX850 manuals
Add to My Manuals
Save this manual to your list of manuals |
Page 85 highlights
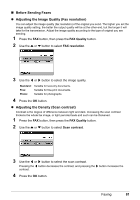
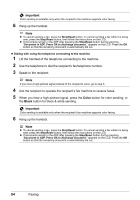
„ Before Sending Faxes z Adjusting the Image Quality (Fax resolution) You can adjust the image quality (fax resolution) of the original you send. The higher you set the image quality setting, the better the output quality will be at the other end, but the longer it will take for the transmission. Adjust the image quality according to the type of original you are sending. 1 Press the FAX button, then press the FAX Quality button. 2 Use the { or } button to select FAX resolution. 3 Use the [ or ] button to select the image quality. Standard: Fine: Photo: Suitable for text-only documents. Suitable for fine-print documents. Suitable for photographs. 4 Press the OK button. z Adjusting the Density (Scan contrast) Contrast is the degree of difference between light and dark. Increasing the scan contrast thickens the whole fax image, or light penciled texts and such can be thickened. 1 Press the FAX button, then press the FAX Quality button. 2 Use the { or } button to select Scan contrast. 3 Use the [ or ] button to select the scan contrast. Pressing the [ button decreases the contrast, and pressing the ] button increases the contrast. 4 Press the OK button. Faxing 81
-
 1
1 -
2
-
3
-
4
-
5
-
6
-
7
-
8
-
9
-
10
-
11
-
12
-
13
-
14
-
15
-
16
-
17
-
18
-
19
-
20
-
21
-
22
-
23
-
24
-
25
-
26
-
27
-
28
-
29
-
30
-
31
-
32
-
33
-
34
-
35
-
36
-
37
-
38
-
39
-
40
-
41
-
42
-
43
-
44
-
45
-
46
-
47
-
48
-
49
-
50
-
51
-
52
-
53
-
54
-
55
-
56
-
57
-
58
-
59
-
60
-
61
-
62
-
63
-
64
-
65
-
66
-
67
-
68
-
69
-
70
-
71
-
72
-
73
-
74
-
75
-
76
-
77
-
78
-
79
-
 80
80 -
 81
81 -
 82
82 -
 83
83 -
 84
84 -
 85
85 -
 86
86 -
 87
87 -
 88
88 -
 89
89 -
 90
90 -
91
-
92
-
93
-
94
-
95
-
96
-
97
-
98
-
99
-
100
-
101
-
102
-
103
-
104
-
105
-
106
-
107
-
108
-
109
-
110
-
111
-
112
-
113
-
114
-
115
-
116
-
117
-
118
-
119
-
120
-
121
-
122
-
123
-
124
-
125
-
126
-
127
-
128
-
129
-
130
-
131
-
132
-
133
-
134
-
135
-
136
-
137
-
138
-
139
-
140
-
141
-
142
-
143
-
144
-
145
-
146
-
147
-
148
-
149
-
150
-
151
-
152
-
153
-
154
-
155
-
156
-
157
-
158
-
159
-
160
-
161
-
162
-
163
-
164
-
165
-
166
-
167
-
168
-
169
-
170
-
171
-
172
-
173
-
174
-
175
-
176
-
177
-
178
-
179
-
180
-
181
-
182
-
183
-
184
-
185
-
186
-
187
-
188
 |
 |
