Canon PIXMA MX850 Quick Start Guide - Page 147
Printed Surface Is Scratched/Paper Is Smudged - drivers & software
 |
View all Canon PIXMA MX850 manuals
Add to My Manuals
Save this manual to your list of manuals |
Page 147 highlights
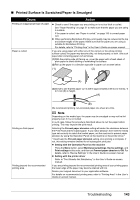
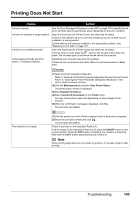
„ Printed Surface Is Scratched/Paper Is Smudged Cause Action Printing on inappropriate type of paper. z Check to see if the paper you are printing on is not too thick or curled. See "Paper Handling" on page 21 to make sure that the paper you are using is suitable. If the paper is curled, see "Paper is curled." on page 143 to correct paper curl. z When performing Borderless Printing, print quality may be reduced at the top and bottom edges of the paper. Make sure that the paper you are using is suitable for Borderless Printing. For details, refer to "Printing Area" in the User's Guide on-screen manual. Paper is curled. If you are using paper with either any of the corners or the whole printing surface curled, the paper may become dirty, not feed properly, or both. Use such paper after correcting paper curl as follows. (1)With the printing side (A) facing up, cover the paper with a fresh sheet of plain paper to avoid staining or scratching the surface. (2)Roll up the paper in a direction opposite to paper curl as seen below. (1) (2) (A) (3)Check to see that the paper curl is within approximately 0.08 to 0.2 inches / 2 to 5 mm (B) in height. (A) Printing on thick paper. Printing beyond the recommended printing area. (B) We recommend printing curl-corrected paper one sheet at a time. Note Depending on the media type, the paper may be smudged or may not be fed properly even if it is not curled. In such case, follow the procedure described above to curl the paper before printing. This may improve the print result. Selecting the Prevent paper abrasion setting will widen the clearance between the Print Head and the loaded paper. If you notice abrasion even with the media type set correctly to match the loaded paper, set the machine to prevent paper abrasion by using the Operation Panel on the machine or the printer driver.* * Deactivate the Prevent paper abrasion setting once printing is complete. If not, this setting remains enabled for all subsequent print jobs. z Setting with the Operation Panel on the machine Press the Menu button, select Maintenance/settings, Device settings, and Print settings in this order, and then set Prevent paper abrasion to ON. For details, refer to "Device Settings" in the User's Guide on-screen manual. z Setting with the printer driver Refer to "Print Results Not Satisfactory" in the User's Guide on-screen manual. If you are printing beyond the recommended printing area of your printing paper, the lower edge of the paper may become stained with ink. Resize your original document in your application software. For details on recommended printing area, refer to "Printing Area" in the User's Guide on-screen manual. Troubleshooting 143
-
 1
1 -
2
-
3
-
4
-
5
-
6
-
7
-
8
-
9
-
10
-
11
-
12
-
13
-
14
-
15
-
16
-
17
-
18
-
19
-
20
-
21
-
22
-
23
-
24
-
25
-
26
-
27
-
28
-
29
-
30
-
31
-
32
-
33
-
34
-
35
-
36
-
37
-
38
-
39
-
40
-
41
-
42
-
43
-
44
-
45
-
46
-
47
-
48
-
49
-
50
-
51
-
52
-
53
-
54
-
55
-
56
-
57
-
58
-
59
-
60
-
61
-
62
-
63
-
64
-
65
-
66
-
67
-
68
-
69
-
70
-
71
-
72
-
73
-
74
-
75
-
76
-
77
-
78
-
79
-
80
-
81
-
82
-
83
-
84
-
85
-
86
-
87
-
88
-
89
-
90
-
91
-
92
-
93
-
94
-
95
-
96
-
97
-
98
-
99
-
100
-
101
-
102
-
103
-
104
-
105
-
106
-
107
-
108
-
109
-
110
-
111
-
112
-
113
-
114
-
115
-
116
-
117
-
118
-
119
-
120
-
121
-
122
-
123
-
124
-
125
-
126
-
127
-
128
-
129
-
130
-
131
-
132
-
133
-
134
-
135
-
136
-
137
-
138
-
139
-
140
-
141
-
 142
142 -
 143
143 -
 144
144 -
 145
145 -
 146
146 -
 147
147 -
 148
148 -
 149
149 -
 150
150 -
 151
151 -
 152
152 -
153
-
154
-
155
-
156
-
157
-
158
-
159
-
160
-
161
-
162
-
163
-
164
-
165
-
166
-
167
-
168
-
169
-
170
-
171
-
172
-
173
-
174
-
175
-
176
-
177
-
178
-
179
-
180
-
181
-
182
-
183
-
184
-
185
-
186
-
187
-
188
 |
 |
