Canon PIXMA MX850 Quick Start Guide - Page 149
Printing Does Not Start
 |
View all Canon PIXMA MX850 manuals
Add to My Manuals
Save this manual to your list of manuals |
Page 149 highlights
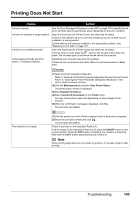
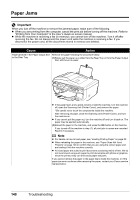
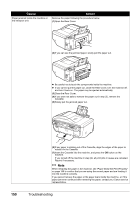
Printing Does Not Start Cause Action Ink tank is empty. See "An Error Message Is Displayed on the LCD" on page 133 to identify the ink error, and then take the appropriate action depending on the error condition. Ink tank not installed in proper position. Open the Scanning Unit (Printer Cover) and check the ink lamps. If there is still sufficient ink but its ink lamp is flashing red, an ink tank may be installed in a wrong position. Confirm that the ink tanks are installed in the appropriate positions. See "Replacing an Ink Tank" on page 107. Ink tank is not installed securely. Open the Scanning Unit (Printer Cover) and check the ink lamps. If the ink lamp is not lit, press the mark on the ink tank until it clicks into place. The ink lamp lights up red when the ink tank is fully inserted. Unnecessary print jobs are left in queue. / Computer problems. Restarting your computer may solve the problem. If there are any unnecessary print jobs, follow the procedure below to delete them. (1)Open the printer properties dialog box. Refer to "Opening the Printer Properties Dialog Box Directly from the Control Panel" in "Opening the Printer Properties Dialog Box (Windows)" of the User's Guide on-screen manual. (2)Click the Maintenance tab and then View Printer Status. The printer status monitor is displayed. (3)Click Display Print Queue. (4)Select Cancel All Documents on the Printer menu. You may not be able to select this depending on the privileges of the account. (5)When the confirmation message is displayed, click Yes. The print jobs are deleted. The machine is not ready. (1)Click the printer icon in the Dock to display the list of print jobs in progress. (2)Select the print job to delete and click . The print jobs are deleted. Check if any lamp on the Operation Panel is lit. If all the lamps on the Operation Panel are off, press the ON/OFF button to turn on the machine. While the COPY button is flashing, the machine is initializing. Wait until the COPY button stops flashing and remains lit. Note When printing large data such as a photo or graphics, it may take longer to start printing. Troubleshooting 145
-
 1
1 -
2
-
3
-
4
-
5
-
6
-
7
-
8
-
9
-
10
-
11
-
12
-
13
-
14
-
15
-
16
-
17
-
18
-
19
-
20
-
21
-
22
-
23
-
24
-
25
-
26
-
27
-
28
-
29
-
30
-
31
-
32
-
33
-
34
-
35
-
36
-
37
-
38
-
39
-
40
-
41
-
42
-
43
-
44
-
45
-
46
-
47
-
48
-
49
-
50
-
51
-
52
-
53
-
54
-
55
-
56
-
57
-
58
-
59
-
60
-
61
-
62
-
63
-
64
-
65
-
66
-
67
-
68
-
69
-
70
-
71
-
72
-
73
-
74
-
75
-
76
-
77
-
78
-
79
-
80
-
81
-
82
-
83
-
84
-
85
-
86
-
87
-
88
-
89
-
90
-
91
-
92
-
93
-
94
-
95
-
96
-
97
-
98
-
99
-
100
-
101
-
102
-
103
-
104
-
105
-
106
-
107
-
108
-
109
-
110
-
111
-
112
-
113
-
114
-
115
-
116
-
117
-
118
-
119
-
120
-
121
-
122
-
123
-
124
-
125
-
126
-
127
-
128
-
129
-
130
-
131
-
132
-
133
-
134
-
135
-
136
-
137
-
138
-
139
-
140
-
141
-
142
-
143
-
 144
144 -
 145
145 -
 146
146 -
 147
147 -
 148
148 -
 149
149 -
 150
150 -
 151
151 -
 152
152 -
 153
153 -
 154
154 -
155
-
156
-
157
-
158
-
159
-
160
-
161
-
162
-
163
-
164
-
165
-
166
-
167
-
168
-
169
-
170
-
171
-
172
-
173
-
174
-
175
-
176
-
177
-
178
-
179
-
180
-
181
-
182
-
183
-
184
-
185
-
186
-
187
-
188
 |
 |
