D-Link DGS-3200-16 User Manual - Page 107
p Default Priority, 802.1p User Priority
 |
UPC - 790069312007
View all D-Link DGS-3200-16 manuals
Add to My Manuals
Save this manual to your list of manuals |
Page 107 highlights
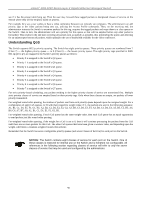
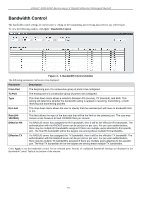
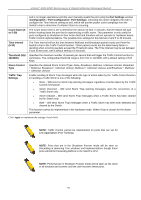
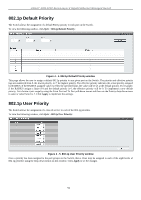
xStack® DGS-3200 Series Layer 2 Gigabit Ethernet Managed Switch 802.1p Default Priority The Switch allows the assignment of a default 802.1p priority to each port on the Switch. To view the following window, click QoS > 802.1p Default Priority: Figure 4 - 4. 802.1p Default Priority window This page allows the user to assign a default 802.1p priority to any given port on the Switch. The priority and effective priority tags are numbered from 0, the lowest priority, to 7, the highest priority. The effective priority indicates the actual priority assigned by RADIUS. If the RADIUS assigned value exceedes the specified limit, the value will be set at the default priority. For example, if the RADIUS assigns a limit of 8 and the default priority is 0, the effective priority will be 0. To implement a new default priority, first choose a port range by using the From Port and To Port pull-down menus and then use the Priority drop-down menu to select a value from 0 to 7. Click Apply to implement the settings. 802.1p User Priority The Switch allows the assignment of a class of service to each of the 802.1p priorities. To view the following window, click QoS > 802.1p User Priority: Figure 4 - 5. 802.1p User Priority window Once a priority has been assigned to the port groups on the Switch, then a Class may be assigned to each of the eight levels of 802.1p priorities using the drop-down menus on this window. Click Apply to set the changes. 94
-
 1
1 -
2
-
3
-
4
-
5
-
6
-
7
-
8
-
9
-
10
-
11
-
12
-
13
-
14
-
15
-
16
-
17
-
18
-
19
-
20
-
21
-
22
-
23
-
24
-
25
-
26
-
27
-
28
-
29
-
30
-
31
-
32
-
33
-
34
-
35
-
36
-
37
-
38
-
39
-
40
-
41
-
42
-
43
-
44
-
45
-
46
-
47
-
48
-
49
-
50
-
51
-
52
-
53
-
54
-
55
-
56
-
57
-
58
-
59
-
60
-
61
-
62
-
63
-
64
-
65
-
66
-
67
-
68
-
69
-
70
-
71
-
72
-
73
-
74
-
75
-
76
-
77
-
78
-
79
-
80
-
81
-
82
-
83
-
84
-
85
-
86
-
87
-
88
-
89
-
90
-
91
-
92
-
93
-
94
-
95
-
96
-
97
-
98
-
99
-
100
-
101
-
 102
102 -
 103
103 -
 104
104 -
 105
105 -
 106
106 -
 107
107 -
 108
108 -
 109
109 -
 110
110 -
 111
111 -
 112
112 -
113
-
114
-
115
-
116
-
117
-
118
-
119
-
120
-
121
-
122
-
123
-
124
-
125
-
126
-
127
-
128
-
129
-
130
-
131
-
132
-
133
-
134
-
135
-
136
-
137
-
138
-
139
-
140
-
141
-
142
-
143
-
144
-
145
-
146
-
147
-
148
-
149
-
150
-
151
-
152
-
153
-
154
-
155
-
156
-
157
-
158
-
159
-
160
-
161
-
162
-
163
-
164
-
165
-
166
-
167
-
168
-
169
-
170
-
171
-
172
-
173
-
174
-
175
-
176
-
177
-
178
-
179
-
180
-
181
-
182
-
183
-
184
-
185
-
186
-
187
-
188
-
189
-
190
-
191
-
192
-
193
-
194
-
195
-
196
-
197
-
198
-
199
-
200
-
201
-
202
-
203
-
204
-
205
-
206
-
207
-
208
-
209
-
210
-
211
-
212
-
213
-
214
-
215
-
216
-
217
-
218
-
219
-
220
-
221
-
222
-
223
-
224
-
225
-
226
-
227
-
228
-
229
-
230
-
231
-
232
-
233
-
234
-
235
-
236
-
237
-
238
-
239
-
240
-
241
-
242
-
243
-
244
-
245
-
246
-
247
-
248
-
249
-
250
-
251
-
252
-
253
-
254
-
255
-
256
-
257
-
258
-
259
-
260
-
261
-
262
-
263
-
264
-
265
-
266
-
267
-
268
-
269
-
270
-
271
-
272
-
273
 |
 |
