D-Link DGS-3200-16 User Manual - Page 27
User Accounts, Admin and User Privileges - user guide
 |
UPC - 790069312007
View all D-Link DGS-3200-16 manuals
Add to My Manuals
Save this manual to your list of manuals |
Page 27 highlights
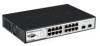
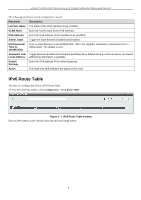
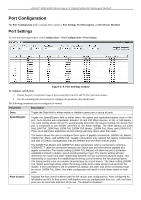
xStack® DGS-3200 Series Layer 2 Gigabit Ethernet Managed Switch User Accounts The Switch allows the control of user privileges. To view the following window, click Configuration > User Accounts: Figure 2- 13. User Accounts window To add a new user, type in a User Name and New Password and retype the same password in the Confirm New Password field. Choose the level of privilege (Admin or User) from the Access Right drop-down menu. Figure 2- 14. User Accounts window (modify) Modify or delete an existing user account in the table at the bottom of the window. To delete the user account, click the Delete button. To change the password, click the Edit button next to the entry in the table at the bottom of the window. Enter an Old Password, New Password, and retype the new password in the Confirm Password field offered, use the drop-down menu to select the type of encryption desired (Plain Text or Sha 1), and then click Apply. The level of privilege (Admin or User) can be viewed in the Access Right column in the table at the bottom of the window. NOTICE: In case of lost passwords or password corruption, please refer to the Appendix D, "Password Recovery Procedure," which will guide you through the steps necessary to resolve this issue. Admin and User Privileges There are two levels of user privileges, Admin and User. Some menu selections available to users with Admin privileges may not be available to those with User privileges. The following table summarizes the Admin and User privileges: 14
-
 1
1 -
2
-
3
-
4
-
5
-
6
-
7
-
8
-
9
-
10
-
11
-
12
-
13
-
14
-
15
-
16
-
17
-
18
-
19
-
20
-
21
-
 22
22 -
 23
23 -
 24
24 -
 25
25 -
 26
26 -
 27
27 -
 28
28 -
 29
29 -
 30
30 -
 31
31 -
 32
32 -
33
-
34
-
35
-
36
-
37
-
38
-
39
-
40
-
41
-
42
-
43
-
44
-
45
-
46
-
47
-
48
-
49
-
50
-
51
-
52
-
53
-
54
-
55
-
56
-
57
-
58
-
59
-
60
-
61
-
62
-
63
-
64
-
65
-
66
-
67
-
68
-
69
-
70
-
71
-
72
-
73
-
74
-
75
-
76
-
77
-
78
-
79
-
80
-
81
-
82
-
83
-
84
-
85
-
86
-
87
-
88
-
89
-
90
-
91
-
92
-
93
-
94
-
95
-
96
-
97
-
98
-
99
-
100
-
101
-
102
-
103
-
104
-
105
-
106
-
107
-
108
-
109
-
110
-
111
-
112
-
113
-
114
-
115
-
116
-
117
-
118
-
119
-
120
-
121
-
122
-
123
-
124
-
125
-
126
-
127
-
128
-
129
-
130
-
131
-
132
-
133
-
134
-
135
-
136
-
137
-
138
-
139
-
140
-
141
-
142
-
143
-
144
-
145
-
146
-
147
-
148
-
149
-
150
-
151
-
152
-
153
-
154
-
155
-
156
-
157
-
158
-
159
-
160
-
161
-
162
-
163
-
164
-
165
-
166
-
167
-
168
-
169
-
170
-
171
-
172
-
173
-
174
-
175
-
176
-
177
-
178
-
179
-
180
-
181
-
182
-
183
-
184
-
185
-
186
-
187
-
188
-
189
-
190
-
191
-
192
-
193
-
194
-
195
-
196
-
197
-
198
-
199
-
200
-
201
-
202
-
203
-
204
-
205
-
206
-
207
-
208
-
209
-
210
-
211
-
212
-
213
-
214
-
215
-
216
-
217
-
218
-
219
-
220
-
221
-
222
-
223
-
224
-
225
-
226
-
227
-
228
-
229
-
230
-
231
-
232
-
233
-
234
-
235
-
236
-
237
-
238
-
239
-
240
-
241
-
242
-
243
-
244
-
245
-
246
-
247
-
248
-
249
-
250
-
251
-
252
-
253
-
254
-
255
-
256
-
257
-
258
-
259
-
260
-
261
-
262
-
263
-
264
-
265
-
266
-
267
-
268
-
269
-
270
-
271
-
272
-
273
 |
 |