D-Link DGS-3200-16 User Manual - Page 111
Trusted Host, Parameter, Description, Safeguard, Engine State, Rising, Threshold, Falling, Trap / Log
 |
UPC - 790069312007
View all D-Link DGS-3200-16 manuals
Add to My Manuals
Save this manual to your list of manuals |
Page 111 highlights
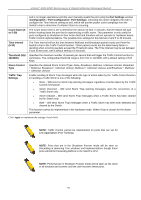
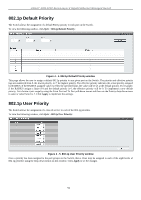
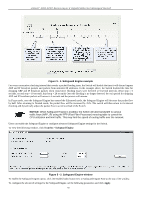
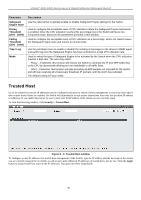
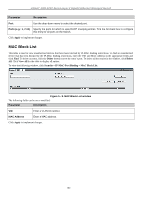
xStack® DGS-3200 Series Layer 2 Gigabit Ethernet Managed Switch Parameter Safeguard Engine State Rising Threshold (20% - 100%) Falling Threshold (20% - 100%) Trap / Log Mode Description Use the radio button to globally enable or disable Safeguard Engine settings for the Switch. Used to configure the acceptable level of CPU utilization before the Safeguard Engine mechanism is enabled. Once the CPU utilization reaches this percentage level, the Switch will move into Exhausted mode, based on the parameters provided in this window. Used to configure the acceptable level of CPU utilization as a percentage, where the Switch leaves the Safeguard Engine state and returns to normal mode. Use the pull-down menu to enable or disable the sending of messages to the device's SNMP agent and switch log once the Safeguard Engine has been activated by a high CPU utilization rate. Used to select the type of Safeguard Engine to be activated by the Switch when the CPU utilization reaches a high rate. The user may select: Fuzzy - If selected, this function will instruct the Switch to minimize the IP and ARP traffic flow to the CPU by dynamically allotting an even bandwidth to all traffic flows. Strict - If selected, this function will stop accepting all ARP packets not intended for the Switch, and will stop receiving all unnecessary broadcast IP packets, until the storm has subsided. The default setting is Fuzzy mode. Trusted Host Up to ten trusted host secure IP addresses may be configured and used for remote Switch management. It should be noted that if one or more trusted hosts are enabled, the Switch will immediately accept remote instructions from only the specified IP address or addresses. If you enable this feature, be sure to first enter the IP address of the station you are currently using. To view the following window, click Security > Trusted Host: Figure 5 - 3. Trusted Host window To configure secure IP addresses for trusted host management of the Switch, type the IP address and the net mask of the station you are currently using in the two fields, as well as up to nine additional IP addresses of trusted hosts, one by one. Click the Apply button to assign trusted host status to the IP addresses. This goes into effect immediately. 98
-
 1
1 -
2
-
3
-
4
-
5
-
6
-
7
-
8
-
9
-
10
-
11
-
12
-
13
-
14
-
15
-
16
-
17
-
18
-
19
-
20
-
21
-
22
-
23
-
24
-
25
-
26
-
27
-
28
-
29
-
30
-
31
-
32
-
33
-
34
-
35
-
36
-
37
-
38
-
39
-
40
-
41
-
42
-
43
-
44
-
45
-
46
-
47
-
48
-
49
-
50
-
51
-
52
-
53
-
54
-
55
-
56
-
57
-
58
-
59
-
60
-
61
-
62
-
63
-
64
-
65
-
66
-
67
-
68
-
69
-
70
-
71
-
72
-
73
-
74
-
75
-
76
-
77
-
78
-
79
-
80
-
81
-
82
-
83
-
84
-
85
-
86
-
87
-
88
-
89
-
90
-
91
-
92
-
93
-
94
-
95
-
96
-
97
-
98
-
99
-
100
-
101
-
102
-
103
-
104
-
105
-
 106
106 -
 107
107 -
 108
108 -
 109
109 -
 110
110 -
 111
111 -
 112
112 -
 113
113 -
 114
114 -
 115
115 -
 116
116 -
117
-
118
-
119
-
120
-
121
-
122
-
123
-
124
-
125
-
126
-
127
-
128
-
129
-
130
-
131
-
132
-
133
-
134
-
135
-
136
-
137
-
138
-
139
-
140
-
141
-
142
-
143
-
144
-
145
-
146
-
147
-
148
-
149
-
150
-
151
-
152
-
153
-
154
-
155
-
156
-
157
-
158
-
159
-
160
-
161
-
162
-
163
-
164
-
165
-
166
-
167
-
168
-
169
-
170
-
171
-
172
-
173
-
174
-
175
-
176
-
177
-
178
-
179
-
180
-
181
-
182
-
183
-
184
-
185
-
186
-
187
-
188
-
189
-
190
-
191
-
192
-
193
-
194
-
195
-
196
-
197
-
198
-
199
-
200
-
201
-
202
-
203
-
204
-
205
-
206
-
207
-
208
-
209
-
210
-
211
-
212
-
213
-
214
-
215
-
216
-
217
-
218
-
219
-
220
-
221
-
222
-
223
-
224
-
225
-
226
-
227
-
228
-
229
-
230
-
231
-
232
-
233
-
234
-
235
-
236
-
237
-
238
-
239
-
240
-
241
-
242
-
243
-
244
-
245
-
246
-
247
-
248
-
249
-
250
-
251
-
252
-
253
-
254
-
255
-
256
-
257
-
258
-
259
-
260
-
261
-
262
-
263
-
264
-
265
-
266
-
267
-
268
-
269
-
270
-
271
-
272
-
273
 |
 |
