Dell PowerEdge 2321DS Dell 1082DS/2162DS/4322DS Remote Console Switch Softw - Page 17
Configuring Switches and Target Devices
 |
View all Dell PowerEdge 2321DS manuals
Add to My Manuals
Save this manual to your list of manuals |
Page 17 highlights
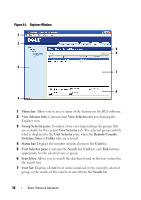
From the application folder (/usr/lib/Dell_Remote_Console_Switch_Software by default), enter the following command: ./Dell_Remote_Console_Switch_Software -orFrom (/user/bin), enter the following link: ./Dell_Remote_Console_Switch_Software -orIf the product was installed in a directory other than the default, then execute the following command from a shell: /Dell_Remote_Console_Switch_Software -orIf a desktop shortcut was created on installation, double-click the shortcut. Configuring Switches and Target Devices This section provides an overview of configuration steps for the switch and for user access to target devices. For switch-specific information, see the Installation and User's Guide for the switch. To add switches, complete the following steps: 1 Install the software on one or more client computers. 2 Open the software on a client computer. 3 Use the Explorer to set unit properties, options, and other customization as needed. 4 Configure the names of all target devices using the local GUI interface. 5 Repeat steps 3 through 6 for each switch you want to manage. 6 After one software environment is set up, select File - Database - Save to save a copy of the local database with all the settings. 7 From the software on a second computer, select File - Database - Load and browse to find the saved file. Select the file and then click Load. Repeat this step for each client computer that you want to setup. Installation 11
-
 1
1 -
2
-
3
-
4
-
5
-
6
-
7
-
8
-
9
-
10
-
11
-
 12
12 -
 13
13 -
 14
14 -
 15
15 -
 16
16 -
 17
17 -
 18
18 -
 19
19 -
 20
20 -
 21
21 -
 22
22 -
23
-
24
-
25
-
26
-
27
-
28
-
29
-
30
-
31
-
32
-
33
-
34
-
35
-
36
-
37
-
38
-
39
-
40
-
41
-
42
-
43
-
44
-
45
-
46
-
47
-
48
-
49
-
50
-
51
-
52
-
53
-
54
-
55
-
56
-
57
-
58
-
59
-
60
-
61
-
62
-
63
-
64
-
65
-
66
-
67
-
68
-
69
-
70
-
71
-
72
-
73
-
74
-
75
-
76
-
77
-
78
-
79
-
80
-
81
-
82
-
83
-
84
-
85
-
86
-
87
-
88
-
89
-
90
-
91
-
92
-
93
-
94
-
95
-
96
-
97
-
98
-
99
-
100
-
101
-
102
-
103
-
104
-
105
-
106
 |
 |