Dell PowerEdge 2321DS Dell 1082DS/2162DS/4322DS Remote Console Switch Softw - Page 36
Information Properties, Properties, Network, Apply, Cancel, Information, Remote Console Switches
 |
View all Dell PowerEdge 2321DS manuals
Add to My Manuals
Save this manual to your list of manuals |
Page 36 highlights
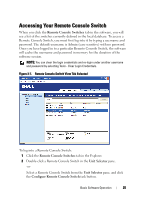
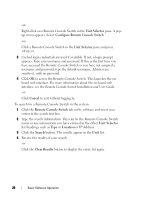
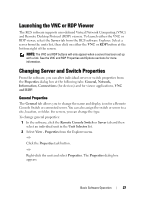
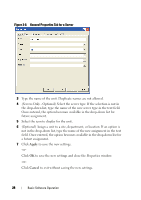
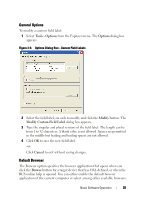
Click the Properties task button. -or- Right-click the unit and select Properties. The Properties dialog box appears. 3 Click the Network tab and type in the address of the Remote Console Switch. This field can contain an IP dot notation or a domain name. Duplicate addresses are not allowed and the field cannot be left blank. You can enter up to 128 characters, and may use an IPv4 or an IPv6 address, or dual-stack an IPv4 and IPv6 simultaneously. 4 Type the HTTP and HTTPS port numbers in the HTTP Port and HTTPS Port fields, respectively, if you changed the port numbers for the Remote Console Switch in the serial console. For more information on changing the port numbers in the serial console, see "HTTP/HTTPS Options" on page 37. 5 Click Apply to save the new settings. -or- Click OK to save the new settings and close the window. -or- Click Cancel to exit without saving the new settings. Information Properties The Information tab allows you to enter information about the switch or server including a description, contact information and any comments you might wish to add. To change information properties: 1 In the software, click the Remote Console Switches or Server tab and then select an individual unit in the Unit Selector list. 2 Select View - Properties from the Explorer menu. -or- Click the Properties task button. -or- 30 Basic Software Operation
-
 1
1 -
2
-
3
-
4
-
5
-
6
-
7
-
8
-
9
-
10
-
11
-
12
-
13
-
14
-
15
-
16
-
17
-
18
-
19
-
20
-
21
-
22
-
23
-
24
-
25
-
26
-
27
-
28
-
29
-
30
-
 31
31 -
 32
32 -
 33
33 -
 34
34 -
 35
35 -
 36
36 -
 37
37 -
 38
38 -
 39
39 -
 40
40 -
 41
41 -
42
-
43
-
44
-
45
-
46
-
47
-
48
-
49
-
50
-
51
-
52
-
53
-
54
-
55
-
56
-
57
-
58
-
59
-
60
-
61
-
62
-
63
-
64
-
65
-
66
-
67
-
68
-
69
-
70
-
71
-
72
-
73
-
74
-
75
-
76
-
77
-
78
-
79
-
80
-
81
-
82
-
83
-
84
-
85
-
86
-
87
-
88
-
89
-
90
-
91
-
92
-
93
-
94
-
95
-
96
-
97
-
98
-
99
-
100
-
101
-
102
-
103
-
104
-
105
-
106
 |
 |