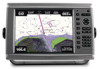
Garmin GPSMAP 6012 Owner's Manual - Page 47
Navigating with a Garmin Autopilot, Clearing the Active Track
 |
View all Garmin GPSMAP 6012 manuals
Add to My Manuals
Save this manual to your list of manuals |
Page 47 highlights
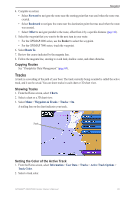
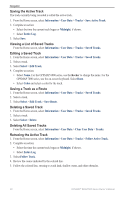
Navigation Clearing the Active Track From the Home screen, select Information > User Data > Tracks > Clear Active Track. The track memory is cleared, and the current track continues to be recorded. Managing the Track Log Memory During Recording 1. From the Home screen, select Information > User Data > Tracks > Active Track Options > Record Mode. 2. Complete an action: • Select Fill to record a track log until the track memory is full. • Select Wrap to continuously record a track log, replacing the oldest track data with new data. Configuring the Recording Interval of the Track Log You can indicate the frequency at which the track plot is recorded. Recording more-frequent plots is more accurate but fills the track log faster. 1. From the Home screen, select Information > User Data > Tracks > Active Track Options > Interval > Interval. 2. Complete an action: • Select Distance to record the track based on a distance between points. Select Change to set the distance. For the GPSMAP 6000 series, use the Rocker or the Numeric Keypad. For the GPSMAP 7000 series, use the on-screen keyboard. Select Done. • Select Time to record the track based on a time interval. Select Change to set the time. For the GPSMAP 6000 series, use the Rocker or the Numeric Keypad. For the GPSMAP 7000 series, use the on-screen keyboard. Select Done. • Select Resolution to record the track plot based on a variance from your course. This setting is recommended for the most-efficient use of memory. Select Change to enter the maximum error allowed from the true course before recording a track point. For the GPSMAP 6000 series, use the Rocker or the Numeric Keypad. For the GPSMAP 7000 series, use the onscreen keyboard. Select Done. 3. Select Done. Copying Tracks See "Chartplotter Data Management" (page 69). Deleting All Saved Waypoints, Routes, and Tracks From the Home screen, select Information > User Data > Clear User Data > All. Navigating with a Garmin Autopilot When you start any type of navigation (Go To, Route To, Guide To, or Follow Track), if you are connected to a compatible Garmin autopilot (such as the GHP™ 10), you are prompted to engage the autopilot. GPSMAP® 6000/7000 Series Owner's Manual 41
-
 1
1 -
2
-
3
-
4
-
5
-
6
-
7
-
8
-
9
-
10
-
11
-
12
-
13
-
14
-
15
-
16
-
17
-
18
-
19
-
20
-
21
-
22
-
23
-
24
-
25
-
26
-
27
-
28
-
29
-
30
-
31
-
32
-
33
-
34
-
35
-
36
-
37
-
38
-
39
-
40
-
41
-
 42
42 -
 43
43 -
 44
44 -
 45
45 -
 46
46 -
 47
47 -
 48
48 -
 49
49 -
 50
50 -
 51
51 -
 52
52 -
53
-
54
-
55
-
56
-
57
-
58
-
59
-
60
-
61
-
62
-
63
-
64
-
65
-
66
-
67
-
68
-
69
-
70
-
71
-
72
-
73
-
74
-
75
-
76
-
77
-
78
-
79
-
80
-
81
-
82
-
83
-
84
-
85
-
86
-
87
-
88
-
89
-
90
-
91
-
92
-
93
-
94
-
95
-
96
-
97
-
98
-
99
-
100
-
101
-
102
-
103
-
104
-
105
-
106
-
107
-
108
-
109
-
110
-
111
-
112
-
113
-
114
-
115
-
116
-
117
-
118
-
119
-
120
-
121
-
122
-
123
-
124
-
125
-
126
-
127
-
128
-
129
-
130
-
131
-
132
 |
 |