Garmin GPSMAP 6012 Owner's Manual - Page 57
On-boat Data, Depth Data, Engine Gauges
 |
View all Garmin GPSMAP 6012 manuals
Add to My Manuals
Save this manual to your list of manuals |
Page 57 highlights
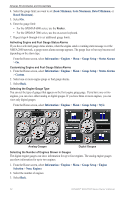
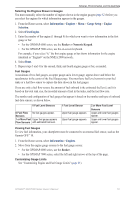
Almanac, Environmental, and On-boat Data Depth Data Viewing the Depth Graph The chartplotter must be connected to a depth-capable transducer to capture the data shown on the depth graph. From the Home screen, select Information > Graphs > Depth. If you have turned on and configured the shallow water and deep water alarms (page 105), the graph shows in red any water depth data that is less than the depth specified for the shallow water alarm, and it shows in red any water depth data that is greater than the depth specified for the deep water alarm. On-boat Data Engine Gauges Viewing Engine Gauges You must be connected to a NMEA (National Marine Electronics Association) 2000 network capable of sensing engine data to view engine gauges. See the GPSMAP 6000/7000 Series Installation Instructions for details. From the Home screen, select Information > Engines. Cycling Through Engine and Fuel Gauge Screens 1. From the Home screen, select Information > Engines. 2. Move from one gauge screen to the next: • For the GPSMAP 6000 series, use the Rocker. • For the GPSMAP 7000 series, select the left and right arrows at the top of the page. The chartplotter shows the next engine gauge or fuel gauge screen. 3. Repeat step 2 to cycle through all the engine gauge and fuel gauge screens. Customizing Engine and Fuel Gauge Limits You can configure up to four values for each engine gauge or fuel gauge, to establish the upper and lower limits of the gauge, and the range of desired standard operation. When a value exceeds the range of standard operation, the gauge face or bar becomes red. Setting Scale minimum Scale maximum Rated minimum Rated maximum Description This value is less than the scale minimum, and it represents the lower limit of the gauge. This setting is not available on all gauges. This value is greater than the scale maximum, and it represents the upper limit of the gauge. This setting is not available on all gauges. Represents the minimum value of the standard operating range. Represents the maximum value of the standard operating range. 1. From the Home screen, select Information > Engines > Menu > Gauge Setup > Set Gauge Limits. 2. Select a gauge. 3. Select Mode > Custom. GPSMAP® 6000/7000 Series Owner's Manual 51
-
 1
1 -
2
-
3
-
4
-
5
-
6
-
7
-
8
-
9
-
10
-
11
-
12
-
13
-
14
-
15
-
16
-
17
-
18
-
19
-
20
-
21
-
22
-
23
-
24
-
25
-
26
-
27
-
28
-
29
-
30
-
31
-
32
-
33
-
34
-
35
-
36
-
37
-
38
-
39
-
40
-
41
-
42
-
43
-
44
-
45
-
46
-
47
-
48
-
49
-
50
-
51
-
 52
52 -
 53
53 -
 54
54 -
 55
55 -
 56
56 -
 57
57 -
 58
58 -
 59
59 -
 60
60 -
 61
61 -
 62
62 -
63
-
64
-
65
-
66
-
67
-
68
-
69
-
70
-
71
-
72
-
73
-
74
-
75
-
76
-
77
-
78
-
79
-
80
-
81
-
82
-
83
-
84
-
85
-
86
-
87
-
88
-
89
-
90
-
91
-
92
-
93
-
94
-
95
-
96
-
97
-
98
-
99
-
100
-
101
-
102
-
103
-
104
-
105
-
106
-
107
-
108
-
109
-
110
-
111
-
112
-
113
-
114
-
115
-
116
-
117
-
118
-
119
-
120
-
121
-
122
-
123
-
124
-
125
-
126
-
127
-
128
-
129
-
130
-
131
-
132
 |
 |