Garmin GPSMAP 6012 Owner's Manual - Page 59
Information, Engines, Gauge Setup, Selection, First Engine, Selecting the Engines Shown in Gauges
 |
View all Garmin GPSMAP 6012 manuals
Add to My Manuals
Save this manual to your list of manuals |
Page 59 highlights
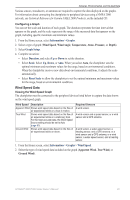
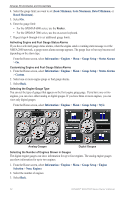
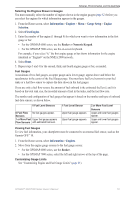
Almanac, Environmental, and On-boat Data Selecting the Engines Shown in Gauges You must manually select the number of engines shown in the engine gauges (page 52) before you can select the engines for which information appears in the gauges. 1. From the Home screen, select Information > Engines > Menu > Gauge Setup > Engine Selection. 2. Select First Engine. 3. Enter the number of the engine (1 through 8) for which you want to view information in the first gauge or bar: • For the GPSMAP 6000 series, use the Rocker or Numeric Keypad. • For the GPSMAP 7000 series, use the on-screen keyboard. For example, if you select "6," the first engine gauge or bar shows information for the engine identified as "Engine6" on the NMEA 2000 network. 4. Select Done. 5. Repeat steps 3 and 4 for the second, third, and fourth engine gauge or bar, as needed. Fuel Gauges A maximum of two fuel gauges, an upper gauge and a lower gauge, appear above and below the speedometer in the center of the Fuel Gauges page. You must have fuel level sensors in your fuel tanks or a fuel flow sensor to capture the data shown in the fuel gauges. If you use only a fuel flow sensor, the amount of fuel onboard is the estimated fuel level, and it is based on the total tank size, the recorded amount of fuel in the tanks, and the fuel flow rate. The number and configuration of fuel gauges that appear is based on the number and type of onboard fuel data sensors, as shown below. 0 Fuel Level Sensors 0 Fuel Flow No fuel gauges appear. Sensors 1 or More Fuel Upper fuel gauge appears Flow Sensors with estimated fuel level. 1 Fuel Level Sensor Upper fuel gauge appears. Upper fuel gauge appears. 2 or More Fuel Level Sensors Upper and lower fuel gauges appear. Upper and lower fuel gauges appear. Viewing Fuel Gauges To view fuel information, your chartplotter must be connected to an external fuel sensor, such as the Garmin GFS™ 10. 1. From the Home screen, select Information > Engines. 2. Move from the engine gauge screens to the fuel gauge screen: • For the GPSMAP 6000 series, use the Rocker. • For the GPSMAP 7000 series, select the left and right arrows at the top of the page. Customizing Gauge Limits See "Customizing Engine and Fuel Gauge Limits" (page 51). GPSMAP® 6000/7000 Series Owner's Manual 53
-
 1
1 -
2
-
3
-
4
-
5
-
6
-
7
-
8
-
9
-
10
-
11
-
12
-
13
-
14
-
15
-
16
-
17
-
18
-
19
-
20
-
21
-
22
-
23
-
24
-
25
-
26
-
27
-
28
-
29
-
30
-
31
-
32
-
33
-
34
-
35
-
36
-
37
-
38
-
39
-
40
-
41
-
42
-
43
-
44
-
45
-
46
-
47
-
48
-
49
-
50
-
51
-
52
-
53
-
 54
54 -
 55
55 -
 56
56 -
 57
57 -
 58
58 -
 59
59 -
 60
60 -
 61
61 -
 62
62 -
 63
63 -
 64
64 -
65
-
66
-
67
-
68
-
69
-
70
-
71
-
72
-
73
-
74
-
75
-
76
-
77
-
78
-
79
-
80
-
81
-
82
-
83
-
84
-
85
-
86
-
87
-
88
-
89
-
90
-
91
-
92
-
93
-
94
-
95
-
96
-
97
-
98
-
99
-
100
-
101
-
102
-
103
-
104
-
105
-
106
-
107
-
108
-
109
-
110
-
111
-
112
-
113
-
114
-
115
-
116
-
117
-
118
-
119
-
120
-
121
-
122
-
123
-
124
-
125
-
126
-
127
-
128
-
129
-
130
-
131
-
132
 |
 |