Intel S7000FC4UR Product Guide - Page 77
Installing the Top Cover, Hot-swapping a Front System Fan
 |
UPC - 735858194259
View all Intel S7000FC4UR manuals
Add to My Manuals
Save this manual to your list of manuals |
Page 77 highlights
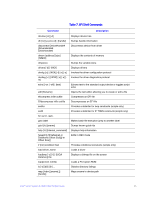
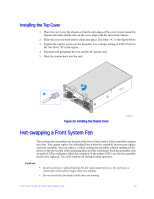
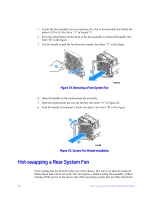
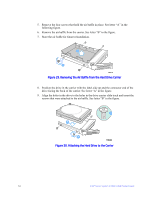
Installing the Top Cover 1. Place the cover over the chassis so that the side edges of the cover sit just inside the chassis sidewalls and the tabs on the cover align with the slots in the chassis. 2. Slide the cover forward until it clicks into place. See letter "A" in the figure below. 3. Tighten the captive screws on the faceplate. Use a torque setting of 0.90 N M (8 in lb). See letter "B" in the figure. 4. Reconnect all peripheral devices and the AC power cord. 5. Slide the system back into the rack. A B Figure 23. Installing the Chassis Cover AF002263 Hot-swapping a Front System Fan Two cooling fan assemblies are located at the front of the chassis. Each assembly contains two fans. You cannot replace the individual fans within the assembly, but you can replace each fan assembly. You can replace a failed cooling fan assembly without turning off the power to the server only if the remaining fans are fully functional. Each fan assembly uses an amber LED to indicate a failed fan condition. If the amber LED is on, the fan assembly needs to be replaced. The LED remains off during normal operation. Cautions: • System cooling is reduced during the fan replacement process. Do not leave a system fan removed for longer than two minutes. • Do not touch the fan blades while they are turning. Intel® Server System S7000FC4UR Product Guide 59
-
 1
1 -
2
-
3
-
4
-
5
-
6
-
7
-
8
-
9
-
10
-
11
-
12
-
13
-
14
-
15
-
16
-
17
-
18
-
19
-
20
-
21
-
22
-
23
-
24
-
25
-
26
-
27
-
28
-
29
-
30
-
31
-
32
-
33
-
34
-
35
-
36
-
37
-
38
-
39
-
40
-
41
-
42
-
43
-
44
-
45
-
46
-
47
-
48
-
49
-
50
-
51
-
52
-
53
-
54
-
55
-
56
-
57
-
58
-
59
-
60
-
61
-
62
-
63
-
64
-
65
-
66
-
67
-
68
-
69
-
70
-
71
-
 72
72 -
 73
73 -
 74
74 -
 75
75 -
 76
76 -
 77
77 -
 78
78 -
 79
79 -
 80
80 -
 81
81 -
 82
82 -
83
-
84
-
85
-
86
-
87
-
88
-
89
-
90
-
91
-
92
-
93
-
94
-
95
-
96
-
97
-
98
-
99
-
100
-
101
-
102
-
103
-
104
-
105
-
106
-
107
-
108
-
109
-
110
-
111
-
112
-
113
-
114
-
115
-
116
-
117
-
118
-
119
-
120
-
121
-
122
-
123
-
124
-
125
-
126
-
127
-
128
-
129
-
130
-
131
-
132
-
133
-
134
-
135
-
136
-
137
-
138
-
139
-
140
-
141
-
142
-
143
-
144
-
145
-
146
-
147
-
148
-
149
-
150
-
151
-
152
-
153
-
154
-
155
-
156
-
157
-
158
-
159
-
160
-
161
-
162
-
163
-
164
-
165
-
166
-
167
-
168
-
169
-
170
-
171
-
172
-
173
-
174
-
175
-
176
-
177
-
178
-
179
-
180
-
181
-
182
-
183
-
184
-
185
-
186
-
187
-
188
-
189
-
190
-
191
-
192
-
193
-
194
-
195
-
196
-
197
-
198
-
199
-
200
-
201
-
202
-
203
-
204
-
205
-
206
-
207
-
208
-
209
-
210
-
211
-
212
-
213
-
214
-
215
-
216
-
217
-
218
-
219
-
220
-
221
-
222
-
223
-
224
-
225
-
226
-
227
-
228
-
229
-
230
-
231
-
232
 |
 |
