Intel S7000FC4UR Product Guide - Page 82
Removing the Air Baffle from the Hard Drive Carrier
 |
UPC - 735858194259
View all Intel S7000FC4UR manuals
Add to My Manuals
Save this manual to your list of manuals |
Page 82 highlights
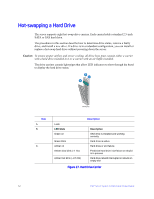
5. Remove the four screws that hold the air baffle in place. See letter "A" in the following figure. 6. Remove the air baffle from the carrier. See letter "B" in the figure. 7. Store the air baffle for future reinstallation. Figure 29. Removing the Air Baffle from the Hard Drive Carrier 8. Position the drive in the carrier with the label-side up and the connector end of the drive facing the back of the carrier. See letter "A" in the figure. 9. Align the holes in the drive to the holes in the drive carrier slide track and insert the screws that were attached to the air baffle. See letter "B" in the figure. Figure 30. Attaching the Hard Drive to the Carrier 64 Intel® Server System S7000FC4UR Product Guide
-
 1
1 -
2
-
3
-
4
-
5
-
6
-
7
-
8
-
9
-
10
-
11
-
12
-
13
-
14
-
15
-
16
-
17
-
18
-
19
-
20
-
21
-
22
-
23
-
24
-
25
-
26
-
27
-
28
-
29
-
30
-
31
-
32
-
33
-
34
-
35
-
36
-
37
-
38
-
39
-
40
-
41
-
42
-
43
-
44
-
45
-
46
-
47
-
48
-
49
-
50
-
51
-
52
-
53
-
54
-
55
-
56
-
57
-
58
-
59
-
60
-
61
-
62
-
63
-
64
-
65
-
66
-
67
-
68
-
69
-
70
-
71
-
72
-
73
-
74
-
75
-
76
-
 77
77 -
 78
78 -
 79
79 -
 80
80 -
 81
81 -
 82
82 -
 83
83 -
 84
84 -
 85
85 -
 86
86 -
 87
87 -
88
-
89
-
90
-
91
-
92
-
93
-
94
-
95
-
96
-
97
-
98
-
99
-
100
-
101
-
102
-
103
-
104
-
105
-
106
-
107
-
108
-
109
-
110
-
111
-
112
-
113
-
114
-
115
-
116
-
117
-
118
-
119
-
120
-
121
-
122
-
123
-
124
-
125
-
126
-
127
-
128
-
129
-
130
-
131
-
132
-
133
-
134
-
135
-
136
-
137
-
138
-
139
-
140
-
141
-
142
-
143
-
144
-
145
-
146
-
147
-
148
-
149
-
150
-
151
-
152
-
153
-
154
-
155
-
156
-
157
-
158
-
159
-
160
-
161
-
162
-
163
-
164
-
165
-
166
-
167
-
168
-
169
-
170
-
171
-
172
-
173
-
174
-
175
-
176
-
177
-
178
-
179
-
180
-
181
-
182
-
183
-
184
-
185
-
186
-
187
-
188
-
189
-
190
-
191
-
192
-
193
-
194
-
195
-
196
-
197
-
198
-
199
-
200
-
201
-
202
-
203
-
204
-
205
-
206
-
207
-
208
-
209
-
210
-
211
-
212
-
213
-
214
-
215
-
216
-
217
-
218
-
219
-
220
-
221
-
222
-
223
-
224
-
225
-
226
-
227
-
228
-
229
-
230
-
231
-
232
 |
 |

64
Intel® Server System S7000FC4UR Product Guide
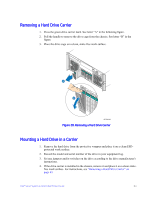
5.
Remove the four screws that hold the air baffle in place. See letter “A” in the
following figure.
6.
Remove the air baffle from the carrier. See letter “B” in the figure.
7.
Store the air baffle for future reinstallation.
Figure 29. Removing the Air Baffle from the Hard Drive Carrier
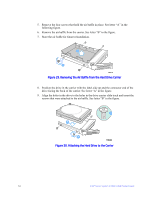
8.
Position the drive in the carrier with the label-side up and the connector end of the
drive facing the back of the carrier. See letter “A” in the figure.
9.
Align the holes in the drive to the holes in the drive carrier slide track and insert the
screws that were attached to the air baffle. See letter “B” in the figure.
Figure 30. Attaching the Hard Drive to the Carrier