Kyocera KM-6030 6030/8030 Operation Guide (Advanced Edition) Rev-3 - Page 73
Specifying Copy Functions, 2-sided], [Book], or [Multi- Form]
 |
View all Kyocera KM-6030 manuals
Add to My Manuals
Save this manual to your list of manuals |
Page 73 highlights
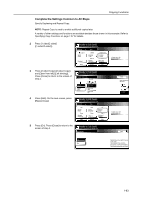
Copying Functions 23 All originals have been scanned. Press [Scanning finished] to start the job. 24 If there are no problems with the accomplished copies, you can use Repeat Copy to produce additional copies in the desired quantity as needed. Refer to Repeat Copy on page 1-42 for details. You are now completed programming a copy job with job build. Specifying Copy Functions Paper Selection Select the paper size as follows. 1 On the [Basic] screen, press [Select Paper]. 2 Select the MP tray or a cassette and press [Close]. Ready to Job build. Place originals then press Start key. Job Build Step 11x8½" Select Paper Finished Basic 1 sided Original Type Auto % Reduce /Enlarge Quality 2 sided Copy 1 sided/ 2 sided Rear Orig. Set Direction Edit 1 sided copy-Left Finished page #: Ready to Job build. Place originals then press Start key. Select Paper Back 11x8½" Plain 11x8½" Recycled 11x17" Plain 8½x11" Plain MP tray Color Types of Originals Select originals that are one-sided or two-sided, have facing pages like books or magazines, or are like multi-page business forms. 1 On the [Basic] screen, press [Original Type]. Ready to Job build. Place originals then press Start key. Job Build Step 11x8½" Select Paper Finished Basic 1 sided Original Type Auto % Reduce /Enlarge Quality 2 sided Copy 1 sided/ 2 sided Rear Orig. Set Direction Edit 1 sided copy-Left Finished page #: 2 Based on the originals to be placed, select [1 sided] ([1-sided]), [2 sided] Ready to Job build. Place originals then press Start key. ([2-sided]), [Book], or [Multi-Page Form] Original Type B ack ([Multi-Page Forme]). NOTE: When selecting [2 sided] ([2-sided]), check the binding direction and be sure that the originals are placed in the correct orientation. When selecting [Book], be sure that the binding direction is correct. 1 sided 2 sided Book Multi-Page Form 1-67
-
 1
1 -
2
-
3
-
4
-
5
-
6
-
7
-
8
-
9
-
10
-
11
-
12
-
13
-
14
-
15
-
16
-
17
-
18
-
19
-
20
-
21
-
22
-
23
-
24
-
25
-
26
-
27
-
28
-
29
-
30
-
31
-
32
-
33
-
34
-
35
-
36
-
37
-
38
-
39
-
40
-
41
-
42
-
43
-
44
-
45
-
46
-
47
-
48
-
49
-
50
-
51
-
52
-
53
-
54
-
55
-
56
-
57
-
58
-
59
-
60
-
61
-
62
-
63
-
64
-
65
-
66
-
67
-
 68
68 -
 69
69 -
 70
70 -
 71
71 -
 72
72 -
 73
73 -
 74
74 -
 75
75 -
 76
76 -
 77
77 -
 78
78 -
79
-
80
-
81
-
82
-
83
-
84
-
85
-
86
-
87
-
88
-
89
-
90
-
91
-
92
-
93
-
94
-
95
-
96
-
97
-
98
-
99
-
100
-
101
-
102
-
103
-
104
-
105
-
106
-
107
-
108
-
109
-
110
-
111
-
112
-
113
-
114
-
115
-
116
-
117
-
118
-
119
-
120
-
121
-
122
-
123
-
124
-
125
-
126
-
127
-
128
-
129
-
130
-
131
-
132
-
133
-
134
-
135
-
136
-
137
-
138
-
139
-
140
-
141
-
142
-
143
-
144
-
145
-
146
-
147
-
148
-
149
-
150
-
151
-
152
-
153
-
154
-
155
-
156
-
157
-
158
-
159
-
160
-
161
-
162
-
163
-
164
-
165
-
166
-
167
-
168
-
169
-
170
-
171
-
172
-
173
-
174
-
175
-
176
-
177
-
178
-
179
-
180
-
181
-
182
-
183
-
184
-
185
-
186
-
187
-
188
-
189
-
190
-
191
-
192
-
193
-
194
-
195
-
196
-
197
-
198
-
199
-
200
-
201
-
202
-
203
-
204
-
205
-
206
-
207
-
208
-
209
-
210
-
211
-
212
 |
 |
