Kyocera KM-6030 6030/8030 Operation Guide (Advanced Edition) Rev-3 - Page 99
Using Output Management Functions, Move Behind] [Move down]
 |
View all Kyocera KM-6030 manuals
Add to My Manuals
Save this manual to your list of manuals |
Page 99 highlights
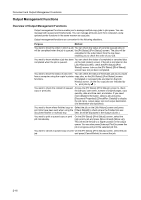
Document and Output Management Functions Using Output Management Functions Manage jobs using output management functions from the [Prt Status] ([Prnt Status]) and [Job History] screens. Press the Print Management key to display the [Prt Status] ([Prnt Status]) screen. To display the [Job History] screen, press [Job History] below the [Prt Status] ([Prnt Status]) tab. Print Management Job User Original Set Registration State Printing Waiting Move Ahead Prt Status Move Behind Job History Interrupt Print Cancel/ Delete Document Properties [Prt Status] ([Prnt Status]) Screen The screen shows queued jobs and the current output status. Print Management End 8 Job User Original Set Registration State Printing 1 Waiting 7 2 Move Ahead Move Behind Interrupt Print Cancel/ Delete Document Properties Prt Status Job History 9 3 4 5 6 1 Job List: Provides job information. The job currently in progress is listed on top, with subsequent jobs listed below in the order they will be finished. In the list, copy jobs are designated by and print jobs by . 2 [Move Ahead] ([Move up]): Moves the selected job order higher in the queue so it will be delivered sooner. You can move jobs up to the second position. 3 [Move Behind] ([Move down]): Moves the selected job order lower in the queue so it will be delivered later. 4 [Interrupt Print]: Pauses the job in progress and starts printing the selected job, which is then moved to the top of the list. 5 [Cancel/Delete]: Removes the selected job from the list. 6 [Document Properties] ([Check/Rev. Details]): Displays the Check/Correct Details (Check/Revise Details) screen. From this screen, you can check the content of the selected job, change the print quantity, and so on. Check/Correct Details Item User name Job name Orig. Page Set Print size Input Source Registration Date Output Details 8½x11" Copy Left Tray Change Preset Job 7 [S] and [T]: Used when selecting jobs. 8 [End]: Exits the output management functions. Pressing this key displays the [Basic] screen or shows the current progress. 9 [Job History]: Switches to the [Job History] screen. 2-17
-
 1
1 -
2
-
3
-
4
-
5
-
6
-
7
-
8
-
9
-
10
-
11
-
12
-
13
-
14
-
15
-
16
-
17
-
18
-
19
-
20
-
21
-
22
-
23
-
24
-
25
-
26
-
27
-
28
-
29
-
30
-
31
-
32
-
33
-
34
-
35
-
36
-
37
-
38
-
39
-
40
-
41
-
42
-
43
-
44
-
45
-
46
-
47
-
48
-
49
-
50
-
51
-
52
-
53
-
54
-
55
-
56
-
57
-
58
-
59
-
60
-
61
-
62
-
63
-
64
-
65
-
66
-
67
-
68
-
69
-
70
-
71
-
72
-
73
-
74
-
75
-
76
-
77
-
78
-
79
-
80
-
81
-
82
-
83
-
84
-
85
-
86
-
87
-
88
-
89
-
90
-
91
-
92
-
93
-
 94
94 -
 95
95 -
 96
96 -
 97
97 -
 98
98 -
 99
99 -
 100
100 -
 101
101 -
 102
102 -
 103
103 -
 104
104 -
105
-
106
-
107
-
108
-
109
-
110
-
111
-
112
-
113
-
114
-
115
-
116
-
117
-
118
-
119
-
120
-
121
-
122
-
123
-
124
-
125
-
126
-
127
-
128
-
129
-
130
-
131
-
132
-
133
-
134
-
135
-
136
-
137
-
138
-
139
-
140
-
141
-
142
-
143
-
144
-
145
-
146
-
147
-
148
-
149
-
150
-
151
-
152
-
153
-
154
-
155
-
156
-
157
-
158
-
159
-
160
-
161
-
162
-
163
-
164
-
165
-
166
-
167
-
168
-
169
-
170
-
171
-
172
-
173
-
174
-
175
-
176
-
177
-
178
-
179
-
180
-
181
-
182
-
183
-
184
-
185
-
186
-
187
-
188
-
189
-
190
-
191
-
192
-
193
-
194
-
195
-
196
-
197
-
198
-
199
-
200
-
201
-
202
-
203
-
204
-
205
-
206
-
207
-
208
-
209
-
210
-
211
-
212
 |
 |
