Kyocera KM-6030 6030/8030 Operation Guide (Advanced Edition) Rev-3 - Page 81
numbering]., Select of Output].
 |
View all Kyocera KM-6030 manuals
Add to My Manuals
Save this manual to your list of manuals |
Page 81 highlights
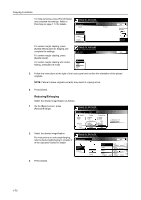
Copying Functions Page Numbering Specify page numbering in the sequence of originals as follows. 1 Press [Edit]. On the next screen, press [Page #] ([Page numbering]). NOTE: The page numbering setting applies to all other steps. Simply complete this setting once as an initial step. Ready to Job build. Place originals then press Start key. Job Build Step Off Border Erase None Margin/ Centering Basic Auto Select Orig.Size None Page # Quality Off Repeat Copy Tray A Select of Output Edit 1 sided copy-Left Finished page #: 2 For instructions on page numbering, refer to Page Numbering on page 1-25. Ready to Job build. Place originals then press Start key. Page # Back None P.1 -1- 1/n Page # can be added on bottom o 3 Press [Close] to return to the screen of step 1. Output Destination Specify the optional document finisher or multi-job tray as the output destination as follows. 1 Press [Edit]. On the next screen, press [Select of Output]. NOTE: The option to select the output destination is displayed only if the copier is equipped with the optional document finisher or multi-job tray. The output destination setting applies to all other steps. Simply complete this setting once as an initial step. Ready to Job build. Place originals then press Start key. Job Build Step Off Border Erase None Margin/ Centering Basic Auto Select Orig.Size None Page # Quality Off Repeat Copy Tray A Select of Output Edit 1 sided copy-Left Finished page #: 2 Specify the output destination. Refer to Output Destination on page 1-49 for details. 3 Press [Close]. Ready to Job build. Place originals then press Start key. Select of Output Auto Tray A Tray 1 Tray 2 Tray 3 Tray 4 Tray 5 B ack Select proper output tray to avoid mixing jobs. You can confirm output tray with out management. 1-75
-
 1
1 -
2
-
3
-
4
-
5
-
6
-
7
-
8
-
9
-
10
-
11
-
12
-
13
-
14
-
15
-
16
-
17
-
18
-
19
-
20
-
21
-
22
-
23
-
24
-
25
-
26
-
27
-
28
-
29
-
30
-
31
-
32
-
33
-
34
-
35
-
36
-
37
-
38
-
39
-
40
-
41
-
42
-
43
-
44
-
45
-
46
-
47
-
48
-
49
-
50
-
51
-
52
-
53
-
54
-
55
-
56
-
57
-
58
-
59
-
60
-
61
-
62
-
63
-
64
-
65
-
66
-
67
-
68
-
69
-
70
-
71
-
72
-
73
-
74
-
75
-
 76
76 -
 77
77 -
 78
78 -
 79
79 -
 80
80 -
 81
81 -
 82
82 -
 83
83 -
 84
84 -
 85
85 -
 86
86 -
87
-
88
-
89
-
90
-
91
-
92
-
93
-
94
-
95
-
96
-
97
-
98
-
99
-
100
-
101
-
102
-
103
-
104
-
105
-
106
-
107
-
108
-
109
-
110
-
111
-
112
-
113
-
114
-
115
-
116
-
117
-
118
-
119
-
120
-
121
-
122
-
123
-
124
-
125
-
126
-
127
-
128
-
129
-
130
-
131
-
132
-
133
-
134
-
135
-
136
-
137
-
138
-
139
-
140
-
141
-
142
-
143
-
144
-
145
-
146
-
147
-
148
-
149
-
150
-
151
-
152
-
153
-
154
-
155
-
156
-
157
-
158
-
159
-
160
-
161
-
162
-
163
-
164
-
165
-
166
-
167
-
168
-
169
-
170
-
171
-
172
-
173
-
174
-
175
-
176
-
177
-
178
-
179
-
180
-
181
-
182
-
183
-
184
-
185
-
186
-
187
-
188
-
189
-
190
-
191
-
192
-
193
-
194
-
195
-
196
-
197
-
198
-
199
-
200
-
201
-
202
-
203
-
204
-
205
-
206
-
207
-
208
-
209
-
210
-
211
-
212
 |
 |
