Kyocera KM-6030 6030/8030 Operation Guide (Advanced Edition) Rev-3 - Page 75
Processing of Finished Copies, Function, Optional Equipment, Description
 |
View all Kyocera KM-6030 manuals
Add to My Manuals
Save this manual to your list of manuals |
Page 75 highlights
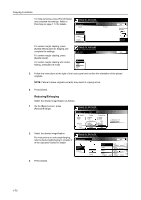
Copying Functions Processing of Finished Copies Specify stacking of accomplished copies as follows. If your copier is equipped with the optional document finisher, you can also specify stapling or hole punching. Function Stacking Stapling Center margin stapling Punching Optional Equipment Document finisher: None Document finisher: Installed Document finisher: None Document finisher: Installed Document finisher: None Document finisher: Installed Folding unit: None Document finisher: Installed Folding unit: Installed Document finisher: None Document finisher: Installed Punching unit: Installed Description Each completed set is rotated 90° before stacking. Stacked by the document finisher. Stapling is not available. Stapling is available. Center margin stapling is not available. Center margin stapling is available. Center margin stapling as well as center margin with center folding is available. Punching not is available. Punching is available. 1 On the [Basic] screen, press [Finished]. NOTE: The finishing settings apply to all other steps. Simply complete this setting once as an initial step. Ready to Job build. Place originals then press Start key. Job Build Step 11x8½" Select Paper Finished Basic 1 sided Original Type Auto % Reduce /Enlarge Quality 2 sided Copy 1 sided/ 2 sided Rear Orig. Set Direction Edit 1 sided copy-Left Finished page #: 2 For finishing, press [On] ([1 set] or [Output each page]) or [Off]. Refer to Offset Mode on page 1-10 for details. Ready to Job build. Place originals then press Start key. Finished Offset Staple Off Staple Mode On None Saddle Stitch For stapling, press [Staple Mode] and complete the settings. Refer to Stapling on page 1-11 for details. Ready to Job build. Place originals then press Start key. Staple Mode Staple Punch Punch Mode None 1 staple 2 staples Limited number of staple pages. The limit is set in setting mode. ! When selecting staple function the offset can not be combined. B ack Select Original Ima Direction. Top Edge Back Select Original I Direction. Top Edge 1-69
-
 1
1 -
2
-
3
-
4
-
5
-
6
-
7
-
8
-
9
-
10
-
11
-
12
-
13
-
14
-
15
-
16
-
17
-
18
-
19
-
20
-
21
-
22
-
23
-
24
-
25
-
26
-
27
-
28
-
29
-
30
-
31
-
32
-
33
-
34
-
35
-
36
-
37
-
38
-
39
-
40
-
41
-
42
-
43
-
44
-
45
-
46
-
47
-
48
-
49
-
50
-
51
-
52
-
53
-
54
-
55
-
56
-
57
-
58
-
59
-
60
-
61
-
62
-
63
-
64
-
65
-
66
-
67
-
68
-
69
-
 70
70 -
 71
71 -
 72
72 -
 73
73 -
 74
74 -
 75
75 -
 76
76 -
 77
77 -
 78
78 -
 79
79 -
 80
80 -
81
-
82
-
83
-
84
-
85
-
86
-
87
-
88
-
89
-
90
-
91
-
92
-
93
-
94
-
95
-
96
-
97
-
98
-
99
-
100
-
101
-
102
-
103
-
104
-
105
-
106
-
107
-
108
-
109
-
110
-
111
-
112
-
113
-
114
-
115
-
116
-
117
-
118
-
119
-
120
-
121
-
122
-
123
-
124
-
125
-
126
-
127
-
128
-
129
-
130
-
131
-
132
-
133
-
134
-
135
-
136
-
137
-
138
-
139
-
140
-
141
-
142
-
143
-
144
-
145
-
146
-
147
-
148
-
149
-
150
-
151
-
152
-
153
-
154
-
155
-
156
-
157
-
158
-
159
-
160
-
161
-
162
-
163
-
164
-
165
-
166
-
167
-
168
-
169
-
170
-
171
-
172
-
173
-
174
-
175
-
176
-
177
-
178
-
179
-
180
-
181
-
182
-
183
-
184
-
185
-
186
-
187
-
188
-
189
-
190
-
191
-
192
-
193
-
194
-
195
-
196
-
197
-
198
-
199
-
200
-
201
-
202
-
203
-
204
-
205
-
206
-
207
-
208
-
209
-
210
-
211
-
212
 |
 |
