Lexmark C750 Service Manual - Page 169
Lexmark C750 Manual
 |
View all Lexmark C750 manuals
Add to My Manuals
Save this manual to your list of manuals |
Page 169 highlights
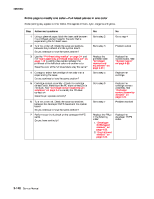
5060-00x No indication that Bin x is full or no indication that Bin x is near full. Step 1 Actions and questions Sensor cable installation-check for correct installation of the sensor cable at J5 on the control board. Is the cable installed correctly? 2 Dual output bin x sensor assembly Do either the bin x full or the bin x near full sensor fail the sensor test? 3 Voltage-check the voltages at J5-3 and J5-4. The voltages should measure approximately +5 V dc. Are the voltages correct? Replace the sensor Go to step 3 Call your next level support Yes Go to step 2 No Install the cable correctly Replace the control board Printer does not recognize that one or more output options as being installed. Step 1 Actions and questions Excessive static electricity buildup-check the output expander control board cover to make sure the ESD brush ground lead is firmly attached to the output expander frame. Make sure the ESD is loose not or damaged. Is the ESD brush ground cable correctly installed and the ESD brush not loose or broken? 2 Options check-If more than a single output expander option is installed, check each one to see if the printer recognizes any single option as being installed. If the printer recognizes any of the output expander options then the base printer autoconnect system is operating correctly and the problem is in the unrecognized expander option. Make sure that the output expander option is the only output option that is not recognized by the base printer. Is this the only output option not recognized by the base printer? 3 Output Expander assembly mechanical linkage (cables)-Check the output expander autoconnect cable and connector for any signs of damage, especially the connector pins. Is there any signs of damage to the cable, connector, or connector pins? 4 Output Expander assembly mechanical linkage (electrical) Check the cables at J1A, J1B, J2A and J2B on the control board to make sure they are attached securely and correctly. Are the cables attached securely and correctly? 5 Voltage check, base printer autoconnect connector- turn the power off and remove the output expander option from the printer and check the voltages on the base printer top autoconnect connector. Go to Autoconnect - Top. Are the voltages correct? Go to step 6 The problem is in the base printer. Check autoconnects in the printer. Go to step 5 Reseat the cables Replace the autoconnect cable Go to step 4 Go to step 3 Yes Go to step 2 No 1. Attach the ground cable if not installed correctly. 2. Replace the cover assembly if the ESD brush is loose or damaged. Go to the autoconnect system on the Output Expander option, base printer and check cables and connections to the engine board Diagnostic information 2-135
-
 1
1 -
2
-
3
-
4
-
5
-
6
-
7
-
8
-
9
-
10
-
11
-
12
-
13
-
14
-
15
-
16
-
17
-
18
-
19
-
20
-
21
-
22
-
23
-
24
-
25
-
26
-
27
-
28
-
29
-
30
-
31
-
32
-
33
-
34
-
35
-
36
-
37
-
38
-
39
-
40
-
41
-
42
-
43
-
44
-
45
-
46
-
47
-
48
-
49
-
50
-
51
-
52
-
53
-
54
-
55
-
56
-
57
-
58
-
59
-
60
-
61
-
62
-
63
-
64
-
65
-
66
-
67
-
68
-
69
-
70
-
71
-
72
-
73
-
74
-
75
-
76
-
77
-
78
-
79
-
80
-
81
-
82
-
83
-
84
-
85
-
86
-
87
-
88
-
89
-
90
-
91
-
92
-
93
-
94
-
95
-
96
-
97
-
98
-
99
-
100
-
101
-
102
-
103
-
104
-
105
-
106
-
107
-
108
-
109
-
110
-
111
-
112
-
113
-
114
-
115
-
116
-
117
-
118
-
119
-
120
-
121
-
122
-
123
-
124
-
125
-
126
-
127
-
128
-
129
-
130
-
131
-
132
-
133
-
134
-
135
-
136
-
137
-
138
-
139
-
140
-
141
-
142
-
143
-
144
-
145
-
146
-
147
-
148
-
149
-
150
-
151
-
152
-
153
-
154
-
155
-
156
-
157
-
158
-
159
-
160
-
161
-
162
-
163
-
 164
164 -
 165
165 -
 166
166 -
 167
167 -
 168
168 -
 169
169 -
 170
170 -
 171
171 -
 172
172 -
 173
173 -
 174
174 -
175
-
176
-
177
-
178
-
179
-
180
-
181
-
182
-
183
-
184
-
185
-
186
-
187
-
188
-
189
-
190
-
191
-
192
-
193
-
194
-
195
-
196
-
197
-
198
-
199
-
200
-
201
-
202
-
203
-
204
-
205
-
206
-
207
-
208
-
209
-
210
-
211
-
212
-
213
-
214
-
215
-
216
-
217
-
218
-
219
-
220
-
221
-
222
-
223
-
224
-
225
-
226
-
227
-
228
-
229
-
230
-
231
-
232
-
233
-
234
-
235
-
236
-
237
-
238
-
239
-
240
-
241
-
242
-
243
-
244
-
245
-
246
-
247
-
248
-
249
-
250
-
251
-
252
-
253
-
254
-
255
-
256
-
257
-
258
-
259
-
260
-
261
-
262
-
263
-
264
-
265
-
266
-
267
-
268
-
269
-
270
-
271
-
272
-
273
-
274
-
275
-
276
-
277
-
278
-
279
-
280
-
281
-
282
-
283
-
284
-
285
-
286
-
287
-
288
-
289
-
290
-
291
-
292
-
293
-
294
-
295
-
296
-
297
-
298
-
299
-
300
-
301
-
302
-
303
-
304
-
305
-
306
-
307
-
308
-
309
-
310
-
311
-
312
-
313
-
314
-
315
-
316
-
317
-
318
-
319
-
320
-
321
-
322
-
323
-
324
-
325
-
326
-
327
-
328
-
329
-
330
-
331
-
332
-
333
-
334
-
335
-
336
-
337
-
338
-
339
-
340
-
341
-
342
-
343
-
344
-
345
-
346
-
347
-
348
-
349
-
350
-
351
-
352
-
353
-
354
-
355
-
356
-
357
-
358
-
359
-
360
-
361
-
362
-
363
-
364
-
365
-
366
-
367
-
368
-
369
-
370
-
371
-
372
-
373
-
374
-
375
-
376
-
377
-
378
-
379
-
380
-
381
-
382
-
383
-
384
-
385
-
386
-
387
-
388
-
389
-
390
-
391
-
392
-
393
-
394
-
395
-
396
-
397
-
398
-
399
-
400
-
401
-
402
-
403
-
404
-
405
-
406
-
407
-
408
-
409
-
410
-
411
-
412
-
413
-
414
-
415
-
416
-
417
-
418
-
419
-
420
-
421
-
422
-
423
-
424
-
425
-
426
-
427
-
428
-
429
-
430
-
431
-
432
-
433
-
434
-
435
-
436
-
437
-
438
-
439
-
440
-
441
-
442
-
443
-
444
-
445
-
446
-
447
-
448
-
449
-
450
-
451
-
452
-
453
-
454
-
455
-
456
-
457
-
458
-
459
-
460
-
461
-
462
-
463
-
464
-
465
-
466
-
467
-
468
-
469
-
470
-
471
-
472
-
473
-
474
-
475
-
476
-
477
-
478
-
479
-
480
-
481
-
482
-
483
-
484
-
485
-
486
-
487
-
488
-
489
-
490
 |
 |
