Samsung HMX-S10BN User Manual (user Manual) (ver.1.0) (English, Chinese) - Page 61
Setting the Photo Size
 |
UPC - 036725303263
View all Samsung HMX-S10BN manuals
Add to My Manuals
Save this manual to your list of manuals |
Page 61 highlights
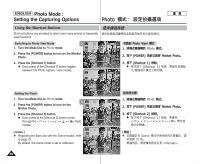
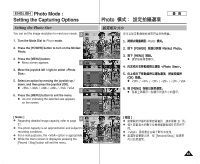
ENGLISH Photo Mode : Setting the Capturing Options 23 Photo Setting the Photo Size 23 You can set the image resolution to meet your needs. 3 23 23 IN 2592 1. Turn the Mode Dial to Photo mode. 1. Photo 0 0 2. Press the [POWER] button to turn on the Miniket Photo. 3. Press the [MENU] button. N Menu screen appears. 4 4. Move the joystick left / right to select . 5. Select an option by moving the joystick up / down, and then press the joystick (OK). N / / / / / VGA 5 6. Press the [MENU] button to exit the menu. N An icon indicating the selected size appears on the screen. [ Notes ] ✤ Regarding detailed image capacity, refer to page 6 31. ✤ The photo capacity is an approximation and subject to recording conditions. ✤ For e-mail purposes, the option is appropriate. ✤ While the menu screen is displayed, pressing the [Record / Stop] button will exit the menu. Photo Photo Size Photo PPhhoototoSize Photo Photo Size Move Select 5M 4MPhoto Size 2272 3M Move 2M 2048 Select 1600 Photo Move OK Select Exit Exit MENU Exit MPPohvhoeottooSize Select Exit PPhhoototoSize 5M 4MPPhhoottooSize 2272 3M 2048 2MMove Select 1600 Photo Size Move OK Select Exit MENU Exit Move 2272 Move S3e0lect IN Exit 30 Select Exit 30 30 2. [POWER] Miniket Photo0 3. [MENU] 0 N 0 4. 0 5. (OK) 0 N / / / / / VGA 6. [MENU] N 0 0 [ ] ✤ ✤ 0 ✤ ✤ 0 31 0 0 [Record/Stop] 61
-
 1
1 -
2
-
3
-
4
-
5
-
6
-
7
-
8
-
9
-
10
-
11
-
12
-
13
-
14
-
15
-
16
-
17
-
18
-
19
-
20
-
21
-
22
-
23
-
24
-
25
-
26
-
27
-
28
-
29
-
30
-
31
-
32
-
33
-
34
-
35
-
36
-
37
-
38
-
39
-
40
-
41
-
42
-
43
-
44
-
45
-
46
-
47
-
48
-
49
-
50
-
51
-
52
-
53
-
54
-
55
-
 56
56 -
 57
57 -
 58
58 -
 59
59 -
 60
60 -
 61
61 -
 62
62 -
 63
63 -
 64
64 -
 65
65 -
 66
66 -
67
-
68
-
69
-
70
-
71
-
72
-
73
-
74
-
75
-
76
-
77
-
78
-
79
-
80
-
81
-
82
-
83
-
84
-
85
-
86
-
87
-
88
-
89
-
90
-
91
-
92
-
93
-
94
-
95
-
96
-
97
-
98
-
99
-
100
-
101
-
102
-
103
-
104
-
105
-
106
-
107
-
108
-
109
-
110
-
111
-
112
-
113
-
114
-
115
-
116
-
117
-
118
-
119
-
120
-
121
-
122
-
123
-
124
-
125
-
126
-
127
-
128
-
129
-
130
-
131
-
132
-
133
-
134
-
135
-
136
-
137
-
138
-
139
-
140
-
141
-
142
-
143
-
144
-
145
-
146
-
147
-
148
-
149
-
150
-
151
-
152
-
153
-
154
-
155
-
156
 |
 |
