Samsung HMX-S10BN User Manual (user Manual) (ver.1.0) (English, Chinese) - Page 73
Setting the Sharpness
 |
UPC - 036725303263
View all Samsung HMX-S10BN manuals
Add to My Manuals
Save this manual to your list of manuals |
Page 73 highlights
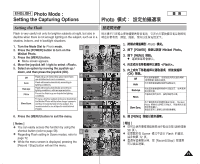
ENGLISH Photo Mode : Setting the Capturing Options Photo Setting the Sharpness 23 You can set the sharpness of the image to be captured. Set the image sharpness before taking a picture. 23 0 1. Turn the Mode Dial to Photo mode. 3 2592 23 23 IN 2. Press the [POWER] button to turn on the Miniket Photo. 3. Press the [MENU] button. N Menu screen appears. 4. Move the joystick left / right to select 4 . 5. Select an option by moving the joystick up / down, and then press the joystick (OK). The image's edges display softly and you can select this when you want to edit it on the computer. The image's edges display sharply, and you can select this when you want to print. 5 As the image's edges are sharpened and emphasised, some noise might occur although it is seen clearly. 6. Press the [MENU] button to exit the menu. N An icon indicating the selected sharpness appears on the screen. 6 N No icon will be displayed when it is set to . Photo Sharpness Photo Photo Sharpness Photo Sharpness SSNMhooaofrtvmrpeanless Sharp Select Move Select Exit Exit PMhovoeto OK Select MENU Exit MSoPvhheaortponessSelect Photo Sharpness SPoShftohatorpness Normal Sharp SMhaovrpeness Select Exit Exit Move OK Select MENU Exit Move 2592 Move Select Exit 23 IN 23 Se2l3ect Exit [ Note ] ✤ While the menu screen is displayed, pressing the 23 [Record / Stop] button will exit the menu. 0 1. Photo 2. [POWER] 3. [MENU] 0 N 0 4. 5. (OK) 0 0 Miniket Photo0 0 0 0 0 6. [MENU] 0 N 0 N 0 [ ] ✤ [Record/Stop] 0 73
-
 1
1 -
2
-
3
-
4
-
5
-
6
-
7
-
8
-
9
-
10
-
11
-
12
-
13
-
14
-
15
-
16
-
17
-
18
-
19
-
20
-
21
-
22
-
23
-
24
-
25
-
26
-
27
-
28
-
29
-
30
-
31
-
32
-
33
-
34
-
35
-
36
-
37
-
38
-
39
-
40
-
41
-
42
-
43
-
44
-
45
-
46
-
47
-
48
-
49
-
50
-
51
-
52
-
53
-
54
-
55
-
56
-
57
-
58
-
59
-
60
-
61
-
62
-
63
-
64
-
65
-
66
-
67
-
 68
68 -
 69
69 -
 70
70 -
 71
71 -
 72
72 -
 73
73 -
 74
74 -
 75
75 -
 76
76 -
 77
77 -
 78
78 -
79
-
80
-
81
-
82
-
83
-
84
-
85
-
86
-
87
-
88
-
89
-
90
-
91
-
92
-
93
-
94
-
95
-
96
-
97
-
98
-
99
-
100
-
101
-
102
-
103
-
104
-
105
-
106
-
107
-
108
-
109
-
110
-
111
-
112
-
113
-
114
-
115
-
116
-
117
-
118
-
119
-
120
-
121
-
122
-
123
-
124
-
125
-
126
-
127
-
128
-
129
-
130
-
131
-
132
-
133
-
134
-
135
-
136
-
137
-
138
-
139
-
140
-
141
-
142
-
143
-
144
-
145
-
146
-
147
-
148
-
149
-
150
-
151
-
152
-
153
-
154
-
155
-
156
 |
 |
