Samsung HMX-S10BN User Manual (user Manual) (ver.1.0) (English, Chinese) - Page 68
Setting the ISO Speed Sensitivity
 |
UPC - 036725303263
View all Samsung HMX-S10BN manuals
Add to My Manuals
Save this manual to your list of manuals |
Page 68 highlights
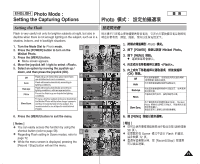
ENGLISH Photo Mode : Setting the Capturing Options 23 Photo Setting the ISO Speed (Sensitivity) 23 ISO ISO Speed is the rating of a film's sensitivity to light. 3 Though Miniket Photo doesn't use film, they normally 2592 use the same rating system to describe the sensitivity of 2233 IN the Miniket's imaging sensor. Photo 1. Turn the Mode Dial to Photo mode. 2. Press the [POWER] button to turn on the Miniket ISO Photo. 3. Press the [MENU] button. Photo N Menu screen appears. 4 PhIoStOo 4. Move the joystick left / right to select . PhoIStOo 5. Select an option by moving the joystick up / Move Select Exit ISO down, and then press the joystick (OK). Auto ISO ISO AUTO Auto Automatically sets the ISO according to the light brightness 100 The standard sensitivity rate, and therefore it is the usual shooting sensitivity rate. 100 20M0ove 400Photo ISO 100 IS2S0O0elect ISO 400 Move OK Select Exit MENU Exit 200 When you use this in a dark place, you can increase the shutter speed, but it might come out grainy. 5 MoveISO Photo Select Exit When you use this in a very dark place, you can 400 greatly increase the shutter speed, but you may get a rough image due to severe graininess. 6. Press the [MENU] button to exit the menu. N An icon indicating the selected ISO Speed appears on the screen. ISO PhIoStOo Auto 120000PMhovIoSetOo 400 ISO ISO AUTO ISO 100 ISOSelect 200 ISO 400 Exit Move OK Select MENU Exit N If is selected, no icon will be displayed. 6 [ Notes ] ✤ The higher the ISO Speed number, the higher sensitivity to light. It results in brighter imaging under Move 2592 Move S2el3ect IN Exit 23Select Exit darker lighting. 23 ✤ High ISO Speed setting may result in picture noise. ISO 100 ✤ Regarding ISO setting in Scene modes, refer to page 72. 23 ✤ If is set, ISO setting will be limited. ✤ While the menu screen is displayed, pressing the [Record / Stop] 68 button will exit the menu. ISO 0 1. Photo 2. [POWER] 3. [MENU] 0 N 0 4. 5. (OK) 0 Auto 0 0 Miniket Photo0 0 ISO 100 0 200 0 400 0 6. [MENU] N N [ ] ✤ ISO 0 ISO ✤ ISO 0 ✤ Scene ISO 72 0 ✤ ISO 0 ✤ [Record/Stop] 0 0 0 0 0
-
 1
1 -
2
-
3
-
4
-
5
-
6
-
7
-
8
-
9
-
10
-
11
-
12
-
13
-
14
-
15
-
16
-
17
-
18
-
19
-
20
-
21
-
22
-
23
-
24
-
25
-
26
-
27
-
28
-
29
-
30
-
31
-
32
-
33
-
34
-
35
-
36
-
37
-
38
-
39
-
40
-
41
-
42
-
43
-
44
-
45
-
46
-
47
-
48
-
49
-
50
-
51
-
52
-
53
-
54
-
55
-
56
-
57
-
58
-
59
-
60
-
61
-
62
-
 63
63 -
 64
64 -
 65
65 -
 66
66 -
 67
67 -
 68
68 -
 69
69 -
 70
70 -
 71
71 -
 72
72 -
 73
73 -
74
-
75
-
76
-
77
-
78
-
79
-
80
-
81
-
82
-
83
-
84
-
85
-
86
-
87
-
88
-
89
-
90
-
91
-
92
-
93
-
94
-
95
-
96
-
97
-
98
-
99
-
100
-
101
-
102
-
103
-
104
-
105
-
106
-
107
-
108
-
109
-
110
-
111
-
112
-
113
-
114
-
115
-
116
-
117
-
118
-
119
-
120
-
121
-
122
-
123
-
124
-
125
-
126
-
127
-
128
-
129
-
130
-
131
-
132
-
133
-
134
-
135
-
136
-
137
-
138
-
139
-
140
-
141
-
142
-
143
-
144
-
145
-
146
-
147
-
148
-
149
-
150
-
151
-
152
-
153
-
154
-
155
-
156
 |
 |
