Samsung HMX-S10BN User Manual (user Manual) (ver.1.0) (English, Chinese) - Page 70
Setting the Macro Mode
 |
UPC - 036725303263
View all Samsung HMX-S10BN manuals
Add to My Manuals
Save this manual to your list of manuals |
Page 70 highlights
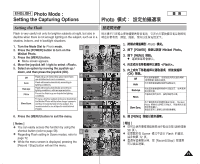
ENGLISH Photo Mode : Setting the Capturing Options Photo Setting the Macro Mode 23 Macro mode allows users to have a fine focused image of a close-up subject within 50 cm. 1. Turn the Mode Dial to Photo mode. 2 Press the [POWER] button to turn on the Miniket Photo. 3 3. Press the [MENU] button. N Menu screen appears. 4. Move the joystick left / right to select . 5. Select an option by moving the joystick up / down, and then press the joystick (OK). 2592 Photo 23 23 23 IN Macro Setting Focus Range 50 cm ~ ∞ W: 10 cm ~ ∞ T: 30 cm ~ ∞ 4 W: 1 cm ~ 5 cm 6. Press the [MENU] button to exit the menu. [ Notes ] ✤ You can easily access this function by using the shortcut button (refer to page 59). ✤ Flash setting is not available when you set the Macro mode to . ✤ Zooming is not available when you set the Macro 5 mode to . ✤ is only available when the zoom is positioned to W end. ✤ When you use Macro mode and record a close-up subject, be careful not to shade your subject. ✤ As the distance gets closer, the focused area gets narrower. ✤ If the focus will not set, try to put more distance between you and the subject. 6 ✤ It is recommended to use a tripod to avoid unstable picture taking and have best results. ✤ Regarding Macro setting in Scene modes, refer to page 72. ✤ While the menu screen is displayed, pressing the [Record / Stop] button will exit the menu. 70 Macro Photo Photo Macro PMhoatcoro MOoffve Select MacroMacro Super Macro Move Select PhMoovtoe OK Select Exit Exit MENU Exit MMPoahvcoertoo Select Exit Photo Macro Off Macro MaPcrhooto MSouvpeer MacroSelect Macro Move OK Select Exit MENU Exit Move 2592 Move Select 23 IN 23 Select 23 Exit Exit 23 50 1. Photo 2. [POWER] 3. [MENU] 0 N 0 4. 5. 0 0 0 Miniket Photo0 0 (OK) 50 ~ ∞ W 10 ~ ∞ T 30 ~ ∞ W 1 ~5 6. [MENU] 0 [ ] ✤ 0 ✤ Macro 0 ✤ Macro 0 ✤ 0 ✤ 0 ✤ ✤ ✤ 0 ✤ Scene 72 0 ✤ 0 59 W 0 0 Macro [Record/Stop]
-
 1
1 -
2
-
3
-
4
-
5
-
6
-
7
-
8
-
9
-
10
-
11
-
12
-
13
-
14
-
15
-
16
-
17
-
18
-
19
-
20
-
21
-
22
-
23
-
24
-
25
-
26
-
27
-
28
-
29
-
30
-
31
-
32
-
33
-
34
-
35
-
36
-
37
-
38
-
39
-
40
-
41
-
42
-
43
-
44
-
45
-
46
-
47
-
48
-
49
-
50
-
51
-
52
-
53
-
54
-
55
-
56
-
57
-
58
-
59
-
60
-
61
-
62
-
63
-
64
-
 65
65 -
 66
66 -
 67
67 -
 68
68 -
 69
69 -
 70
70 -
 71
71 -
 72
72 -
 73
73 -
 74
74 -
 75
75 -
76
-
77
-
78
-
79
-
80
-
81
-
82
-
83
-
84
-
85
-
86
-
87
-
88
-
89
-
90
-
91
-
92
-
93
-
94
-
95
-
96
-
97
-
98
-
99
-
100
-
101
-
102
-
103
-
104
-
105
-
106
-
107
-
108
-
109
-
110
-
111
-
112
-
113
-
114
-
115
-
116
-
117
-
118
-
119
-
120
-
121
-
122
-
123
-
124
-
125
-
126
-
127
-
128
-
129
-
130
-
131
-
132
-
133
-
134
-
135
-
136
-
137
-
138
-
139
-
140
-
141
-
142
-
143
-
144
-
145
-
146
-
147
-
148
-
149
-
150
-
151
-
152
-
153
-
154
-
155
-
156
 |
 |
