Samsung HMX-S10BN User Manual (user Manual) (ver.1.0) (English, Chinese) - Page 71
Setting the Flash
 |
UPC - 036725303263
View all Samsung HMX-S10BN manuals
Add to My Manuals
Save this manual to your list of manuals |
Page 71 highlights
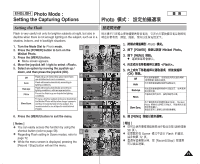
ENGLISH Photo Mode : Setting the Capturing Options Photo Setting the Flash 23 Flash is very useful not only for brighter subjects at night, but also in daytime when there is not enough lighting on the subject, such as in a shadow, indoors, and in backlight situations. 23 1. Turn the Mode Dial to Photo mode. 2. Press the [POWER] button to turn on the 3 2592 2233 IN Miniket Photo. 3. Press the [MENU] button. N Menu screen appears. Photo 4. Move the joystick left / right to select . 5. Select an option by moving the joystick up / down, and then press the joystick (OK). Off Flash will go off. Select this option when flash 4 use is limited such as in a museum. Auto Flash will be set automatically according to lighting conditions. Red-eye Flash will be set automatically according to lighting conditions, with red-eye reduction. Fill-in Forces the flash to go on despite the lighting conditions. To have a brighter subject and scene (backdrop), the Miniket Photo will first allow longer exposure Slow Sync. and then throws the flash on the subject. It is 5 recommended to use a tripod to avoid blurred images. Flash Photo PhFolatosh Photo Flash OMffovFelash Auto ReMdo-veeye Fill-in Select Select Exit Exit PMhovoeto OK Select MENU Exit MPoFhvoleatsoh Select Exit PhFolatosh Off 6. Press the [MENU] button to exit the menu. [ Notes ] ✤ You can easily access this function by using the AuPtohFolatosh Red-eye FMillo-ivne Flash Select Move OK Select Exit MENU Exit shortcut button (refer to page 58). 6 Move ✤ Regarding Flash setting in Scene modes, refer to 2592 page 72. Move ✤ While the menu screen is displayed, pressing the S2e3lect IN 23 Select 23 Exit Exit [Record / Stop] button will exit the menu. 23 / 0 1. Photo 0 2. [POWER] Miniket Photo0 3. [MENU] 0 N 0 4. 0 5. (OK) 0 Off Auto 0 0 0 Red-eye 0 Fill-in Photo Slow Sync. 0 0 Miniket 0 6. [MENU] 0 [ ] ✤ 58 ✤ ✤ 0 Scene 72 0 0 Flash [Record/Stop] 71
-
 1
1 -
2
-
3
-
4
-
5
-
6
-
7
-
8
-
9
-
10
-
11
-
12
-
13
-
14
-
15
-
16
-
17
-
18
-
19
-
20
-
21
-
22
-
23
-
24
-
25
-
26
-
27
-
28
-
29
-
30
-
31
-
32
-
33
-
34
-
35
-
36
-
37
-
38
-
39
-
40
-
41
-
42
-
43
-
44
-
45
-
46
-
47
-
48
-
49
-
50
-
51
-
52
-
53
-
54
-
55
-
56
-
57
-
58
-
59
-
60
-
61
-
62
-
63
-
64
-
65
-
 66
66 -
 67
67 -
 68
68 -
 69
69 -
 70
70 -
 71
71 -
 72
72 -
 73
73 -
 74
74 -
 75
75 -
 76
76 -
77
-
78
-
79
-
80
-
81
-
82
-
83
-
84
-
85
-
86
-
87
-
88
-
89
-
90
-
91
-
92
-
93
-
94
-
95
-
96
-
97
-
98
-
99
-
100
-
101
-
102
-
103
-
104
-
105
-
106
-
107
-
108
-
109
-
110
-
111
-
112
-
113
-
114
-
115
-
116
-
117
-
118
-
119
-
120
-
121
-
122
-
123
-
124
-
125
-
126
-
127
-
128
-
129
-
130
-
131
-
132
-
133
-
134
-
135
-
136
-
137
-
138
-
139
-
140
-
141
-
142
-
143
-
144
-
145
-
146
-
147
-
148
-
149
-
150
-
151
-
152
-
153
-
154
-
155
-
156
 |
 |
