Samsung SPH-M320 User Manual (user Manual) (ver.f6) (English) - Page 96
In Camera Folder Options, Saved to Phone Folder - memory card
 |
View all Samsung SPH-M320 manuals
Add to My Manuals
Save this manual to your list of manuals |
Page 96 highlights
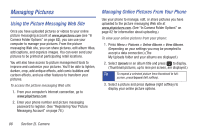
In Camera Folder Options When you are viewing the In Camera folder, press Options (right softkey) to display the following options: ⅷ Upload to upload pictures to the picture messaging Web site (www.plspictures.com). (Depending on your settings, you may be prompted to accept a data connection.) Choose from the following options: Ⅲ Upload This to upload the currently highlighted picture. Ⅲ Upload Selection to upload the previously selected items. Press to select an item. (The check box on the upper left corner of the image will be marked.) Ⅲ Upload All to upload all pictures in the In Camera folder. Note If this is the first time you have accessed picture messaging, you will be prompted to register your picture messaging account. See "Registering Your Picture Messaging Account" on page 78. ⅷ Assign to assign the current image as a Picture ID, Screen Saver, or Incoming Call. ⅷ Save To Phone to save images from the In Camera folder into the phone memory for use in assigning images to contacts, screen savers, etc. ⅷ Edit Caption to edit the title associated with the image. ⅷ Erase to erase the image or selected images. Note Deleting pictures will free up memory space in your phone to enable you to take more pictures. Once deleted, pictures cannot be uploaded to your online picture messaging account. ⅷ Picture Info to display the list of albums saved in your phone. ⅷ Camera Mode to switch back to the camera mode. ⅷ Expand to enlarge the image so that it is displayed on the entire screen. ⅷ Send Pic to attach the picture to an outgoing message. Saved to Phone Folder Once a picture is taken, it is automatically saved to the In Camera folder, but the picture can then be moved to a separate My Pictures subfolder called Saved to Phone. From this folder, you can also view all of the pictures you have saved, store additional images into this folder, send pictures to the picture messaging Web site (www.plspictures.com, delete images, and access additional picture options. Note The Saved to Phone folder is a separate storage location from the In Camera folder, and it is similar to the Memory Card folder found on some other phones. 82 Section 2I. Camera
-
 1
1 -
2
-
3
-
4
-
5
-
6
-
7
-
8
-
9
-
10
-
11
-
12
-
13
-
14
-
15
-
16
-
17
-
18
-
19
-
20
-
21
-
22
-
23
-
24
-
25
-
26
-
27
-
28
-
29
-
30
-
31
-
32
-
33
-
34
-
35
-
36
-
37
-
38
-
39
-
40
-
41
-
42
-
43
-
44
-
45
-
46
-
47
-
48
-
49
-
50
-
51
-
52
-
53
-
54
-
55
-
56
-
57
-
58
-
59
-
60
-
61
-
62
-
63
-
64
-
65
-
66
-
67
-
68
-
69
-
70
-
71
-
72
-
73
-
74
-
75
-
76
-
77
-
78
-
79
-
80
-
81
-
82
-
83
-
84
-
85
-
86
-
87
-
88
-
89
-
90
-
 91
91 -
 92
92 -
 93
93 -
 94
94 -
 95
95 -
 96
96 -
 97
97 -
 98
98 -
 99
99 -
 100
100 -
 101
101 -
102
-
103
-
104
-
105
-
106
-
107
-
108
-
109
-
110
-
111
-
112
-
113
-
114
-
115
-
116
-
117
-
118
-
119
-
120
-
121
-
122
-
123
-
124
-
125
-
126
-
127
-
128
-
129
-
130
-
131
-
132
-
133
-
134
-
135
-
136
-
137
-
138
-
139
-
140
-
141
-
142
-
143
-
144
-
145
-
146
-
147
 |
 |