3Com 3C63311 Reference Guide - Page 108
Frame Length, Max. Link Delay, Min Tx/Rx Startup Ports, IMA ID, Test Link, Test Pattern
 |
View all 3Com 3C63311 manuals
Add to My Manuals
Save this manual to your list of manuals |
Page 108 highlights
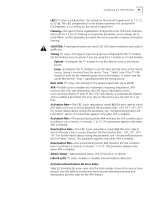
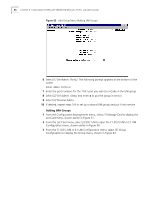
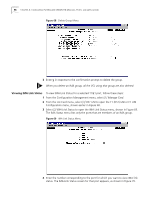
96 CHAPTER 4: CONFIGURING PATHBUILDER S330/S310 MODULES, PORTS, AND APPLICATIONS Figure 66 Add Group Menu (Adding IMA Group) 6 Select [1] Set Admin. Port(s). The following prompt appears at the bottom of the screen: Enter Admin Port(s) (1..4): 7 Enter the port numbers for the T1/E1 ports you want to include in the group. You can use a hyphen to indicate a range of ports. For example, to include ports 1-3 in a group you could enter 1-3. 8 Specify any of the following information (by selecting the appropriate options and responding to the prompts that appear at the bottom of the screen) to configure the IMA group. Frame Length-The frame length: 32, 64, 128, 256. Max. Link Delay-The maximum link differential delay allowed in the group: 0 to 70 msec. Min Tx/Rx Startup Ports-The minimum number of ports in the group that must be operational in order for the group to come up: 1 to n, where n is the number of ports in the group. Min Tx/Rx Oper. Ports-The minimum number of ports in the group that must be operational in order for the group to come up and be operational: 1 to n, where n is the number of ports in the group. IMA ID-A user-selected number to identify the IMA group. Test Link-The port number of the link that is to perform the test procedure. Test Pattern-The pattern to be looped back in the test procedure: 0-254. Test Procedure-Enables or disables the test procedure. When the test procedure is enabled, the test pattern is sent out on the designated test link and then looped back on the other links in the group. Admin Status-The administrative status of the group: In Service or Out of Service. 9 Select [11] Previous Menu. 10 If desired, repeat steps 5-8 to set up another IMA group.
-
 1
1 -
2
-
3
-
4
-
5
-
6
-
7
-
8
-
9
-
10
-
11
-
12
-
13
-
14
-
15
-
16
-
17
-
18
-
19
-
20
-
21
-
22
-
23
-
24
-
25
-
26
-
27
-
28
-
29
-
30
-
31
-
32
-
33
-
34
-
35
-
36
-
37
-
38
-
39
-
40
-
41
-
42
-
43
-
44
-
45
-
46
-
47
-
48
-
49
-
50
-
51
-
52
-
53
-
54
-
55
-
56
-
57
-
58
-
59
-
60
-
61
-
62
-
63
-
64
-
65
-
66
-
67
-
68
-
69
-
70
-
71
-
72
-
73
-
74
-
75
-
76
-
77
-
78
-
79
-
80
-
81
-
82
-
83
-
84
-
85
-
86
-
87
-
88
-
89
-
90
-
91
-
92
-
93
-
94
-
95
-
96
-
97
-
98
-
99
-
100
-
101
-
102
-
 103
103 -
 104
104 -
 105
105 -
 106
106 -
 107
107 -
 108
108 -
 109
109 -
 110
110 -
 111
111 -
 112
112 -
 113
113 -
114
-
115
-
116
-
117
-
118
-
119
-
120
-
121
-
122
-
123
-
124
-
125
-
126
-
127
-
128
-
129
-
130
-
131
-
132
-
133
-
134
-
135
-
136
-
137
-
138
-
139
-
140
-
141
-
142
-
143
-
144
-
145
-
146
-
147
-
148
-
149
-
150
-
151
-
152
-
153
-
154
-
155
-
156
-
157
-
158
-
159
-
160
-
161
-
162
-
163
-
164
-
165
-
166
-
167
-
168
-
169
-
170
-
171
-
172
-
173
-
174
-
175
-
176
-
177
-
178
-
179
-
180
-
181
-
182
-
183
-
184
-
185
-
186
-
187
-
188
-
189
-
190
-
191
-
192
-
193
-
194
-
195
-
196
-
197
-
198
-
199
-
200
-
201
-
202
-
203
-
204
-
205
-
206
-
207
-
208
-
209
-
210
-
211
-
212
-
213
-
214
-
215
-
216
-
217
-
218
-
219
-
220
-
221
-
222
-
223
-
224
-
225
-
226
-
227
-
228
-
229
-
230
-
231
-
232
-
233
-
234
-
235
-
236
-
237
-
238
-
239
-
240
-
241
-
242
-
243
-
244
-
245
-
246
-
247
-
248
-
249
-
250
-
251
-
252
-
253
-
254
-
255
-
256
-
257
-
258
-
259
-
260
-
261
-
262
 |
 |
