3Com 3C63311 Reference Guide - Page 174
Viewing the Video Call Routing Table, display the Manually Disconnect A Site menu
 |
View all 3Com 3C63311 manuals
Add to My Manuals
Save this manual to your list of manuals |
Page 174 highlights
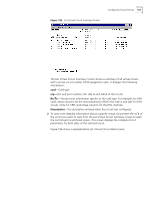
162 CHAPTER 4: CONFIGURING PATHBUILDER S330/S310 MODULES, PORTS, AND APPLICATIONS 3 Select [1] Set Destination Pone # and enter the phone number of the site to which you want to connect. 4 Select [2] Set Connection. The session begins as soon as the software matches the phone number you entered in step 3 to one of the numbers on the call routing table (one of the numbers associated with an RS366 virtual circuit template). Ending Video Dial-up Sessions A video dial-up session ends (disconnects) automatically when the video call is disconnected. You can also end (disconnect) a video dial-up session via the PathBuilder S330/S310 interface. To do this, follow these steps: 1 From the Configuration Management menu, select [4] Manage Video Dial to display the Manage Video Dial menu, shown earlier in Figure 129. 2 From the Manage Video Dial menu, select [3] Manually Disconnect A Site to display the Manually Disconnect A Site menu, shown in Figure 131. The destination phone number for the current session and the current connection status are displayed at the top of the menu. Figure 131 Manually Disconnect A Site Menu Check that a destination phone number and a current connection status of active are listed at the top of the Manually Disconnect A Site menu. If there is no active connection, your disconnect request will be rejected by the system. 3 Select [1] Set Disconnect to end the dial-up session. Viewing the Video Call Routing Table You build the video call routing table as you create video-associated virtual circuits between PathBuilder S330/S310 CBR modules. When you enter a number-either from a video keypad or from the Manually Connect A Site menu-to start a video dial-up session, the system checks the number you enter against the call routing table and makes a connection if it finds a match.
-
 1
1 -
2
-
3
-
4
-
5
-
6
-
7
-
8
-
9
-
10
-
11
-
12
-
13
-
14
-
15
-
16
-
17
-
18
-
19
-
20
-
21
-
22
-
23
-
24
-
25
-
26
-
27
-
28
-
29
-
30
-
31
-
32
-
33
-
34
-
35
-
36
-
37
-
38
-
39
-
40
-
41
-
42
-
43
-
44
-
45
-
46
-
47
-
48
-
49
-
50
-
51
-
52
-
53
-
54
-
55
-
56
-
57
-
58
-
59
-
60
-
61
-
62
-
63
-
64
-
65
-
66
-
67
-
68
-
69
-
70
-
71
-
72
-
73
-
74
-
75
-
76
-
77
-
78
-
79
-
80
-
81
-
82
-
83
-
84
-
85
-
86
-
87
-
88
-
89
-
90
-
91
-
92
-
93
-
94
-
95
-
96
-
97
-
98
-
99
-
100
-
101
-
102
-
103
-
104
-
105
-
106
-
107
-
108
-
109
-
110
-
111
-
112
-
113
-
114
-
115
-
116
-
117
-
118
-
119
-
120
-
121
-
122
-
123
-
124
-
125
-
126
-
127
-
128
-
129
-
130
-
131
-
132
-
133
-
134
-
135
-
136
-
137
-
138
-
139
-
140
-
141
-
142
-
143
-
144
-
145
-
146
-
147
-
148
-
149
-
150
-
151
-
152
-
153
-
154
-
155
-
156
-
157
-
158
-
159
-
160
-
161
-
162
-
163
-
164
-
165
-
166
-
167
-
168
-
 169
169 -
 170
170 -
 171
171 -
 172
172 -
 173
173 -
 174
174 -
 175
175 -
 176
176 -
 177
177 -
 178
178 -
 179
179 -
180
-
181
-
182
-
183
-
184
-
185
-
186
-
187
-
188
-
189
-
190
-
191
-
192
-
193
-
194
-
195
-
196
-
197
-
198
-
199
-
200
-
201
-
202
-
203
-
204
-
205
-
206
-
207
-
208
-
209
-
210
-
211
-
212
-
213
-
214
-
215
-
216
-
217
-
218
-
219
-
220
-
221
-
222
-
223
-
224
-
225
-
226
-
227
-
228
-
229
-
230
-
231
-
232
-
233
-
234
-
235
-
236
-
237
-
238
-
239
-
240
-
241
-
242
-
243
-
244
-
245
-
246
-
247
-
248
-
249
-
250
-
251
-
252
-
253
-
254
-
255
-
256
-
257
-
258
-
259
-
260
-
261
-
262
 |
 |
