Canon PowerShot G5 X Camera User Guide - Page 150
Image Sending Options
 |
View all Canon PowerShot G5 X manuals
Add to My Manuals
Save this manual to your list of manuals |
Page 150 highlights
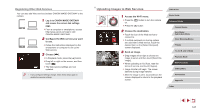
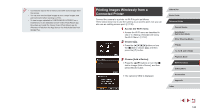
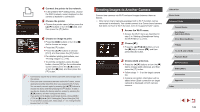
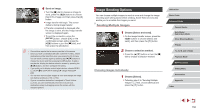
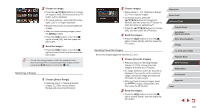
4 Send an image. zzTurn the [ ] dial to choose an image to send, press the [ ][ ] buttons to choose [Send this image], and then press the [ ] button. zzImage transfer will begin. The screen darkens during image transfer. zz[Transfer completed] is displayed after the image is sent, and the image transfer screen is displayed again. zzTo end the connection, press the [ ] button, choose [OK] on the confirmation screen (either press the [ ][ ] buttons or turn the [ ] dial), and then press the [ ] button. ●● Connections require that a memory card be in the camera. ●● Once you have connected to devices via the Wi-Fi menu, recent destinations will be listed first when you access the Wi-Fi menu. You can easily connect again by pressing the [ ][ ] buttons to choose the device and then pressing the [ ] button. To add a new device, display the device selection screen by pressing the [ ][ ] buttons, and then configure the setting. ●● If you prefer not to display recent target devices, choose MENU (=31) ► [ 4] tab ► [Wi-Fi Settings] ► [Target History] ► [Off]. ●● You can also send multiple images at once and change the image size before sending (=150, =152). ●● Once a connection destination is assigned in Touch Actions (=122), you can automatically reconnect to a previous destination simply by dragging across the screen with the assigned gesture. Image Sending Options You can choose multiple images to send at once and change the image recording pixel setting (size) before sending. Some Web services also enable you to annotate the images you send. Sending Multiple Images 1 Choose [Select and send]. zzOn the image transfer screen, press the [ ][ ] buttons to choose [Select and send], and then press the [ ] button. 2 Choose a selection method. zzPress the [ ][ ] buttons or turn the [ ] dial to choose a selection method. Choosing Images Individually 1 Choose [Select]. zzFollowing step 2 in "Sending Multiple Images" (=150), choose [Select] and press the [ ] button. Before Use Basic Guide Advanced Guide Camera Basics Auto Mode / Hybrid Auto Mode Other Shooting Modes P Mode Tv, Av, M, and C Mode Playback Mode Wi-Fi Functions Setting Menu Accessories Appendix Index 150
-
 1
1 -
2
-
3
-
4
-
5
-
6
-
7
-
8
-
9
-
10
-
11
-
12
-
13
-
14
-
15
-
16
-
17
-
18
-
19
-
20
-
21
-
22
-
23
-
24
-
25
-
26
-
27
-
28
-
29
-
30
-
31
-
32
-
33
-
34
-
35
-
36
-
37
-
38
-
39
-
40
-
41
-
42
-
43
-
44
-
45
-
46
-
47
-
48
-
49
-
50
-
51
-
52
-
53
-
54
-
55
-
56
-
57
-
58
-
59
-
60
-
61
-
62
-
63
-
64
-
65
-
66
-
67
-
68
-
69
-
70
-
71
-
72
-
73
-
74
-
75
-
76
-
77
-
78
-
79
-
80
-
81
-
82
-
83
-
84
-
85
-
86
-
87
-
88
-
89
-
90
-
91
-
92
-
93
-
94
-
95
-
96
-
97
-
98
-
99
-
100
-
101
-
102
-
103
-
104
-
105
-
106
-
107
-
108
-
109
-
110
-
111
-
112
-
113
-
114
-
115
-
116
-
117
-
118
-
119
-
120
-
121
-
122
-
123
-
124
-
125
-
126
-
127
-
128
-
129
-
130
-
131
-
132
-
133
-
134
-
135
-
136
-
137
-
138
-
139
-
140
-
141
-
142
-
143
-
144
-
 145
145 -
 146
146 -
 147
147 -
 148
148 -
 149
149 -
 150
150 -
 151
151 -
 152
152 -
 153
153 -
 154
154 -
 155
155 -
156
-
157
-
158
-
159
-
160
-
161
-
162
-
163
-
164
-
165
-
166
-
167
-
168
-
169
-
170
-
171
-
172
-
173
-
174
-
175
-
176
-
177
-
178
-
179
-
180
-
181
-
182
-
183
-
184
-
185
-
186
-
187
-
188
-
189
-
190
-
191
-
192
-
193
-
194
-
195
-
196
-
197
-
198
-
199
-
200
-
201
-
202
-
203
-
204
-
205
-
206
-
207
-
208
-
209
-
210
-
211
-
212
-
213
-
214
-
215
-
216
-
217
 |
 |
