Canon PowerShot G5 X Camera User Guide - Page 170
Using Optional Accessories
 |
View all Canon PowerShot G5 X manuals
Add to My Manuals
Save this manual to your list of manuals |
Page 170 highlights
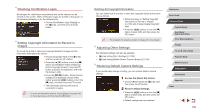
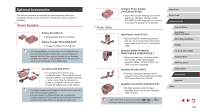
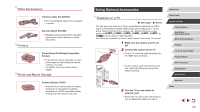
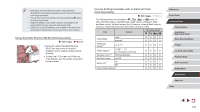
Other Accessories Interface Cable IFC-600PCU zzFor connecting the camera to a computer or printer. Printers Remote Switch RS-60E3 zzEnables remote shutter button operation (pressing the button halfway or all the way down). Canon-Brand PictBridge-Compatible Printers zzEven without using a computer, you can print images by connecting the camera directly to a printer. For details, visit your nearest Canon retailer. Photo and Movie Storage Connect Station CS100 ●●A media hub for storing camera images, viewing on a connected TV, printing wirelessly on a Wi-Fi-compatible printer, sharing over the Internet, and more. Using Optional Accessories Playback on a TV Still Images Movies You can view your shots on a TV by connecting the camera to an HDTV with a commercially available HDMI cable (not exceeding 2.5 m / 8.2 ft., with a Type D terminal on the camera end). Movies shot at an image quality of [ ], [ ], [ ], [ ], [ ], [ ], or [ ] can be viewed in high definition. For details on connection or how to switch inputs, refer to the TV manual. 1 Make sure the camera and TV are off. 2 Connect the camera to the TV. zzOn the TV, insert the cable plug fully into the HDMI input as shown. zzOn the camera, open the terminal cover and insert the cable plug fully into the camera terminal. 3 Turn the TV on and switch to external input. zzSwitch the TV input to the external input you connected the cable to in step 2. Before Use Basic Guide Advanced Guide Camera Basics Auto Mode / Hybrid Auto Mode Other Shooting Modes P Mode Tv, Av, M, and C Mode Playback Mode Wi-Fi Functions Setting Menu Accessories Appendix Index 170
-
 1
1 -
2
-
3
-
4
-
5
-
6
-
7
-
8
-
9
-
10
-
11
-
12
-
13
-
14
-
15
-
16
-
17
-
18
-
19
-
20
-
21
-
22
-
23
-
24
-
25
-
26
-
27
-
28
-
29
-
30
-
31
-
32
-
33
-
34
-
35
-
36
-
37
-
38
-
39
-
40
-
41
-
42
-
43
-
44
-
45
-
46
-
47
-
48
-
49
-
50
-
51
-
52
-
53
-
54
-
55
-
56
-
57
-
58
-
59
-
60
-
61
-
62
-
63
-
64
-
65
-
66
-
67
-
68
-
69
-
70
-
71
-
72
-
73
-
74
-
75
-
76
-
77
-
78
-
79
-
80
-
81
-
82
-
83
-
84
-
85
-
86
-
87
-
88
-
89
-
90
-
91
-
92
-
93
-
94
-
95
-
96
-
97
-
98
-
99
-
100
-
101
-
102
-
103
-
104
-
105
-
106
-
107
-
108
-
109
-
110
-
111
-
112
-
113
-
114
-
115
-
116
-
117
-
118
-
119
-
120
-
121
-
122
-
123
-
124
-
125
-
126
-
127
-
128
-
129
-
130
-
131
-
132
-
133
-
134
-
135
-
136
-
137
-
138
-
139
-
140
-
141
-
142
-
143
-
144
-
145
-
146
-
147
-
148
-
149
-
150
-
151
-
152
-
153
-
154
-
155
-
156
-
157
-
158
-
159
-
160
-
161
-
162
-
163
-
164
-
 165
165 -
 166
166 -
 167
167 -
 168
168 -
 169
169 -
 170
170 -
 171
171 -
 172
172 -
 173
173 -
 174
174 -
 175
175 -
176
-
177
-
178
-
179
-
180
-
181
-
182
-
183
-
184
-
185
-
186
-
187
-
188
-
189
-
190
-
191
-
192
-
193
-
194
-
195
-
196
-
197
-
198
-
199
-
200
-
201
-
202
-
203
-
204
-
205
-
206
-
207
-
208
-
209
-
210
-
211
-
212
-
213
-
214
-
215
-
216
-
217
 |
 |
