Dell 1815dn User's Guide - Page 104
Scanning Using Network Scan - cannot add network scanner
 |
UPC - 000061100008
View all Dell 1815dn manuals
Add to My Manuals
Save this manual to your list of manuals |
Page 104 highlights
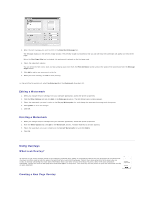
OR Place a single document face down on the document glass. For details about loading a document, see "Loading an Original Document". 2. Press Scroll ( or ) to highlight Scan and press Select ( ). 3. Press Scroll ( or ) to highlight PC and press Select ( ). 4. Press Scroll ( or ) to select an application to which you want to send the scanned image. The default applications are MS Paint, Email, My Documents, PaperPort, and OCR. l MS Paint: Sends the scanned image to Microsoft Paint. l Email: Sends the scanned image to your default email program on the computer. A new message window opens with the image attached. l My Documents: Saves the scanned image in the My Documents folder on the computer. l PaperPort: Sends the scanned image to PaperPort. l OCR: Sends the scanned image to OCR. NOTE: The operator panel's application list supports up to 30 applications and is only displayed in English. NOTE: You can add more TWAIN-compliant software for scanning, such as Adobe Photoshop Deluxe, or Adobe Photoshop, from the Printer Setting Utility. See "The Destination Section". 5. Press Start ( ). The selected application window opens. Adjust the scan settings and start scan. For details, refer to the user's guide of the application. Scanning Using Network Scan About Network Scan Network Scan enables you to scan a document on your printer as a JPEG, TIFF or PDF and save it to a network-connected computer. To use this feature, you must install Network Scan on your computer. Adding a User To register yourself as an authorized Network Scan user, follow the instructions in the Dell Network Scan Manager screens. 1. Click the Add Device button. 2. Click Next. 3. Specify the network scanner you want to use by browsing or by providing an IP address to connect directly to a scanner. For more information on using an IP address, see "Adding a Scanner". Click Next. 4. Enter your ID and Personal Identification Number(PIN) and click Next. Removing a User To remove an authorized user, click the Remove Device button and follow the on-screen instructions to complete removal. NOTE: Use the Help button to see on-line help about Network Scan. Scanning Using Network Scan Using Network Scan you can scan a document from your printer to your computer through the network. 1. Load the document you want to scan in either the ADF or on the document scan glass. 2. Press Scroll ( or ) to highlight Scan and press Select ( ). 3. Press Scroll ( or ) to highlight Network and press Select ( ).
-
 1
1 -
2
-
3
-
4
-
5
-
6
-
7
-
8
-
9
-
10
-
11
-
12
-
13
-
14
-
15
-
16
-
17
-
18
-
19
-
20
-
21
-
22
-
23
-
24
-
25
-
26
-
27
-
28
-
29
-
30
-
31
-
32
-
33
-
34
-
35
-
36
-
37
-
38
-
39
-
40
-
41
-
42
-
43
-
44
-
45
-
46
-
47
-
48
-
49
-
50
-
51
-
52
-
53
-
54
-
55
-
56
-
57
-
58
-
59
-
60
-
61
-
62
-
63
-
64
-
65
-
66
-
67
-
68
-
69
-
70
-
71
-
72
-
73
-
74
-
75
-
76
-
77
-
78
-
79
-
80
-
81
-
82
-
83
-
84
-
85
-
86
-
87
-
88
-
89
-
90
-
91
-
92
-
93
-
94
-
95
-
96
-
97
-
98
-
 99
99 -
 100
100 -
 101
101 -
 102
102 -
 103
103 -
 104
104 -
 105
105 -
 106
106 -
 107
107 -
 108
108 -
 109
109 -
110
-
111
-
112
-
113
-
114
-
115
-
116
-
117
-
118
-
119
-
120
-
121
-
122
-
123
-
124
-
125
-
126
-
127
-
128
-
129
-
130
-
131
-
132
-
133
-
134
-
135
-
136
-
137
-
138
-
139
-
140
-
141
-
142
-
143
-
144
-
145
-
146
-
147
-
148
 |
 |