Dell OptiPlex GX260 User Guide - Page 24
System Setup Options, Changing Boot Sequence for Future Boots - restore
 |
View all Dell OptiPlex GX260 manuals
Add to My Manuals
Save this manual to your list of manuals |
Page 24 highlights
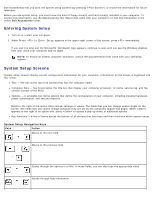
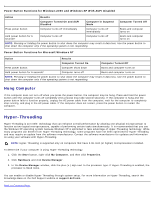
1. Turn on or restart your computer. 2. When F2 = Setup appears in the upper-right corner of the screen, press . The Boot Device Menu appears, listing all available boot devices. Each device has a number next to it. At the bottom of the menu, enter the number of the device that is to be used for the current boot only. Changing Boot Sequence for Future Boots 1. Enter system setup. 2. Use the arrow keys to highlight the Boot Sequence menu option and press to access the pop-up menu. NOTE: Write down your current boot sequence in case you want to restore it. 3. Press the up- and down-arrow keys to move through the list of devices. 4. Press the spacebar to enable or disable a device (enabled devices have a checkmark). 5. Press plus (+) or minus (-) to move a selected device up or down the list. System Setup Options AC Power Recovery- Determines what happens when AC power is restored to the computer Off - Computer remains off when AC power is restored On - Computer starts when AC power is restored Last - Computer returns to the AC power state existing at the time that AC power was lost Asset Tag- Displays the customer-programmable asset tag number for the computer if an asset tag number is assigned- Auto Power On- Sets time and days of week to turn on the computer automatically. Choices are every day or every Monday through Friday. Time is kept in a 24-hour format (hours:minutes). Change the start-up time by pressing the right- or leftarrow keys to increase or decrease the numbers or type numbers in both the date and time fields. Disabled is the default. This feature does not work if you turn off your computer using a power strip or surge protector. CPU ID- Manufacturer's identification code for the installed microprocessor CPU Information CPU Speed - Processor speed at which the computer boots Press the left- or right-arrow key to toggle the CPU Speed option between the resident microprocessor's rated speed (the default) and a lower compatibility speed. A change to this option takes effect immediately (no restart is necessary). To toggle between the rated processor speed and the compatibility speed while the computer is running in real mode, press . (For keyboards that do not use American English, press .) Bus Speed - Speed of the microprocessor's system bus Processor ID - Manufacturer's identification code(s) for the installed microprocessor Clock Speed - Core speed at which the microprocessor(s) operates Cache Size - Size of the microprocessor's L2 cache Diskette Drive A- Type of floppy drive(s) installed in the computer. With the standard cabling configuration,
-
 1
1 -
2
-
3
-
4
-
5
-
6
-
7
-
8
-
9
-
10
-
11
-
12
-
13
-
14
-
15
-
16
-
17
-
18
-
 19
19 -
 20
20 -
 21
21 -
 22
22 -
 23
23 -
 24
24 -
 25
25 -
 26
26 -
 27
27 -
 28
28 -
 29
29 -
30
-
31
-
32
-
33
-
34
-
35
-
36
-
37
-
38
-
39
-
40
-
41
-
42
-
43
-
44
-
45
-
46
-
47
-
48
-
49
-
50
-
51
-
52
-
53
-
54
-
55
-
56
-
57
-
58
-
59
-
60
-
61
-
62
-
63
-
64
-
65
-
66
-
67
-
68
-
69
-
70
-
71
-
72
-
73
-
74
-
75
-
76
-
77
-
78
-
79
-
80
-
81
-
82
-
83
-
84
-
85
-
86
-
87
-
88
-
89
-
90
-
91
-
92
-
93
-
94
-
95
-
96
-
97
-
98
-
99
-
100
-
101
-
102
-
103
-
104
-
105
-
106
-
107
-
108
-
109
-
110
-
111
-
112
-
113
-
114
-
115
-
116
-
117
-
118
-
119
-
120
-
121
-
122
-
123
-
124
-
125
-
126
-
127
-
128
-
129
-
130
-
131
-
132
-
133
-
134
-
135
-
136
-
137
-
138
-
139
-
140
-
141
-
142
-
143
-
144
-
145
-
146
-
147
-
148
-
149
-
150
-
151
-
152
-
153
-
154
-
155
-
156
-
157
-
158
-
159
-
160
-
161
-
162
-
163
-
164
-
165
-
166
-
167
-
168
-
169
-
170
-
171
-
172
-
173
-
174
-
175
-
176
-
177
-
178
-
179
-
180
-
181
-
182
-
183
-
184
-
185
-
186
-
187
-
188
-
189
-
190
-
191
-
192
-
193
-
194
-
195
-
196
-
197
-
198
-
199
-
200
-
201
-
202
-
203
-
204
-
205
-
206
-
207
-
208
-
209
-
210
-
211
-
212
-
213
-
214
-
215
-
216
-
217
-
218
-
219
-
220
-
221
-
222
-
223
-
224
-
225
-
226
-
227
-
228
-
229
-
230
-
231
-
232
-
233
-
234
-
235
 |
 |