Dell OptiPlex GX260 User Guide - Page 51
Removing a Serial Port Adapter
 |
View all Dell OptiPlex GX260 manuals
Add to My Manuals
Save this manual to your list of manuals |
Page 51 highlights
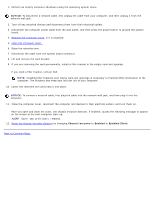
7. Remove the filler bracket. 8. Slide the card bracket down over the card slot opening, and ensure that the top of the card bracket is flush with the alignment bar and that the notch in the top of the card bracket fits around the alignment guide (see "Closing the Retention Arm"). 9. Attach the serial card cable to the connector on the system board (labeled SER2). Installing a Serial Port Adapter 1 SER2 system board connector 2 card bracket 3 serial card cable 4 card slot opening 10. Lower the retention arm into place, securing the card(s) in the computer (see "Closing the Retention Arm"). Removing a Serial Port Adapter CAUTION: Before you perform this procedure, see "CAUTION: Safety Instructions."
-
 1
1 -
2
-
3
-
4
-
5
-
6
-
7
-
8
-
9
-
10
-
11
-
12
-
13
-
14
-
15
-
16
-
17
-
18
-
19
-
20
-
21
-
22
-
23
-
24
-
25
-
26
-
27
-
28
-
29
-
30
-
31
-
32
-
33
-
34
-
35
-
36
-
37
-
38
-
39
-
40
-
41
-
42
-
43
-
44
-
45
-
 46
46 -
 47
47 -
 48
48 -
 49
49 -
 50
50 -
 51
51 -
 52
52 -
 53
53 -
 54
54 -
 55
55 -
 56
56 -
57
-
58
-
59
-
60
-
61
-
62
-
63
-
64
-
65
-
66
-
67
-
68
-
69
-
70
-
71
-
72
-
73
-
74
-
75
-
76
-
77
-
78
-
79
-
80
-
81
-
82
-
83
-
84
-
85
-
86
-
87
-
88
-
89
-
90
-
91
-
92
-
93
-
94
-
95
-
96
-
97
-
98
-
99
-
100
-
101
-
102
-
103
-
104
-
105
-
106
-
107
-
108
-
109
-
110
-
111
-
112
-
113
-
114
-
115
-
116
-
117
-
118
-
119
-
120
-
121
-
122
-
123
-
124
-
125
-
126
-
127
-
128
-
129
-
130
-
131
-
132
-
133
-
134
-
135
-
136
-
137
-
138
-
139
-
140
-
141
-
142
-
143
-
144
-
145
-
146
-
147
-
148
-
149
-
150
-
151
-
152
-
153
-
154
-
155
-
156
-
157
-
158
-
159
-
160
-
161
-
162
-
163
-
164
-
165
-
166
-
167
-
168
-
169
-
170
-
171
-
172
-
173
-
174
-
175
-
176
-
177
-
178
-
179
-
180
-
181
-
182
-
183
-
184
-
185
-
186
-
187
-
188
-
189
-
190
-
191
-
192
-
193
-
194
-
195
-
196
-
197
-
198
-
199
-
200
-
201
-
202
-
203
-
204
-
205
-
206
-
207
-
208
-
209
-
210
-
211
-
212
-
213
-
214
-
215
-
216
-
217
-
218
-
219
-
220
-
221
-
222
-
223
-
224
-
225
-
226
-
227
-
228
-
229
-
230
-
231
-
232
-
233
-
234
-
235
 |
 |
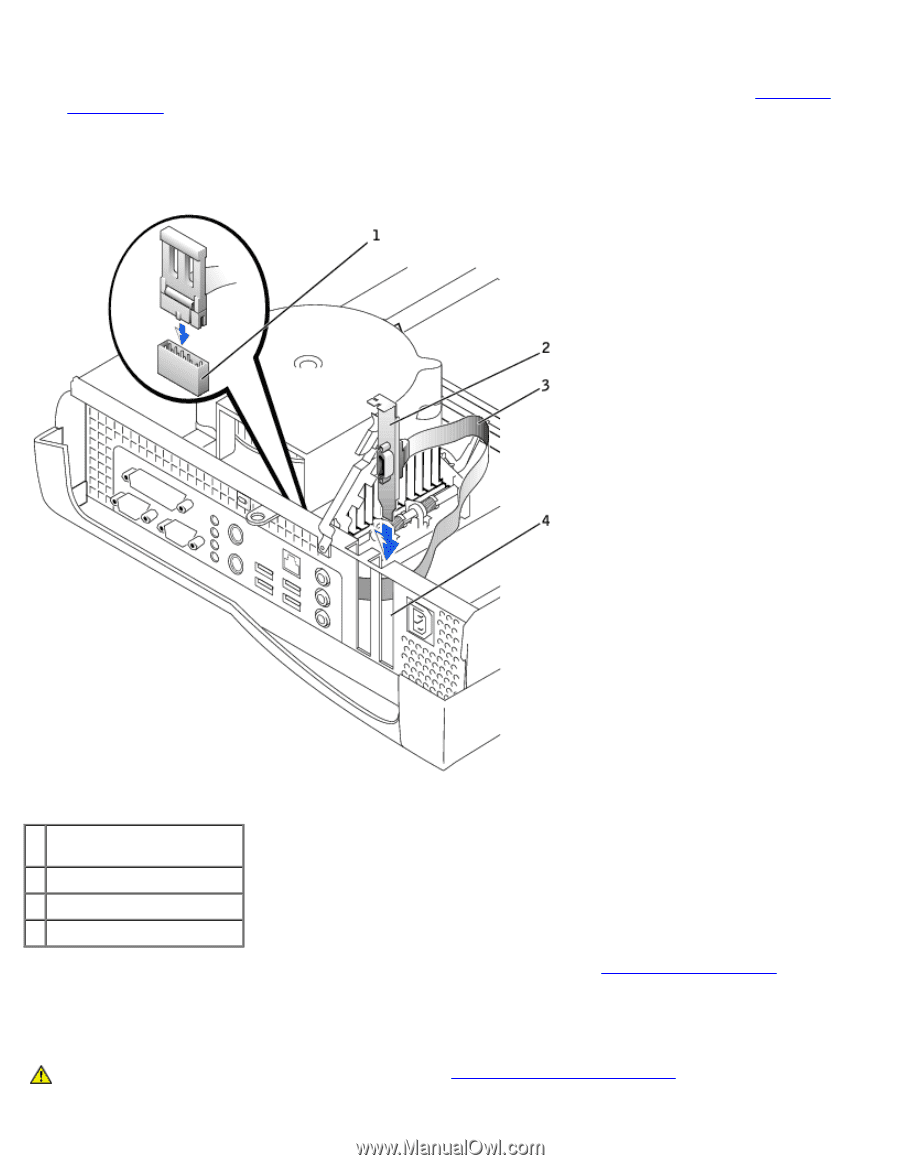
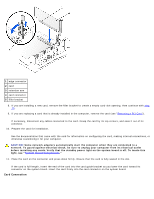
7. Remove the filler bracket.
8. Slide the card bracket down over the card slot opening, and ensure that the top of the card bracket is flush with the
alignment bar and that the notch in the top of the card bracket fits around the alignment guide (see "
Closing the
Retention Arm
").
9. Attach the serial card cable to the connector on the system board (labeled SER2).
Installing a Serial Port Adapter
1
SER2 system board
connector
2
card bracket
3
serial card cable
4
card slot opening
10. Lower the retention arm into place, securing the card(s) in the computer (see "
Closing the Retention Arm
").
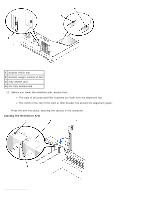
Removing a Serial Port Adapter
CAUTION:
Before you perform this procedure, see "
CAUTION: Safety Instructions
."