Dell PowerConnect B-DCX4S Hardware Reference Guide - Page 27
Unpacking and installing the PowerConnect B-DCX-4S
 |
View all Dell PowerConnect B-DCX4S manuals
Add to My Manuals
Save this manual to your list of manuals |
Page 27 highlights
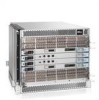
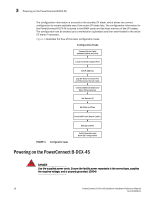
Unpacking and installing the PowerConnect B-DCX-4S 2 • Grounded outlets installed by a licensed electrician and compatible with the power cords ATTENTION To maximize fault tolerance, connect each power cord to a separate power source. 3. Plan for cable management before installing the chassis ("Managing cables"). Cables can be managed in a variety of ways, such as by routing cables below the chassis, along either the port or the nonport side of the chassis, through cable channels on the sides of the cabinet, or by using patch panels. 4. Ensure that the following is available for configuration of the PowerConnect B-DCX-4S: • Workstation with an installed terminal emulator, such as HyperTerminal • Serial cable (provided) • Three Ethernet cables (including one spare) • Access to an FTP server for backing up the switch configuration or collecting supportsave output data (optional) • A Brocade USB stick for collecting supportsave output data (optional) • SFPs and compatible cables NOTE For information about the SFP transceivers that are qualified for the Brocade Encryption Switch, go to http://www.brocade.com/products/interop_and_compatibility.jsp. 5. Ensure that the air intake vents have a minimum of 2 inches of airspace. 6. Ensure that the air temperature on the air intake side is less than 40 degrees Celsius (104 degrees Fahrenheit) during operation. Unpacking and installing the PowerConnect B-DCX-4S CAUTION Use safe lifting practices when moving the product. (C015) NOTE A fully populated PowerConnect B-DCX-4S (four FC8-48 port cards, 192 ports) weighs approximately 68 kg (150 lbs) and requires a hydraulic or assisted lift to install it. 1. Unpack and install the PowerConnect B-DCX-4S. a. Cut the bands that encircle the packaging. b. Remove the lid and the kits and foam from the top of the chassis. c. Lift the cardboard box off the chassis and remove the plastic bag from around the chassis. Save the packing materials for use when returning the old chassis. d. Leave the chassis on top of the plastic shipping tray if the chassis must be transported to the installation location. PowerConnect B-DCX4S Backbone Hardware Reference Manual 13 53-1001808-01
-
 1
1 -
2
-
3
-
4
-
5
-
6
-
7
-
8
-
9
-
10
-
11
-
12
-
13
-
14
-
15
-
16
-
17
-
18
-
19
-
20
-
21
-
 22
22 -
 23
23 -
 24
24 -
 25
25 -
 26
26 -
 27
27 -
 28
28 -
 29
29 -
 30
30 -
 31
31 -
 32
32 -
33
-
34
-
35
-
36
-
37
-
38
-
39
-
40
-
41
-
42
-
43
-
44
-
45
-
46
-
47
-
48
-
49
-
50
-
51
-
52
-
53
-
54
-
55
-
56
-
57
-
58
-
59
-
60
-
61
-
62
-
63
-
64
-
65
-
66
-
67
-
68
-
69
-
70
-
71
-
72
-
73
-
74
-
75
-
76
-
77
-
78
-
79
-
80
-
81
-
82
-
83
-
84
-
85
-
86
-
87
-
88
-
89
-
90
-
91
-
92
-
93
-
94
-
95
-
96
-
97
-
98
-
99
-
100
-
101
-
102
-
103
-
104
-
105
-
106
-
107
-
108
-
109
-
110
-
111
-
112
-
113
-
114
-
115
-
116
-
117
-
118
-
119
-
120
-
121
-
122
-
123
-
124
-
125
-
126
-
127
-
128
-
129
-
130
-
131
-
132
-
133
-
134
 |
 |
