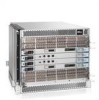
Dell PowerConnect B-DCX4S Hardware Reference Guide - Page 78
from the WWN module.
 |
View all Dell PowerConnect B-DCX4S manuals
Add to My Manuals
Save this manual to your list of manuals |
Page 78 highlights
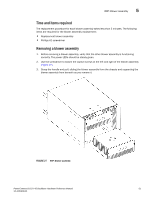
5 RRP: WWN card Do you wish to continue [y/n]? y Backing up WWN card data, please wait about 25 seconds for further instruction. Please install the new FRU now. If this session lost for any reason, please re-enter the frureplace command and follow the instructions to complete the operation. Please enter the word `continue' after the new WWN card has been installed: 6. Wait until all the LEDs on the WWN card turn off. 7. Use a Phillips screwdriver to unscrew the screw that secures the WWN card to the chassis. Use the pull tab to remove the card. 8. Disconnect the WWN cable by depressing the cable connector latch and pulling the connector from the WWN module. 9. Set the WWN card on a static-free surface, such as a grounding pad. FIGURE 28 RRP: WWN bezel (logo plate) and WWN card ' 64 PowerConnect B-DCX-4S Backbone Hardware Reference Manual 53-1001808-01
-
 1
1 -
2
-
3
-
4
-
5
-
6
-
7
-
8
-
9
-
10
-
11
-
12
-
13
-
14
-
15
-
16
-
17
-
18
-
19
-
20
-
21
-
22
-
23
-
24
-
25
-
26
-
27
-
28
-
29
-
30
-
31
-
32
-
33
-
34
-
35
-
36
-
37
-
38
-
39
-
40
-
41
-
42
-
43
-
44
-
45
-
46
-
47
-
48
-
49
-
50
-
51
-
52
-
53
-
54
-
55
-
56
-
57
-
58
-
59
-
60
-
61
-
62
-
63
-
64
-
65
-
66
-
67
-
68
-
69
-
70
-
71
-
72
-
 73
73 -
 74
74 -
 75
75 -
 76
76 -
 77
77 -
 78
78 -
 79
79 -
 80
80 -
 81
81 -
 82
82 -
 83
83 -
84
-
85
-
86
-
87
-
88
-
89
-
90
-
91
-
92
-
93
-
94
-
95
-
96
-
97
-
98
-
99
-
100
-
101
-
102
-
103
-
104
-
105
-
106
-
107
-
108
-
109
-
110
-
111
-
112
-
113
-
114
-
115
-
116
-
117
-
118
-
119
-
120
-
121
-
122
-
123
-
124
-
125
-
126
-
127
-
128
-
129
-
130
-
131
-
132
-
133
-
134
 |
 |
