Dell PowerConnect B-DCX4S Hardware Reference Guide - Page 33
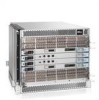
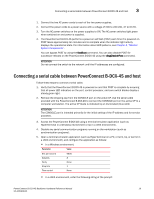
Connecting a serial cable between PowerConnect B-DCX-4S and host
 |
View all Dell PowerConnect B-DCX4S manuals
Add to My Manuals
Save this manual to your list of manuals |
Page 33 highlights
Connecting a serial cable between PowerConnect B-DCX-4S and host 3 1. Connect the two AC power cords to each of the two power supplies. 2. Connect the power cords to a power source with a voltage of 200 to 240 VAC, 47 to 63 Hz. 3. Turn the AC power switches on the power supplies to ON. The AC power switches light green when switched on and power is supplied. 4. The PowerConnect B-DCX-4S performs a power-on self-test (POST) each time it is powered on. POST takes approximately ten minutes and is complete when the indicator light activity displays the operational state. For information about LED patterns, see Chapter 4, "Monitor System Components". You can bypass POST by using the fastBoot command. You can also disable POST for successive reboots on the PowerConnect B-DCX-4S using the diagDisablePost command. ATTENTION Do not connect the switch to the network until the IP addresses are configured. Connecting a serial cable between PowerConnect B-DCX-4S and host Follow these steps to connect a serial cable. 1. Verify that the PowerConnect B-DCX-4S is powered on and that POST is complete by ensuring that all power LED indicators on the port, control processor, and core switch blades display a steady green light. 2. Remove the shipping cap from the CONSOLE port on the active CP. Use the serial cable provided with the PowerConnect B-DCX-4S to connect the CONSOLE port on the active CP to a computer workstation. The active CP blade is indicated by an illuminated (blue) LED. ATTENTION The CONSOLE port is intended primarily for the initial setting of the IP address and for service purposes. 3. Access the PowerConnect B-DCX-4S using a terminal emulator application (such as HyperTerminal in a Windows environment or tip in a UNIX environment). 4. Disable any serial communication programs running on the workstation (such as synchronization programs). 5. Open a terminal emulator application (such as HyperTerminal on a PC, or term, tip, or kermit in a UNIX environment), and configure the application as follows: • In a Windows environment: Parameter Value Bits per second Databits Parity Stop bits Flow control 9600 8 None 1 None • In a UNIX environment, enter the following string at the prompt: PowerConnect B-DCX4S Backbone Hardware Reference Manual 19 53-1001808-01
-
 1
1 -
2
-
3
-
4
-
5
-
6
-
7
-
8
-
9
-
10
-
11
-
12
-
13
-
14
-
15
-
16
-
17
-
18
-
19
-
20
-
21
-
22
-
23
-
24
-
25
-
26
-
27
-
 28
28 -
 29
29 -
 30
30 -
 31
31 -
 32
32 -
 33
33 -
 34
34 -
 35
35 -
 36
36 -
 37
37 -
 38
38 -
39
-
40
-
41
-
42
-
43
-
44
-
45
-
46
-
47
-
48
-
49
-
50
-
51
-
52
-
53
-
54
-
55
-
56
-
57
-
58
-
59
-
60
-
61
-
62
-
63
-
64
-
65
-
66
-
67
-
68
-
69
-
70
-
71
-
72
-
73
-
74
-
75
-
76
-
77
-
78
-
79
-
80
-
81
-
82
-
83
-
84
-
85
-
86
-
87
-
88
-
89
-
90
-
91
-
92
-
93
-
94
-
95
-
96
-
97
-
98
-
99
-
100
-
101
-
102
-
103
-
104
-
105
-
106
-
107
-
108
-
109
-
110
-
111
-
112
-
113
-
114
-
115
-
116
-
117
-
118
-
119
-
120
-
121
-
122
-
123
-
124
-
125
-
126
-
127
-
128
-
129
-
130
-
131
-
132
-
133
-
134
 |
 |
