Dell PowerConnect B-DCX4S Hardware Reference Guide - Page 92
Installing components into the new chassis
 |
View all Dell PowerConnect B-DCX4S manuals
Add to My Manuals
Save this manual to your list of manuals |
Page 92 highlights
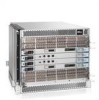
5 RRP: PowerConnect B-DCX-4S chassis NOTE A fully populated PowerConnect B-DCX-4S (four FC8-48 port cards, 192 ports) weighs approximately 68 kg (150 lbs) and requires a hydraulic or assisted lift to install it. NOTE If the PowerConnect B-DCX-4S is installed in a cabinet, ensure that the cabinet is balanced and secured mechanically and that the removal and installation procedure will not compromise cabinet stability. 1. If the chassis is in a cabinet, remove it from the cabinet, remove the rack mount hardware, and save the hardware for use with the new chassis. 2. Place the chassis on a lift or on the shipping pallet provided with the original chassis. 3. Unpack the new chassis: a. Cut the bands that encircle the packaging. b. Remove the lid and the kits and foam from the top of the chassis. c. Lift the cardboard box off the chassis and remove the plastic bag from around the chassis. Save the packing materials for use when returning the old chassis. d. Leave the chassis on top of the plastic shipping tray if the chassis must be transported to the installation location. NOTE The PowerConnect B-DCX-4S packaging does not incorporate wood pallet and pallet brackets. The chassis sits on top of plastic shipping tray. 4. Use a pallet jack or other assisted lift to transport the new chassis to the installation area. Doorways must be wider than 91 cm (36 in.) to accommodate the chassis on the pallet. 5. Use a lift to raise the chassis to the correct level. If installing the chassis in a cabinet, follow the instructions provided by the rack kit manufacturer. Installing components into the new chassis ATTENTION Follow ESD precautions ("ESD precautions"). 1. Replace the WWN bezel (logo plate) and WWN cards ("RRP: WWN card"). 2. Replace the blower assemblies ("RRP: Blower assembly"). 3. Replace the power supplies or filler panels ("RRP: Power supply"). 4. Replace the control processor blades (CP8) ("RRP: Control processor blade (CP8)"). 5. Replace the core switch blades (CR4S-8) ("RRP: Core switch blade (CR4S-8)"). 6. If ICL cables are not used, insert EMI plugs in the ICL sockets in the core switch blades (CR4S-8). 7. Replace the blades or filler panels ("RRP: Port, application, and encryption blades" and "RRP: Blade filler panel"). 78 PowerConnect B-DCX-4S Backbone Hardware Reference Manual 53-1001808-01
-
 1
1 -
2
-
3
-
4
-
5
-
6
-
7
-
8
-
9
-
10
-
11
-
12
-
13
-
14
-
15
-
16
-
17
-
18
-
19
-
20
-
21
-
22
-
23
-
24
-
25
-
26
-
27
-
28
-
29
-
30
-
31
-
32
-
33
-
34
-
35
-
36
-
37
-
38
-
39
-
40
-
41
-
42
-
43
-
44
-
45
-
46
-
47
-
48
-
49
-
50
-
51
-
52
-
53
-
54
-
55
-
56
-
57
-
58
-
59
-
60
-
61
-
62
-
63
-
64
-
65
-
66
-
67
-
68
-
69
-
70
-
71
-
72
-
73
-
74
-
75
-
76
-
77
-
78
-
79
-
80
-
81
-
82
-
83
-
84
-
85
-
86
-
 87
87 -
 88
88 -
 89
89 -
 90
90 -
 91
91 -
 92
92 -
 93
93 -
 94
94 -
 95
95 -
 96
96 -
 97
97 -
98
-
99
-
100
-
101
-
102
-
103
-
104
-
105
-
106
-
107
-
108
-
109
-
110
-
111
-
112
-
113
-
114
-
115
-
116
-
117
-
118
-
119
-
120
-
121
-
122
-
123
-
124
-
125
-
126
-
127
-
128
-
129
-
130
-
131
-
132
-
133
-
134
 |
 |
