Dell PowerConnect B-DCX4S Hardware Reference Guide - Page 77
Removing the WWN bezel (logo plate) and WWN card, ATTENTION, TABLE 11
 |
View all Dell PowerConnect B-DCX4S manuals
Add to My Manuals
Save this manual to your list of manuals |
Page 77 highlights
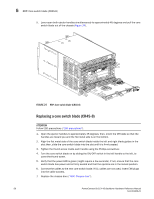
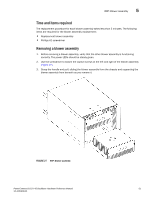
RRP: WWN card 5 TABLE 10 Commands identifying the WWN card status (Continued) Data Related commands Ethernet and Fibre Channel IP address information for the CP blades History log information Name of switch Name of chassis ipAddrShow, ipAddrSet historyShow, historyLastShow switchName chassisName 2. Enter the chassisShow command to display information about the WWN card. WWN units correspond to information specific to the WWN card. An error message is logged that indicates the status of the WWN unit (Table 11). TABLE 11 WWN card related system log messages Type of message System message (errshow or errdump) WWN unit removal was detected WWN unit insertion was detected WWN unit fails to power on WWN unit is being faulted , [EM-1050], ,, INFO, , FRU WWN # removal detected. , [EM-1049], ,, INFO, , FRU WWN # insertion detected. , [EM-1004], ,, CRITICAL, , WWN # failed to power on , [EM-1034], ,, ERROR, , WWN # set to faulty, rc= Removing the WWN bezel (logo plate) and WWN card ATTENTION Follow ESD precautions ("ESD precautions"). 1. Open a Telnet session to the PowerConnect B-DCX-4S and log in to the active CP as admin. The default password is password. 2. Verify that you are logged in to the active CP. Run the haShow command to determine the active CP. 3. Remove the two screws from the WWN bezel (Figure 28). Pull the bezel away from the chassis and set it aside. The WWN cards and their status LEDs are visible. 4. Enter fruReplace wwn from the active CP blade and wait for the phrase "Do you wish to continue [y/n]?" to display; then enter y. 5. Wait until the WWN card data is backed up. Do not enter continue until the mechanical replacement is complete. switch:admin> frureplace wwn This is the WWN card hot swap interface. Continuing from this point will require the whole process to be completed. If this process is not complete due to a power cycle, or CP failover, please follow the recovery procedure in Core Switch WWN Card Removal and Replacement document. PowerConnect B-DCX-4S Backbone Hardware Reference Manual 63 53-1001808-01
-
 1
1 -
2
-
3
-
4
-
5
-
6
-
7
-
8
-
9
-
10
-
11
-
12
-
13
-
14
-
15
-
16
-
17
-
18
-
19
-
20
-
21
-
22
-
23
-
24
-
25
-
26
-
27
-
28
-
29
-
30
-
31
-
32
-
33
-
34
-
35
-
36
-
37
-
38
-
39
-
40
-
41
-
42
-
43
-
44
-
45
-
46
-
47
-
48
-
49
-
50
-
51
-
52
-
53
-
54
-
55
-
56
-
57
-
58
-
59
-
60
-
61
-
62
-
63
-
64
-
65
-
66
-
67
-
68
-
69
-
70
-
71
-
 72
72 -
 73
73 -
 74
74 -
 75
75 -
 76
76 -
 77
77 -
 78
78 -
 79
79 -
 80
80 -
 81
81 -
 82
82 -
83
-
84
-
85
-
86
-
87
-
88
-
89
-
90
-
91
-
92
-
93
-
94
-
95
-
96
-
97
-
98
-
99
-
100
-
101
-
102
-
103
-
104
-
105
-
106
-
107
-
108
-
109
-
110
-
111
-
112
-
113
-
114
-
115
-
116
-
117
-
118
-
119
-
120
-
121
-
122
-
123
-
124
-
125
-
126
-
127
-
128
-
129
-
130
-
131
-
132
-
133
-
134
 |
 |
