Dell PowerEdge 1950 Hardware Owner's Manual (PDF) - Page 72
Removing the RAC Card and Cables - drac
 |
View all Dell PowerEdge 1950 manuals
Add to My Manuals
Save this manual to your list of manuals |
Page 72 highlights
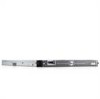
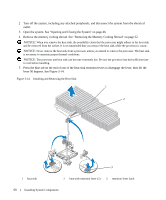
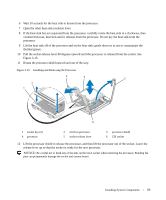
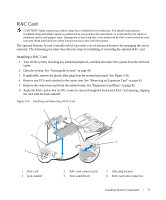
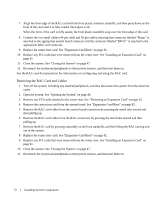
7 Align the front edge of the RAC card with the front plastic retention standoffs, and then press down on the front of the card until it is fully seated. See Figure 3-16. When the front of the card is fully seated, the front plastic standoffs snap over the front edge of the card. 8 Connect the two small cables (44-pin cable and 50-pin cable), ensuring that connector labeled "Planar" is attached to the appropriate system board connector and the connector labeled "DRAC" is attached to the appropriate RAC card connector. 9 Replace the center riser card. See "Expansion-Card Riser" on page 82. 10 Replace any PCI cards that were removed from the center riser. See "Installing an Expansion Card" on page 61. 11 Close the system. See "Closing the System" on page 47. 12 Reconnect the system and peripherals to their power sources, and then turn them on. See the RAC card documentation for information on configuring and using the RAC card. Removing the RAC Card and Cables 1 Turn off the system, including any attached peripherals, and then disconnect the system from the electrical outlet. 2 Open the system. See "Opening the System" on page 46. 3 Remove any PCI cards attached to the center riser. See "Removing an Expansion Card" on page 62. 4 Remove the center riser card from the system board. See "Expansion-Card Riser" on page 82. 5 Remove the RAC card cables from the system board connectors by pressing the metal tabs inward and then pulling up. 6 Remove the RAC card cables from the RAC connectors by pressing the metal tabs inward and then pulling up. 7 Remove the RAC card by pressing outwardly on the front standoffs, and then lifting the RAC card up and out of the system. 8 Replace the center riser card. See "Expansion-Card Riser" on page 82. 9 Replace any PCI cards that were removed from the center riser. See "Installing an Expansion Card" on page 61. 10 Close the system. See "Closing the System" on page 47. 11 Reconnect the system and peripherals to their power sources, and then turn them on. 72 Installing System Components
-
 1
1 -
2
-
3
-
4
-
5
-
6
-
7
-
8
-
9
-
10
-
11
-
12
-
13
-
14
-
15
-
16
-
17
-
18
-
19
-
20
-
21
-
22
-
23
-
24
-
25
-
26
-
27
-
28
-
29
-
30
-
31
-
32
-
33
-
34
-
35
-
36
-
37
-
38
-
39
-
40
-
41
-
42
-
43
-
44
-
45
-
46
-
47
-
48
-
49
-
50
-
51
-
52
-
53
-
54
-
55
-
56
-
57
-
58
-
59
-
60
-
61
-
62
-
63
-
64
-
65
-
66
-
 67
67 -
 68
68 -
 69
69 -
 70
70 -
 71
71 -
 72
72 -
 73
73 -
 74
74 -
 75
75 -
 76
76 -
 77
77 -
78
-
79
-
80
-
81
-
82
-
83
-
84
-
85
-
86
-
87
-
88
-
89
-
90
-
91
-
92
-
93
-
94
-
95
-
96
-
97
-
98
-
99
-
100
-
101
-
102
-
103
-
104
-
105
-
106
-
107
-
108
-
109
-
110
-
111
-
112
-
113
-
114
-
115
-
116
-
117
-
118
-
119
-
120
-
121
-
122
-
123
-
124
-
125
-
126
-
127
-
128
-
129
-
130
-
131
-
132
-
133
-
134
-
135
-
136
-
137
-
138
-
139
-
140
-
141
-
142
-
143
-
144
-
145
-
146
-
147
-
148
-
149
-
150
-
151
-
152
-
153
-
154
-
155
-
156
-
157
-
158
-
159
-
160
 |
 |