Epson Stylus COLOR 850N User Manual - Page 108
Installing the DLC Protocol, Configuring the Ethernet Card
 |
View all Epson Stylus COLOR 850N manuals
Add to My Manuals
Save this manual to your list of manuals |
Page 108 highlights
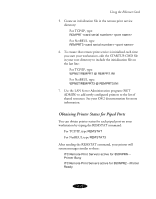
Using the Ethernet Card Note: To verify that the DLC protocol is installed correctly, check the list of installed Network Software in the Network dialog box. Installing the DLC Protocol Make sure Windows NT is running, and follow these steps to install DLC: 1. Open the Control Panel. 2. Double-click the Network icon. 3. Click the Protocols tab and then click Add. 4. Select DLC Protocol from the Select Network Protocol list, and click OK. 5. Follow the instructions on the screen and reboot your system. Configuring the Ethernet Card After you have installed the DLC protocol, follow these steps to configure the card and your printer for Window NT 4.0: 1. Double-click My Computer, then double-click the Printers icon. 2. Double-click the Add Printer icon. 3. Select My Computer, then click Next. 4. Click Add Port. 5. Select whatever DLC network port setting you have on your system, then click New Port. If necessary, insert your Windows NT CD-ROM or diskette so Windows can copy the files. 6. Type a name for the port in the Name box. Make sure the name is not the same as an existing port, such as LPT1. 6-6
-
 1
1 -
2
-
3
-
4
-
5
-
6
-
7
-
8
-
9
-
10
-
11
-
12
-
13
-
14
-
15
-
16
-
17
-
18
-
19
-
20
-
21
-
22
-
23
-
24
-
25
-
26
-
27
-
28
-
29
-
30
-
31
-
32
-
33
-
34
-
35
-
36
-
37
-
38
-
39
-
40
-
41
-
42
-
43
-
44
-
45
-
46
-
47
-
48
-
49
-
50
-
51
-
52
-
53
-
54
-
55
-
56
-
57
-
58
-
59
-
60
-
61
-
62
-
63
-
64
-
65
-
66
-
67
-
68
-
69
-
70
-
71
-
72
-
73
-
74
-
75
-
76
-
77
-
78
-
79
-
80
-
81
-
82
-
83
-
84
-
85
-
86
-
87
-
88
-
89
-
90
-
91
-
92
-
93
-
94
-
95
-
96
-
97
-
98
-
99
-
100
-
101
-
102
-
 103
103 -
 104
104 -
 105
105 -
 106
106 -
 107
107 -
 108
108 -
 109
109 -
 110
110 -
 111
111 -
 112
112 -
 113
113 -
114
-
115
-
116
-
117
-
118
-
119
-
120
-
121
-
122
-
123
-
124
-
125
-
126
-
127
-
128
-
129
-
130
-
131
-
132
-
133
-
134
-
135
-
136
-
137
-
138
-
139
-
140
-
141
-
142
-
143
-
144
-
145
-
146
-
147
-
148
-
149
-
150
-
151
-
152
-
153
-
154
-
155
-
156
-
157
-
158
-
159
-
160
-
161
-
162
-
163
-
164
-
165
-
166
-
167
-
168
-
169
-
170
-
171
-
172
-
173
-
174
-
175
-
176
-
177
-
178
-
179
 |
 |
