Epson Stylus COLOR 850N User Manual - Page 152
Make sure you label each diskette in order as you create it, When the diskettes have finished copying
 |
View all Epson Stylus COLOR 850N manuals
Add to My Manuals
Save this manual to your list of manuals |
Page 152 highlights
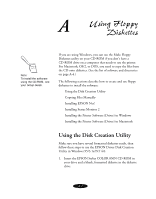
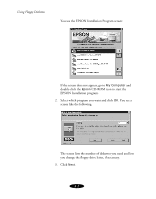
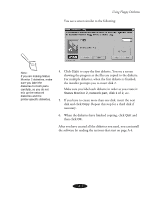
Using Floppy Diskettes You see a screen similar to the following: Note: If you are making Status Monitor 2 diskettes, make sure you label the diskettes for both parts carefully, so you do not mix up the network diskettes and the printer-specific diskettes. 4. Click Copy to copy the first diskette. You see a screen showing the progress as the files are copied to the diskette. For multiple diskettes, when the first diskette is finished, the installer prompts you to insert disk 2. Make sure you label each diskette in order as you create it: Status Monitor 2, network part, disk 1 of 2, etc. 5. If you have to create more than one disk, insert the next disk and click Copy. Repeat this step for a third disk if necessary. 6. When the diskettes have finished copying, click Quit and then click OK. After you have created all the diskettes you need, you can install the software by reading the sections that start on page A-4. A-3
-
 1
1 -
2
-
3
-
4
-
5
-
6
-
7
-
8
-
9
-
10
-
11
-
12
-
13
-
14
-
15
-
16
-
17
-
18
-
19
-
20
-
21
-
22
-
23
-
24
-
25
-
26
-
27
-
28
-
29
-
30
-
31
-
32
-
33
-
34
-
35
-
36
-
37
-
38
-
39
-
40
-
41
-
42
-
43
-
44
-
45
-
46
-
47
-
48
-
49
-
50
-
51
-
52
-
53
-
54
-
55
-
56
-
57
-
58
-
59
-
60
-
61
-
62
-
63
-
64
-
65
-
66
-
67
-
68
-
69
-
70
-
71
-
72
-
73
-
74
-
75
-
76
-
77
-
78
-
79
-
80
-
81
-
82
-
83
-
84
-
85
-
86
-
87
-
88
-
89
-
90
-
91
-
92
-
93
-
94
-
95
-
96
-
97
-
98
-
99
-
100
-
101
-
102
-
103
-
104
-
105
-
106
-
107
-
108
-
109
-
110
-
111
-
112
-
113
-
114
-
115
-
116
-
117
-
118
-
119
-
120
-
121
-
122
-
123
-
124
-
125
-
126
-
127
-
128
-
129
-
130
-
131
-
132
-
133
-
134
-
135
-
136
-
137
-
138
-
139
-
140
-
141
-
142
-
143
-
144
-
145
-
146
-
 147
147 -
 148
148 -
 149
149 -
 150
150 -
 151
151 -
 152
152 -
 153
153 -
 154
154 -
 155
155 -
 156
156 -
 157
157 -
158
-
159
-
160
-
161
-
162
-
163
-
164
-
165
-
166
-
167
-
168
-
169
-
170
-
171
-
172
-
173
-
174
-
175
-
176
-
177
-
178
-
179
 |
 |
