Epson Stylus COLOR 850N User Manual - Page 111
Setting Up Piping to the Printer, Copying the Piping Software
 |
View all Epson Stylus COLOR 850N manuals
Add to My Manuals
Save this manual to your list of manuals |
Page 111 highlights
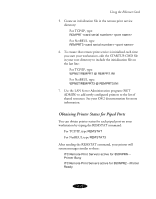
Using the Ethernet Card If several ports are redirected, RSTAT returns a message similar to the following: ITC Remote Print Servers active for LPT1-Printer Busy ITC Remote Print Servers active for LPT2-Printer Ready ITC Remote Print Servers active for LPT3-Printer Ready Setting Up Piping to the Printer To set up piping, you first need to copy the piping software to your computer, then configure the printer and check its status. Copying the Piping Software Print a status sheet following the instructions on page 6-3 to obtain the card serial number. Then follow these steps to copy the piping software to your computer: 1. Insert the EPSON CD-ROM or diskette into your workstation's drive. 2. Open an OS/2 full command session. 3. Create a remote print service directory by typing MD C:\EPNET at the command line. 4. Open the OS/2 directory on the CD-ROM or diskette and go to the PIPES directory for your network protocol. For TCP/IP, type CD TCPIP\PIPE and press Enter. For NetBEUI, type CD NETBEUI\PIPE and press Enter. 6-9
-
 1
1 -
2
-
3
-
4
-
5
-
6
-
7
-
8
-
9
-
10
-
11
-
12
-
13
-
14
-
15
-
16
-
17
-
18
-
19
-
20
-
21
-
22
-
23
-
24
-
25
-
26
-
27
-
28
-
29
-
30
-
31
-
32
-
33
-
34
-
35
-
36
-
37
-
38
-
39
-
40
-
41
-
42
-
43
-
44
-
45
-
46
-
47
-
48
-
49
-
50
-
51
-
52
-
53
-
54
-
55
-
56
-
57
-
58
-
59
-
60
-
61
-
62
-
63
-
64
-
65
-
66
-
67
-
68
-
69
-
70
-
71
-
72
-
73
-
74
-
75
-
76
-
77
-
78
-
79
-
80
-
81
-
82
-
83
-
84
-
85
-
86
-
87
-
88
-
89
-
90
-
91
-
92
-
93
-
94
-
95
-
96
-
97
-
98
-
99
-
100
-
101
-
102
-
103
-
104
-
105
-
 106
106 -
 107
107 -
 108
108 -
 109
109 -
 110
110 -
 111
111 -
 112
112 -
 113
113 -
 114
114 -
 115
115 -
 116
116 -
117
-
118
-
119
-
120
-
121
-
122
-
123
-
124
-
125
-
126
-
127
-
128
-
129
-
130
-
131
-
132
-
133
-
134
-
135
-
136
-
137
-
138
-
139
-
140
-
141
-
142
-
143
-
144
-
145
-
146
-
147
-
148
-
149
-
150
-
151
-
152
-
153
-
154
-
155
-
156
-
157
-
158
-
159
-
160
-
161
-
162
-
163
-
164
-
165
-
166
-
167
-
168
-
169
-
170
-
171
-
172
-
173
-
174
-
175
-
176
-
177
-
178
-
179
 |
 |
