Epson Stylus COLOR 850N User Manual - Page 64
Choosing Print Layout Options on a Macintosh, Using the Fit to Option
 |
View all Epson Stylus COLOR 850N manuals
Add to My Manuals
Save this manual to your list of manuals |
Page 64 highlights
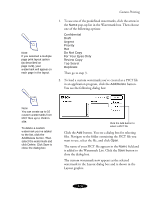
Custom Printing Intensity sets the lightness or darkness of the watermark (from 5% to 100%) based on where you move the slide bar. 6. If you're finished changing Layout options, click OK to close the Layout dialog box. Choosing Print Layout Options on a Macintosh Follow the steps in these sections to use options in the Layout dialog box: Using the Fit to Page option Using multiple print layouts and page frames Adding a watermark Using the Fit to Page Option When you want to make the printed size of a document different from its actual size, you can use your printer software's Fit to Page option to proportion it to fit in the maximum, centered area on a selected paper size. Follow these steps to use the Fit to Page option: 1. Create your image or document in your application software. 2. Open the File menu and select Page Setup. You see the Page Setup dialog box. 3. Click the Paper Size list and select the actual size of the document you want to print. For example, if your document size is 8 1/2 × 11 inches, select Letter for the Paper Size option. 3-27
-
 1
1 -
2
-
3
-
4
-
5
-
6
-
7
-
8
-
9
-
10
-
11
-
12
-
13
-
14
-
15
-
16
-
17
-
18
-
19
-
20
-
21
-
22
-
23
-
24
-
25
-
26
-
27
-
28
-
29
-
30
-
31
-
32
-
33
-
34
-
35
-
36
-
37
-
38
-
39
-
40
-
41
-
42
-
43
-
44
-
45
-
46
-
47
-
48
-
49
-
50
-
51
-
52
-
53
-
54
-
55
-
56
-
57
-
58
-
 59
59 -
 60
60 -
 61
61 -
 62
62 -
 63
63 -
 64
64 -
 65
65 -
 66
66 -
 67
67 -
 68
68 -
 69
69 -
70
-
71
-
72
-
73
-
74
-
75
-
76
-
77
-
78
-
79
-
80
-
81
-
82
-
83
-
84
-
85
-
86
-
87
-
88
-
89
-
90
-
91
-
92
-
93
-
94
-
95
-
96
-
97
-
98
-
99
-
100
-
101
-
102
-
103
-
104
-
105
-
106
-
107
-
108
-
109
-
110
-
111
-
112
-
113
-
114
-
115
-
116
-
117
-
118
-
119
-
120
-
121
-
122
-
123
-
124
-
125
-
126
-
127
-
128
-
129
-
130
-
131
-
132
-
133
-
134
-
135
-
136
-
137
-
138
-
139
-
140
-
141
-
142
-
143
-
144
-
145
-
146
-
147
-
148
-
149
-
150
-
151
-
152
-
153
-
154
-
155
-
156
-
157
-
158
-
159
-
160
-
161
-
162
-
163
-
164
-
165
-
166
-
167
-
168
-
169
-
170
-
171
-
172
-
173
-
174
-
175
-
176
-
177
-
178
-
179
 |
 |
