Epson Stylus COLOR 850N User Manual - Page 71
Redefining Custom Settings, You see the Save
 |
View all Epson Stylus COLOR 850N manuals
Add to My Manuals
Save this manual to your list of manuals |
Page 71 highlights
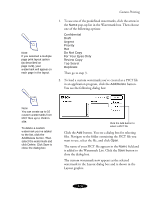
Custom Printing Redefining Custom Settings To change the options in a customized settings group but keep the same name for it, follow these steps: 1. Select Advanced mode. Then select the name of the custom settings group you want to redefine in the Custom Settings list. 2. Change the printer settings as necessary. (If you change the Media Type and Ink settings, the custom settings group name reverts to Custom Settings; this doesn't affect your customized setting.) 3. Click Save Settings. Then select the name of the custom settings group you're redefining in the Custom Settings box. 4. If you're using Windows, click Save. You see the Save As dialog box. Click OK to save your redefined settings. (Click Cancel to cancel your changes.) On a Macintosh, click the Redefine button. Then click Replace at the confirmation dialog box to save your redefined settings. (Click Cancel to cancel your changes.) Deleting Custom Settings 1. Select Advanced mode. Then click Save Settings. 2. Select the custom settings group in the Custom Settings box, and click Delete. (You cannot delete any of the predefined document types.) 3-34
-
 1
1 -
2
-
3
-
4
-
5
-
6
-
7
-
8
-
9
-
10
-
11
-
12
-
13
-
14
-
15
-
16
-
17
-
18
-
19
-
20
-
21
-
22
-
23
-
24
-
25
-
26
-
27
-
28
-
29
-
30
-
31
-
32
-
33
-
34
-
35
-
36
-
37
-
38
-
39
-
40
-
41
-
42
-
43
-
44
-
45
-
46
-
47
-
48
-
49
-
50
-
51
-
52
-
53
-
54
-
55
-
56
-
57
-
58
-
59
-
60
-
61
-
62
-
63
-
64
-
65
-
 66
66 -
 67
67 -
 68
68 -
 69
69 -
 70
70 -
 71
71 -
 72
72 -
 73
73 -
 74
74 -
 75
75 -
 76
76 -
77
-
78
-
79
-
80
-
81
-
82
-
83
-
84
-
85
-
86
-
87
-
88
-
89
-
90
-
91
-
92
-
93
-
94
-
95
-
96
-
97
-
98
-
99
-
100
-
101
-
102
-
103
-
104
-
105
-
106
-
107
-
108
-
109
-
110
-
111
-
112
-
113
-
114
-
115
-
116
-
117
-
118
-
119
-
120
-
121
-
122
-
123
-
124
-
125
-
126
-
127
-
128
-
129
-
130
-
131
-
132
-
133
-
134
-
135
-
136
-
137
-
138
-
139
-
140
-
141
-
142
-
143
-
144
-
145
-
146
-
147
-
148
-
149
-
150
-
151
-
152
-
153
-
154
-
155
-
156
-
157
-
158
-
159
-
160
-
161
-
162
-
163
-
164
-
165
-
166
-
167
-
168
-
169
-
170
-
171
-
172
-
173
-
174
-
175
-
176
-
177
-
178
-
179
 |
 |
