Epson Stylus COLOR 850N User Manual - Page 74
Setting Up Monitoring Preferences
 |
View all Epson Stylus COLOR 850N manuals
Add to My Manuals
Save this manual to your list of manuals |
Page 74 highlights
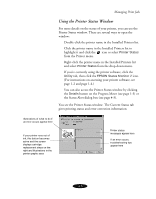
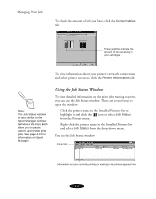
Managing Print Jobs You can customize the appearance of items on the Status Monitor 2 main window using the View menu options or options on the button bar. If you're monitoring multiple printers, you can reorder them in the Installed Printers list by clicking in the Printer Name, Status, or Job Count title bar. If you have more than one printer you want to monitor, you can add them using the Add Printers option in the Settings menu. To save your computer memory and reduce network traffic, you may want to delete any printers from the Status Monitor 2 list that you don't need to monitor. To do this, click the printer in the Installed Printers list and select Delete Printer from the Settings menu. The color of the Installed Printer icon indicates the printer status as follows: Installed Printer icon color Status message Green Ready to print Yellow Paper and/or ink level is low Red Paper and/or ink is out, paper is jammed, or a print or communication error has occurred Other options in Status Monitor 2 let you set up monitoring preferences, view more details on the printer or job status, and enable or disable background monitoring for each printer as described in the next sections. Note: Background monitoring must be turned on to change the Background Monitoring and Status Alert preferences for individual printers in the Monitoring Preferences window. See page 4-7 for instructions. Setting Up Monitoring Preferences You can select the way you want Status Monitor 2 to monitor each printer you use in the Monitoring Preferences window. There are several ways to open the window: Click the printer name in the Installed Printers list to highlight it and click the icon. Click the printer name in the Installed Printers list to highlight it and select Monitoring Preferences from the Settings menu. Right-click the printer name in the Installed Printers list and select Monitoring Preferences from the drop-down menu. 4-3
-
 1
1 -
2
-
3
-
4
-
5
-
6
-
7
-
8
-
9
-
10
-
11
-
12
-
13
-
14
-
15
-
16
-
17
-
18
-
19
-
20
-
21
-
22
-
23
-
24
-
25
-
26
-
27
-
28
-
29
-
30
-
31
-
32
-
33
-
34
-
35
-
36
-
37
-
38
-
39
-
40
-
41
-
42
-
43
-
44
-
45
-
46
-
47
-
48
-
49
-
50
-
51
-
52
-
53
-
54
-
55
-
56
-
57
-
58
-
59
-
60
-
61
-
62
-
63
-
64
-
65
-
66
-
67
-
68
-
 69
69 -
 70
70 -
 71
71 -
 72
72 -
 73
73 -
 74
74 -
 75
75 -
 76
76 -
 77
77 -
 78
78 -
 79
79 -
80
-
81
-
82
-
83
-
84
-
85
-
86
-
87
-
88
-
89
-
90
-
91
-
92
-
93
-
94
-
95
-
96
-
97
-
98
-
99
-
100
-
101
-
102
-
103
-
104
-
105
-
106
-
107
-
108
-
109
-
110
-
111
-
112
-
113
-
114
-
115
-
116
-
117
-
118
-
119
-
120
-
121
-
122
-
123
-
124
-
125
-
126
-
127
-
128
-
129
-
130
-
131
-
132
-
133
-
134
-
135
-
136
-
137
-
138
-
139
-
140
-
141
-
142
-
143
-
144
-
145
-
146
-
147
-
148
-
149
-
150
-
151
-
152
-
153
-
154
-
155
-
156
-
157
-
158
-
159
-
160
-
161
-
162
-
163
-
164
-
165
-
166
-
167
-
168
-
169
-
170
-
171
-
172
-
173
-
174
-
175
-
176
-
177
-
178
-
179
 |
 |
