HP Designjet 250c Service Manual - Page 112
Entering Service Mode 2, Stopping a Test, Calibrations and Adjustments
 |
View all HP Designjet 250c manuals
Add to My Manuals
Save this manual to your list of manuals |
Page 112 highlights
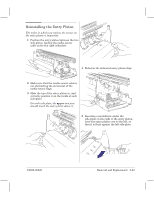
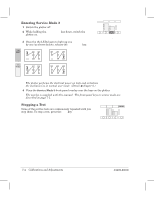
Entering Service Mode 2 1 Switch the plotter off. 2 While holding the Print Quality key down, switch the plotter on. 3 Once the the LEDs begin to light up one by one (as shown below), release the Print Quality key. 230 250C or 330 350C or Print Quality The plotter performs the electrical powerĆon tests and initializes the mechanics as in normal user mode. (Details ' chapter 8.) 4 Place the Service Mode 2 frontĆpanel overlay over the keys on the plotter. The overlay is supplied with this manual. The frontĆpanel keys in service mode are described on page 7Ć5. Stopping a Test Shift Some of the service tests are continuously repeated until you stop them. To stop a test, press the Shift key. 7Ć4 Calibrations and Adjustments C4699Ć90000
-
 1
1 -
2
-
3
-
4
-
5
-
6
-
7
-
8
-
9
-
10
-
11
-
12
-
13
-
14
-
15
-
16
-
17
-
18
-
19
-
20
-
21
-
22
-
23
-
24
-
25
-
26
-
27
-
28
-
29
-
30
-
31
-
32
-
33
-
34
-
35
-
36
-
37
-
38
-
39
-
40
-
41
-
42
-
43
-
44
-
45
-
46
-
47
-
48
-
49
-
50
-
51
-
52
-
53
-
54
-
55
-
56
-
57
-
58
-
59
-
60
-
61
-
62
-
63
-
64
-
65
-
66
-
67
-
68
-
69
-
70
-
71
-
72
-
73
-
74
-
75
-
76
-
77
-
78
-
79
-
80
-
81
-
82
-
83
-
84
-
85
-
86
-
87
-
88
-
89
-
90
-
91
-
92
-
93
-
94
-
95
-
96
-
97
-
98
-
99
-
100
-
101
-
102
-
103
-
104
-
105
-
106
-
 107
107 -
 108
108 -
 109
109 -
 110
110 -
 111
111 -
 112
112 -
 113
113 -
 114
114 -
 115
115 -
 116
116 -
 117
117 -
118
-
119
-
120
-
121
-
122
-
123
-
124
-
125
-
126
-
127
-
128
-
129
-
130
-
131
-
132
-
133
-
134
-
135
-
136
-
137
-
138
-
139
-
140
-
141
-
142
-
143
-
144
-
145
-
146
-
147
-
148
-
149
-
150
-
151
-
152
-
153
-
154
-
155
-
156
-
157
-
158
-
159
-
160
-
161
-
162
-
163
-
164
-
165
-
166
-
167
-
168
-
169
-
170
-
171
-
172
-
173
-
174
-
175
-
176
-
177
-
178
-
179
-
180
-
181
-
182
-
183
-
184
-
185
-
186
-
187
-
188
-
189
-
190
-
191
-
192
-
193
-
194
-
195
-
196
-
197
-
198
-
199
-
200
-
201
-
202
-
203
-
204
-
205
-
206
-
207
-
208
-
209
-
210
-
211
-
212
-
213
-
214
-
215
-
216
-
217
-
218
-
219
-
220
-
221
-
222
-
223
-
224
-
225
-
226
-
227
-
228
-
229
-
230
-
231
-
232
-
233
-
234
-
235
-
236
-
237
-
238
-
239
-
240
-
241
-
242
-
243
-
244
-
245
-
246
-
247
-
248
-
249
-
250
-
251
-
252
-
253
-
254
-
255
-
256
-
257
-
258
-
259
-
260
-
261
-
262
-
263
-
264
-
265
-
266
-
267
-
268
 |
 |
Print
Quality
230
250C
330
350C
7Ć4
Calibrations and Adjustments
C4699Ć90000
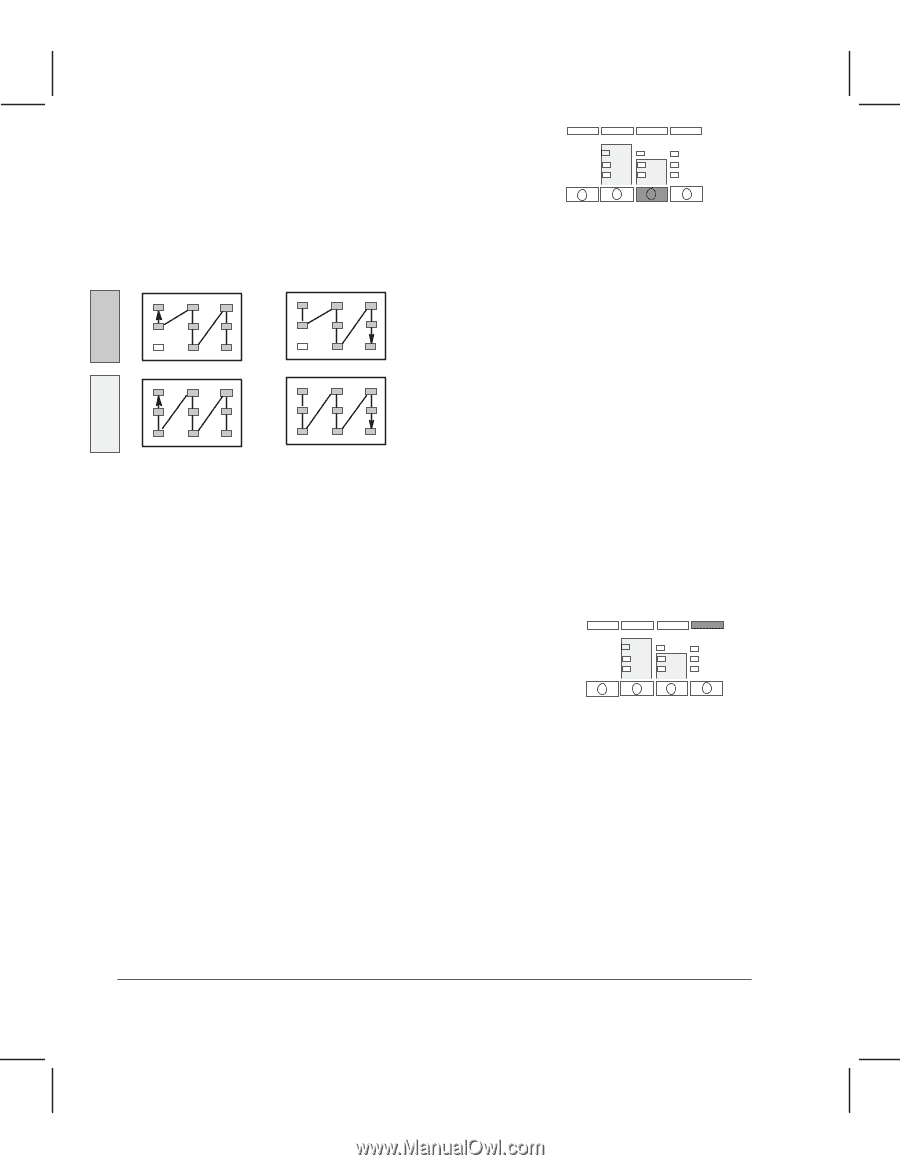
Entering Service Mode 2
1
Switch the plotter off.
2
While holding the
Print Quality
key down, switch the
plotter on.
3
Once the the LEDs begin to light up one
by one (as shown below), release the
Print Quality
key.
or
or
The plotter performs the electrical powerĆon tests and initializes
the mechanics as in normal user mode. (Details
'
chapter 8.)
4
Place the
Service Mode 2
frontĆpanel overlay over the keys on the plotter.
The overlay is supplied with this manual. The frontĆpanel keys in service mode are
described on page 7Ć5.
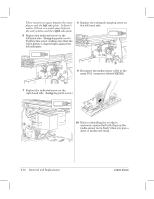
Stopping a Test
Some of the service tests are continuously repeated until you
stop them. To stop a test, press the
Shift
key.
Shift