HP Designjet 250c Service Manual - Page 60
Safety Precautions, ESD Precautions, Reassembly - review
 |
View all HP Designjet 250c manuals
Add to My Manuals
Save this manual to your list of manuals |
Page 60 highlights
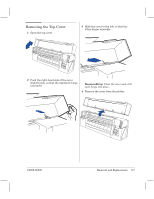
Safety Precautions (Safety symbols ' Immediately after the table of contents.) Review WARNING and CAUTION symbols and instructions before you service the plotters. Follow these warnings and cautions for your protection and to avoid damaging the plotter. WĂAĂRĂNĂIĂNĂG Serious shock hazard leading to death or injury may result if you do not take the following precautions: Ensure that the ac power outlet (mains) has a protective earth (ground) terminal. Switch the plotter off, and disconnect it from the power source prior to performing any maintenance. Prevent water or other liquids from running onto electrical components or circuits, or through openings in the enclosure. ESD Precautions To prevent damage to the plotter circuits from highĆvoltage electrostatic discharge (ESD) 1 Do not wear clothing that is subject to static buildĆup. 2 Do not handle integrated circuits (ICs) in carpeted areas. 3 Do not remove an IC or a printed circuit assembly (PCA) from its conductive foam pad or conductive packaging until you are ready to install it. 4 Ground your body while disassembling and working on the plotter. 5 After removing a cover from the plotter, attach a clip lead between the PCA common and earth ground. Touch all tools to earth ground to remove static charges before using them on the plotter. 6 After removing any PCA from the plotter, place it on a conductive foam pad or into its conductive packaging to prevent ESD damage to any ICs on the PCA. Reassembly Most of the procedures in this chapter describe how to disassemble the plotter. Unless otherwise specified, reassemble the parts in the reverse order of disassembly. 6Ć2 Removal and Replacement C4699Ć90000
-
 1
1 -
2
-
3
-
4
-
5
-
6
-
7
-
8
-
9
-
10
-
11
-
12
-
13
-
14
-
15
-
16
-
17
-
18
-
19
-
20
-
21
-
22
-
23
-
24
-
25
-
26
-
27
-
28
-
29
-
30
-
31
-
32
-
33
-
34
-
35
-
36
-
37
-
38
-
39
-
40
-
41
-
42
-
43
-
44
-
45
-
46
-
47
-
48
-
49
-
50
-
51
-
52
-
53
-
54
-
 55
55 -
 56
56 -
 57
57 -
 58
58 -
 59
59 -
 60
60 -
 61
61 -
 62
62 -
 63
63 -
 64
64 -
 65
65 -
66
-
67
-
68
-
69
-
70
-
71
-
72
-
73
-
74
-
75
-
76
-
77
-
78
-
79
-
80
-
81
-
82
-
83
-
84
-
85
-
86
-
87
-
88
-
89
-
90
-
91
-
92
-
93
-
94
-
95
-
96
-
97
-
98
-
99
-
100
-
101
-
102
-
103
-
104
-
105
-
106
-
107
-
108
-
109
-
110
-
111
-
112
-
113
-
114
-
115
-
116
-
117
-
118
-
119
-
120
-
121
-
122
-
123
-
124
-
125
-
126
-
127
-
128
-
129
-
130
-
131
-
132
-
133
-
134
-
135
-
136
-
137
-
138
-
139
-
140
-
141
-
142
-
143
-
144
-
145
-
146
-
147
-
148
-
149
-
150
-
151
-
152
-
153
-
154
-
155
-
156
-
157
-
158
-
159
-
160
-
161
-
162
-
163
-
164
-
165
-
166
-
167
-
168
-
169
-
170
-
171
-
172
-
173
-
174
-
175
-
176
-
177
-
178
-
179
-
180
-
181
-
182
-
183
-
184
-
185
-
186
-
187
-
188
-
189
-
190
-
191
-
192
-
193
-
194
-
195
-
196
-
197
-
198
-
199
-
200
-
201
-
202
-
203
-
204
-
205
-
206
-
207
-
208
-
209
-
210
-
211
-
212
-
213
-
214
-
215
-
216
-
217
-
218
-
219
-
220
-
221
-
222
-
223
-
224
-
225
-
226
-
227
-
228
-
229
-
230
-
231
-
232
-
233
-
234
-
235
-
236
-
237
-
238
-
239
-
240
-
241
-
242
-
243
-
244
-
245
-
246
-
247
-
248
-
249
-
250
-
251
-
252
-
253
-
254
-
255
-
256
-
257
-
258
-
259
-
260
-
261
-
262
-
263
-
264
-
265
-
266
-
267
-
268
 |
 |