HP Designjet 250c Service Manual - Page 78
CAUTION, Slightly tighten the screw on the left side.
 |
View all HP Designjet 250c manuals
Add to My Manuals
Save this manual to your list of manuals |
Page 78 highlights
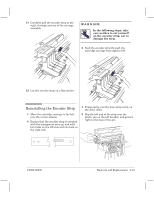
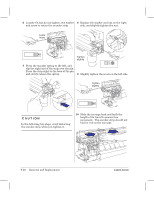
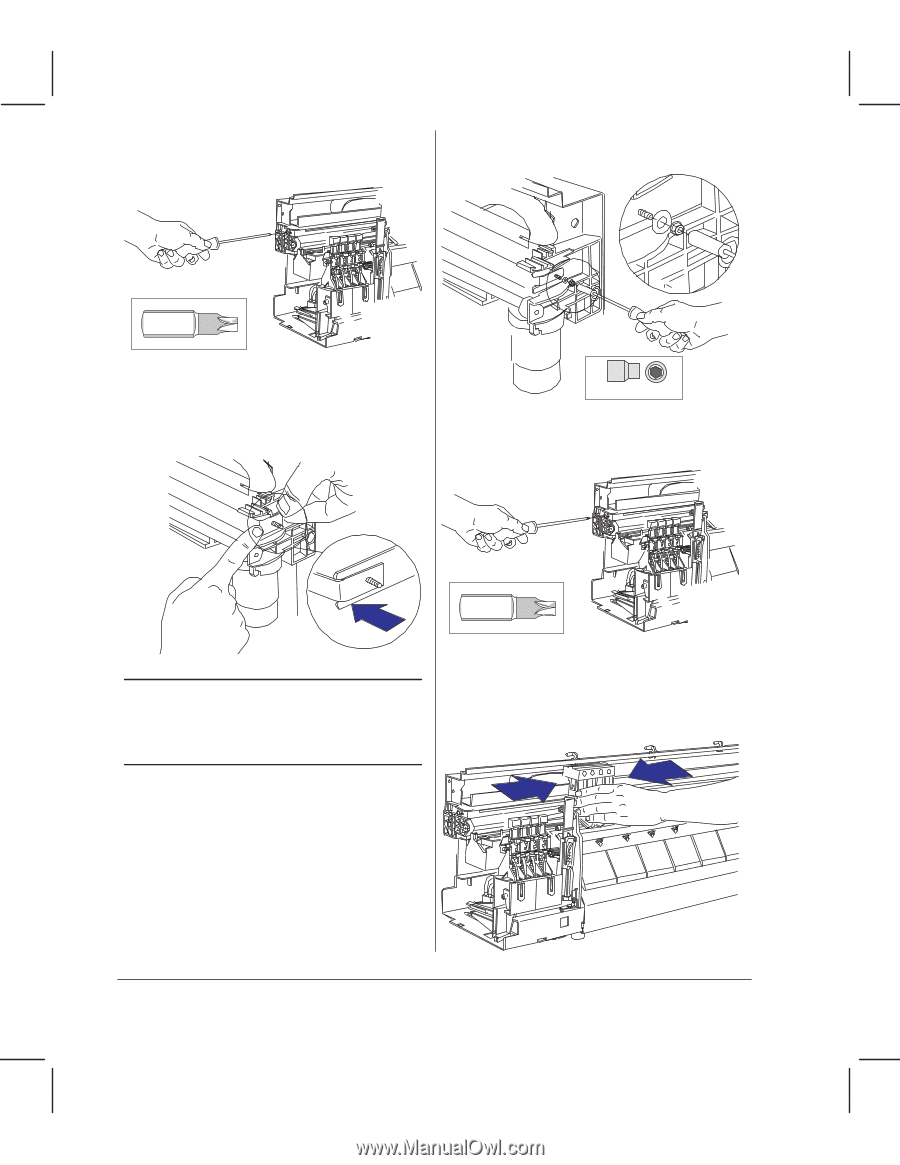
6 Loosely fit, but do not tighten, the washer 8 Replace the washer and nut on the right and screw to retain the encoder strip. side, and slightly tighten the nut. Leave loose Torx-15 Tighten slightly 7 Press the encoder spring to the left, and slip the right end of the strip over the pin. Press the strip right to the base of the pin and slowly release the spring. 5.5 mm 9 Slightly tighten the screw on the left side. Tighten slightly Torx-15 CAUTION In the following two steps, avoid distorting the encoder strip while you tighten it. 10 Slide the carriage back and forth the length of its travel to ensure free movement. The encoder strip should not bind or rub on the carriage. 6Ć20 Removal and Replacement C4699Ć90000
-
 1
1 -
2
-
3
-
4
-
5
-
6
-
7
-
8
-
9
-
10
-
11
-
12
-
13
-
14
-
15
-
16
-
17
-
18
-
19
-
20
-
21
-
22
-
23
-
24
-
25
-
26
-
27
-
28
-
29
-
30
-
31
-
32
-
33
-
34
-
35
-
36
-
37
-
38
-
39
-
40
-
41
-
42
-
43
-
44
-
45
-
46
-
47
-
48
-
49
-
50
-
51
-
52
-
53
-
54
-
55
-
56
-
57
-
58
-
59
-
60
-
61
-
62
-
63
-
64
-
65
-
66
-
67
-
68
-
69
-
70
-
71
-
72
-
 73
73 -
 74
74 -
 75
75 -
 76
76 -
 77
77 -
 78
78 -
 79
79 -
 80
80 -
 81
81 -
 82
82 -
 83
83 -
84
-
85
-
86
-
87
-
88
-
89
-
90
-
91
-
92
-
93
-
94
-
95
-
96
-
97
-
98
-
99
-
100
-
101
-
102
-
103
-
104
-
105
-
106
-
107
-
108
-
109
-
110
-
111
-
112
-
113
-
114
-
115
-
116
-
117
-
118
-
119
-
120
-
121
-
122
-
123
-
124
-
125
-
126
-
127
-
128
-
129
-
130
-
131
-
132
-
133
-
134
-
135
-
136
-
137
-
138
-
139
-
140
-
141
-
142
-
143
-
144
-
145
-
146
-
147
-
148
-
149
-
150
-
151
-
152
-
153
-
154
-
155
-
156
-
157
-
158
-
159
-
160
-
161
-
162
-
163
-
164
-
165
-
166
-
167
-
168
-
169
-
170
-
171
-
172
-
173
-
174
-
175
-
176
-
177
-
178
-
179
-
180
-
181
-
182
-
183
-
184
-
185
-
186
-
187
-
188
-
189
-
190
-
191
-
192
-
193
-
194
-
195
-
196
-
197
-
198
-
199
-
200
-
201
-
202
-
203
-
204
-
205
-
206
-
207
-
208
-
209
-
210
-
211
-
212
-
213
-
214
-
215
-
216
-
217
-
218
-
219
-
220
-
221
-
222
-
223
-
224
-
225
-
226
-
227
-
228
-
229
-
230
-
231
-
232
-
233
-
234
-
235
-
236
-
237
-
238
-
239
-
240
-
241
-
242
-
243
-
244
-
245
-
246
-
247
-
248
-
249
-
250
-
251
-
252
-
253
-
254
-
255
-
256
-
257
-
258
-
259
-
260
-
261
-
262
-
263
-
264
-
265
-
266
-
267
-
268
 |
 |
6Ć20
Removal and Replacement
C4699Ć90000
6
Loosely fit, but do not tighten, the washer
and screw to retain the encoder strip.
Torx-15
Leave
loose
7
Press the encoder spring to the left, and
slip the right end of the strip over the pin.
Press the strip right to the base of the pin
and slowly release the spring.
CAUTION
In the following two steps, avoid distorting
the encoder strip while you tighten it.
8
Replace the washer and nut on the right
side, and slightly tighten the nut.
5.5 mm
Tighten
slightly
9
Slightly tighten the screw on the left side.
Torx-15
Tighten
slightly
10
Slide the carriage back and forth the
length of its travel to ensure free
movement. The encoder strip should not
bind or rub on the carriage.