HP Designjet 5000 HP Designjet 5000 series printer - User's Guide - Page 231
If the Lens Maintenance Advised message is, portion of the lens cover, install the new lens cover
 |
View all HP Designjet 5000 manuals
Add to My Manuals
Save this manual to your list of manuals |
Page 231 highlights
Introduction Media & Ink Solutions Front-Panel Printer Options Other Maintaining the Printer Specifications Ordering Accessories Online Help 5. Take a new lens cover from inside the window of the printer, lens covers are also available from the User Maintenance Kit. 6. Making sure that you do not touch the glass portion of the lens cover, install the new lens cover into the slot. Make sure the lens cover is firmly in place. Index Glossary 7. Close the printer window and press the Enter key. NOTE: If the "Lens Maintenance Advised" message is displayed after you have replaced the lens cover with a new one, contact your HP representative.
-
 1
1 -
2
-
3
-
4
-
5
-
6
-
7
-
8
-
9
-
10
-
11
-
12
-
13
-
14
-
15
-
16
-
17
-
18
-
19
-
20
-
21
-
22
-
23
-
24
-
25
-
26
-
27
-
28
-
29
-
30
-
31
-
32
-
33
-
34
-
35
-
36
-
37
-
38
-
39
-
40
-
41
-
42
-
43
-
44
-
45
-
46
-
47
-
48
-
49
-
50
-
51
-
52
-
53
-
54
-
55
-
56
-
57
-
58
-
59
-
60
-
61
-
62
-
63
-
64
-
65
-
66
-
67
-
68
-
69
-
70
-
71
-
72
-
73
-
74
-
75
-
76
-
77
-
78
-
79
-
80
-
81
-
82
-
83
-
84
-
85
-
86
-
87
-
88
-
89
-
90
-
91
-
92
-
93
-
94
-
95
-
96
-
97
-
98
-
99
-
100
-
101
-
102
-
103
-
104
-
105
-
106
-
107
-
108
-
109
-
110
-
111
-
112
-
113
-
114
-
115
-
116
-
117
-
118
-
119
-
120
-
121
-
122
-
123
-
124
-
125
-
126
-
127
-
128
-
129
-
130
-
131
-
132
-
133
-
134
-
135
-
136
-
137
-
138
-
139
-
140
-
141
-
142
-
143
-
144
-
145
-
146
-
147
-
148
-
149
-
150
-
151
-
152
-
153
-
154
-
155
-
156
-
157
-
158
-
159
-
160
-
161
-
162
-
163
-
164
-
165
-
166
-
167
-
168
-
169
-
170
-
171
-
172
-
173
-
174
-
175
-
176
-
177
-
178
-
179
-
180
-
181
-
182
-
183
-
184
-
185
-
186
-
187
-
188
-
189
-
190
-
191
-
192
-
193
-
194
-
195
-
196
-
197
-
198
-
199
-
200
-
201
-
202
-
203
-
204
-
205
-
206
-
207
-
208
-
209
-
210
-
211
-
212
-
213
-
214
-
215
-
216
-
217
-
218
-
219
-
220
-
221
-
222
-
223
-
224
-
225
-
 226
226 -
 227
227 -
 228
228 -
 229
229 -
 230
230 -
 231
231 -
 232
232 -
 233
233 -
 234
234 -
 235
235 -
 236
236 -
237
-
238
-
239
-
240
-
241
-
242
-
243
-
244
-
245
-
246
-
247
-
248
-
249
-
250
-
251
-
252
-
253
-
254
-
255
-
256
-
257
-
258
-
259
-
260
-
261
-
262
-
263
-
264
-
265
-
266
-
267
-
268
 |
 |
Media & Ink
Introduction
Front-Panel
Other
Index
Solutions
Printer
Options
Maintaining the Printer
Specifications
Ordering Accessories
Online Help
Glossary
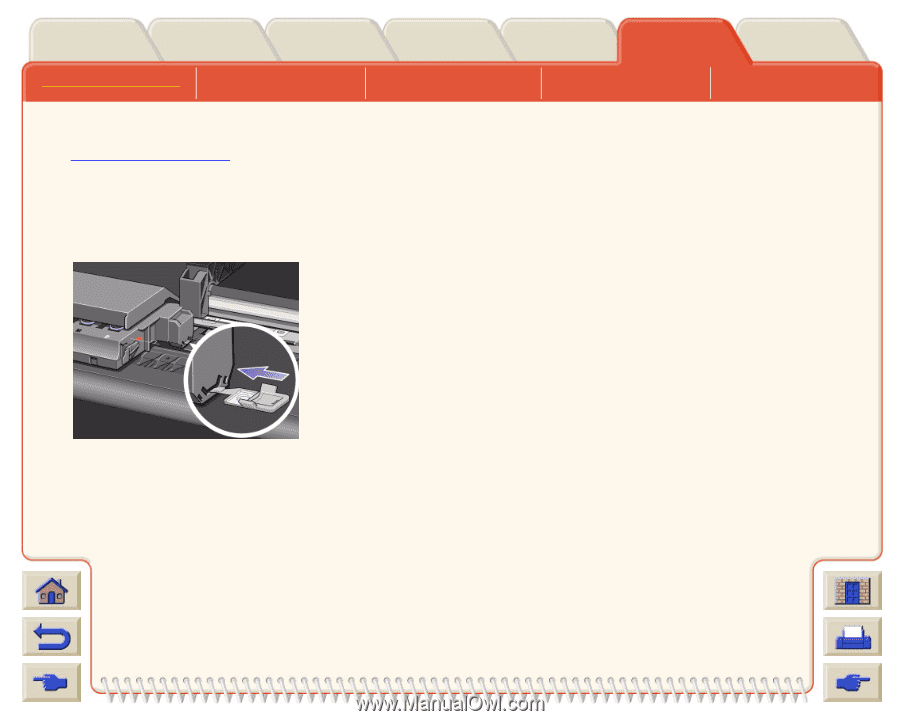
5.
Take a new lens cover from inside the window of
the printer, lens covers are also available from the
User Maintenance Kit
.
6.
Making sure that you do not touch the glass
portion of the lens cover, install the new lens cover
into the slot. Make sure the lens cover is firmly in
place.
7.
Close the printer window and press the
Enter
key.
NOTE:
If the “Lens Maintenance Advised” message is
displayed after you have replaced the lens cover with a
new one, contact your HP representative.