HP Neoware e90 NeoLinux 4.0 Thin Client User Manual - Page 22
Connecting the Components, Back Panel Connectors, USB ports two Type A USB ports.
 |
View all HP Neoware e90 manuals
Add to My Manuals
Save this manual to your list of manuals |
Page 22 highlights
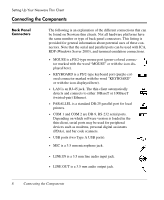
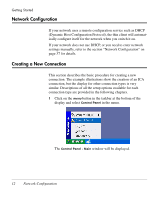
Setting Up Your Neoware Thin Client Connecting the Components Back Panel Connectors The following is an explanation of the different connections that can be found on Neoware thin clients. Not all hardware platforms have the same number or type of back panel connectors. This listing is provided for general information about potential uses of these connectors. Note that the serial and parallel ports can be used with ICA, RDP (Windows Server 2003), and terminal emulation connections. • MOUSE is a PS/2-type mouse port (green-colored connector marked with the word "MOUSE" or with the icon displayed here). • KEYBOARD is a PS/2-type keyboard port (purple-colored connector marked with the word "KEYBOARD" or with the icon displayed here). • LAN is an RJ-45 jack. The thin client automatically detects and connects to either 10BaseT or 100BaseT (twisted-pair) Ethernet. • PARALLEL is a standard DB-25 parallel port for local printers. • COM 1 and COM 2 are DB-9, RS-232 serial ports. Depending on which software version is loaded in the thin client, serial ports may be used for peripheral devices such as modems, personal digital assistants (PDAs), and bar code scanners. • USB ports (two Type A USB ports). • MIC is a 3.5 mm microphone jack. • LINE IN is a 3.5 mm line audio input jack. • LINE OUT is a 3.5 mm audio output jack. 8 Connecting the Components
-
 1
1 -
2
-
3
-
4
-
5
-
6
-
7
-
8
-
9
-
10
-
11
-
12
-
13
-
14
-
15
-
16
-
 17
17 -
 18
18 -
 19
19 -
 20
20 -
 21
21 -
 22
22 -
 23
23 -
 24
24 -
 25
25 -
 26
26 -
 27
27 -
28
-
29
-
30
-
31
-
32
-
33
-
34
-
35
-
36
-
37
-
38
-
39
-
40
-
41
-
42
-
43
-
44
-
45
-
46
-
47
-
48
-
49
-
50
-
51
-
52
-
53
-
54
-
55
-
56
-
57
-
58
-
59
-
60
-
61
-
62
-
63
-
64
-
65
-
66
-
67
-
68
-
69
-
70
-
71
-
72
-
73
-
74
-
75
-
76
-
77
-
78
-
79
-
80
-
81
-
82
-
83
-
84
-
85
-
86
-
87
-
88
-
89
-
90
-
91
-
92
-
93
-
94
-
95
-
96
-
97
-
98
-
99
-
100
-
101
-
102
-
103
-
104
-
105
-
106
-
107
-
108
-
109
-
110
-
111
-
112
-
113
-
114
-
115
-
116
-
117
-
118
-
119
-
120
-
121
-
122
-
123
-
124
-
125
-
126
-
127
-
128
-
129
-
130
-
131
-
132
-
133
-
134
-
135
-
136
-
137
-
138
-
139
-
140
-
141
-
142
-
143
-
144
-
145
-
146
-
147
-
148
-
149
-
150
-
151
-
152
-
153
-
154
-
155
-
156
-
157
-
158
-
159
-
160
-
161
-
162
-
163
-
164
-
165
-
166
-
167
-
168
-
169
-
170
-
171
-
172
-
173
-
174
-
175
-
176
-
177
-
178
-
179
-
180
-
181
-
182
-
183
-
184
-
185
-
186
-
187
-
188
-
189
-
190
-
191
-
192
-
193
-
194
-
195
-
196
-
197
-
198
-
199
-
200
-
201
-
202
-
203
-
204
-
205
-
206
-
207
-
208
-
209
-
210
-
211
-
212
-
213
-
214
-
215
-
216
-
217
-
218
-
219
-
220
-
221
-
222
-
223
-
224
-
225
-
226
-
227
-
228
-
229
-
230
-
231
-
232
-
233
-
234
-
235
-
236
-
237
-
238
-
239
-
240
-
241
-
242
-
243
-
244
-
245
-
246
-
247
-
248
-
249
-
250
-
251
-
252
-
253
-
254
-
255
-
256
-
257
-
258
-
259
-
260
-
261
-
262
-
263
-
264
-
265
-
266
-
267
-
268
-
269
-
270
-
271
-
272
-
273
-
274
-
275
-
276
-
277
-
278
-
279
-
280
-
281
-
282
-
283
-
284
-
285
-
286
-
287
-
288
-
289
-
290
-
291
-
292
-
293
-
294
-
295
-
296
-
297
-
298
-
299
-
300
-
301
-
302
-
303
-
304
-
305
-
306
-
307
-
308
-
309
-
310
 |
 |