Icom IC-7700 Instruction Manual - Page 209
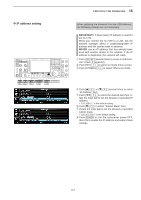
DIP address setting
 |
View all Icom IC-7700 manuals
Add to My Manuals
Save this manual to your list of manuals |
Page 209 highlights
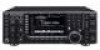
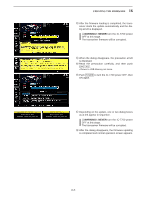
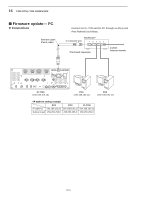
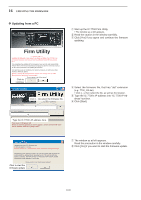
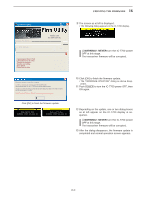
D IP address setting OTHERS SET EXIT/SET F-1 F-2 F-3 F-5 F-7 16 UPDATING THE FIRMWARE When updating the firmware from the USB-Memory, the following settings are not necessary. IMPORTANT!: A fixed (static) IP address is used for the IC-7700. When you connect the IC-7700 to a LAN, ask the network manager about a usable/assignable IP address and the subnet mask in advance. NEVER use an IP address that has already been used with another device in the network. If the IP address is duplicated, the network will crash. q Push EXIT/SET several times to close a multi-function screen, if necessary. w Push [SET] F-7 to select set mode menu screen. e Push [OTHERS] F-5 to select Others set mode. r Push [Y] F-1 or [Z] F-2 several times to select "IP Address" item. t Push [Ω ≈] F-3 to select the desired part then rotate the main dial to set the desired or specified IP address. • "192.168.0.1" is the default setting. y Push [Z] F-2 to select "Subnet Mask" item. u Rotate the main dial to set the desired or specified subnet mask. • "255.255.255.0" is the default setting. i Push POWER to turn the transceiver power OFF, then ON to enable the IP address and subnet mask settings. 16-7
-
 1
1 -
2
-
3
-
4
-
5
-
6
-
7
-
8
-
9
-
10
-
11
-
12
-
13
-
14
-
15
-
16
-
17
-
18
-
19
-
20
-
21
-
22
-
23
-
24
-
25
-
26
-
27
-
28
-
29
-
30
-
31
-
32
-
33
-
34
-
35
-
36
-
37
-
38
-
39
-
40
-
41
-
42
-
43
-
44
-
45
-
46
-
47
-
48
-
49
-
50
-
51
-
52
-
53
-
54
-
55
-
56
-
57
-
58
-
59
-
60
-
61
-
62
-
63
-
64
-
65
-
66
-
67
-
68
-
69
-
70
-
71
-
72
-
73
-
74
-
75
-
76
-
77
-
78
-
79
-
80
-
81
-
82
-
83
-
84
-
85
-
86
-
87
-
88
-
89
-
90
-
91
-
92
-
93
-
94
-
95
-
96
-
97
-
98
-
99
-
100
-
101
-
102
-
103
-
104
-
105
-
106
-
107
-
108
-
109
-
110
-
111
-
112
-
113
-
114
-
115
-
116
-
117
-
118
-
119
-
120
-
121
-
122
-
123
-
124
-
125
-
126
-
127
-
128
-
129
-
130
-
131
-
132
-
133
-
134
-
135
-
136
-
137
-
138
-
139
-
140
-
141
-
142
-
143
-
144
-
145
-
146
-
147
-
148
-
149
-
150
-
151
-
152
-
153
-
154
-
155
-
156
-
157
-
158
-
159
-
160
-
161
-
162
-
163
-
164
-
165
-
166
-
167
-
168
-
169
-
170
-
171
-
172
-
173
-
174
-
175
-
176
-
177
-
178
-
179
-
180
-
181
-
182
-
183
-
184
-
185
-
186
-
187
-
188
-
189
-
190
-
191
-
192
-
193
-
194
-
195
-
196
-
197
-
198
-
199
-
200
-
201
-
202
-
203
-
 204
204 -
 205
205 -
 206
206 -
 207
207 -
 208
208 -
 209
209 -
 210
210 -
 211
211 -
 212
212 -
 213
213 -
 214
214 -
215
-
216
 |
 |